Posts mit dem Label Spectrum Noir Markers werden angezeigt. Alle Posts anzeigen

Samstag, 5. November 2022

♥ LTTS Doodles - We wish you a Merry Christmas with Chilly Friends Digital Stamps ♥

 Hi everyone,

I wish you a happy Saturday and I'm really glad to see you here again on my blog.

Today  I show cou anothe Christmas card with the cute Chilly Friends Digital Stamps from LTTS Doodles. You'll find all her cute Digital Stamps here in her Etsy Shop. 

For my card today I use the cute penguin pyramid which is also included in the Chilly Friends set. I start my card as always with creating a Distress Oxide background. For my card today I use a piece of Bristol paper and inked it with the Distress Oxide Salvaged Patina, Peacock Feathers and Uncharted Mariner. If I'm happy with the blending I add some pearlwhite, pearlgold and Peacock Feathers color splashes on the background and let it dry. In the meantime I printed out the image and color them with my Copic and Tri Blend Markers. For the sentiment I use a banner die and a stamp from Lawn Fawn.


 If the background is dry I cut it out with the Imperial Stitched Rectangle Die from Heffy Doodle and glue it on my white card base. I fussy cut out the image with my scissors and glue the penguin pyramid with Foam Tape on the card. I stamp the Lawn Fawn sentiment on a banner die from Lawn Fawn and glue it over the penguin pyramid. For the last step I glue some golden stars on the background and I'm really happy how the card looks like.

That's all for today, many thanks for stopping by and I hope to see you soon here on my blog. Have a great day and enjoy your weekend.
 

Montag, 10. Oktober 2022

♥ LTTS Doodles - Boo Halloween Card ♥

 Hi everyone,

I wish you a happy Monday and I'm really glad to see you here again on my blog.♥

Today I show you another Halloween card with the cute Boo Digital stamps from LTTS Doodles.  For this card I create a slimline card and use a die from Whimsy stamps. 

I start my card as always with creating the background. For this card I cut a piece of Bristol Paper and use Distress Oxide Wilted Violet, Villainous Potion and Black Soot for inking. Then I add some golden, black, white and purple splashes on the background and let it dry. In the meanwhile I cut out the Slimline Marquee Die with  black cardstock and add also golden, black, white and purple splashes on the black cardstock. After it is dry I glue it on the purple background and on a piece of black cardstock and then on my white card base. I color the digital images from LTTS Doodles Boo Set with my Copics, fussy cut them out with a scissors and the glue them on my card. The sentiment is from a Lawn Fawn stamp set. For the last step I glue some golden sequins on the card and I'm really happy how the card looks like.

Hope you like this Halloween card and hope to see you soon here on my blog.

Freitag, 6. Mai 2022

♥ LTTS Doodles - Happy Birthday ♥

 Hi everyone,

I wish you a happy Friday and I'm really glad to see you here again on my blog.

Today I show you a new birthday card with the cute Digital Stamp from LTTS Doodles. I'm really a big fan of these cute digis. You find these cute Digis here on Etsy.

For this card I use a special anniversary digi, which Ana created for the LTTS Doodles anniversary.


I start my card with printing out the image on a piece of Perfect Colouring Paper. I cut it out with the Stamp Corner - A6 DIE - Wave and use my Copic and Tri Blend Marker for coloring the image. Then I cut out  a piece of MFT Design Paper from the Birthday Brights Paper Pad and glue it on my white card base. I glue the panel with the image on the green background and stamp the sentiments from Lawn Fawn with my Misti Tool directly on the card. For the last step I use some Glossy Accents and glue some little pearls on the card. I'm really happy how the card looks like and hope you like them also.

Many thanks for stopping by and I hope to see you soon here on my blog. Have a great day.


Sonntag, 1. Mai 2022

♥ DT Stamp Corner - Ladybug Grüße ♥

 Hallo Ihr Lieben,

na habt Ihr schon im Shop nach dem neuen Release gestöbert und Euch die neuen Stamp Corner Produkte angeschaut? Wenn nicht, dann aber schnell im Shop vorbei schauen und sichert Euch Eure Favoriten.

Ich zeige Euch heute auf dem Stamp Corner Blog eine Karte auf der ich auch zwei der Neuheiten aus dem Mai Release verwendet habe. Neben der neuen Wave Stanze, habe auch ich diesen süßen Kerl aus dem Ladybug Stempel Set verwendet.

Für den Hintergrund der Karte habe ich ein Stück Bristol Papier mit der größten Stanze der neuen Stamp Corner - Die - Wave Stanze ausgestanzt. Den Rand habe ich mit Distress Oxide Salvaged Patina eingefärbt und dann den HG mit dem Stamp Corner Sticky Tape auf meine weiße Grundkarte geklebt. Für meine Grundkarten nehme ich am liebsten das Perfect Colouring Paper, da dieses perfekt Weiß ist. Für die oberste Lage von der Karte habe ich die zweitgrößte Stanze der neuen Wave Stanze verwendet und ebenfalls ein Stück Bristol Papier ausgestanzt. Darauf habe ich das Stamp Corner Stencil 4 gelegt und den mittleren Teil wieder leicht mit Distress Oxide Salvaged Patina eingefärbt. Das Motiv habe ich mit Copics coloriert, mit der Schere ausgeschnitten und mit Foam Pads aufgeklebt. Die Texte sind aus dem Stamp Corner - Stempel Set - Kleine Worte und sind auf schwarzem Cardstock mit weißem Embossingpulver heiß embosst. Zum Schluss habe ich noch ein paar Perlen aus meinem Bestand aufgeklebt.

Ich wünsche Euch einen schönen kreativen Sonntag und wünsche Euch viel Spaß beim shoppen der neuen Stamp  Corner Produkte. Tschüssi und bis bald.

Materialliste:

Sonntag, 24. April 2022

♥ DT Stamp Corner - Für Dich Glückspost von Herzen ♥

 Hallo Ihr Lieben,

ich wünsche Euch einen schönen Sonntag und freue mich sehr, dass Ihr auch heute wieder hier auf meinem Blog vorbei schaut.

Ich zeige Euch heute auf dem Blog von Stamp Corner als Inspiration eine weitere Slimline Karte.

Für diese Karte habe ich ein Stück Bristol Paper wieder mit der Stamp Corner - Slimline DIE - Deckle Edge ausgestanzt und mit Distress Oxide Dried Marigold eingefärbt. Darauf habe ich mit einem Pinsel goldene Farbkleckse aufgetragen, Die runden Kreise habe ich mit der Double Circle Stax Dienamic von My Favorite Things ausgestanzt. Diese habe ich dann mit Distress Oxide Twisted Citron eingefärbt und grün schimmernde Farbkleckse aufgetragen.

Die Kreise habe ich dann nach dem trocknen mit dem Tombow Multi Talent Liquid Glue auf den Hintergrund und den dann auf meine weiße Grundkarte aus dem Perfect Colouring Paper geklebt. Den Schriftzug Glückspost habe ich mit der Stamp Corner - DIE - Glückspost mehrmals aus weißen Cardstock Resten ausgestanzt. Die oberste Lage habe ich farblich passend mit Twisted Citron eingefärbt und mittig auf die Slimlinekarte geklebt. Die kleineren Texte sind aus dem Stamp Corner - Stempel Set - Kleine Worte und sind auf schwarzem Cardstock mit weißem Embossingpulver heiß embosst. Die eigentlichen Glücksbringer sind ja die süßen Gnome aus dem Stamp Corner - Stempel Set - Glücksbringer. Coloriert habe ich die Motive wieder mit Copics, mit der Schere ausgeschnitten und mit Foam Dots auf die Kreise geklebt.

So ich hoffe ich konnte Euch wieder etwas inspirieren, wünsche Euch noch einen kreativen Tag und sage Tschüssi bis bald.

Materialliste:

Donnerstag, 7. April 2022

♥ Lawn Fawn - Happy Easter ♥

 Hi everyone,

I wish you a happy Thursday and I'm really glad to see you here again on my blog.

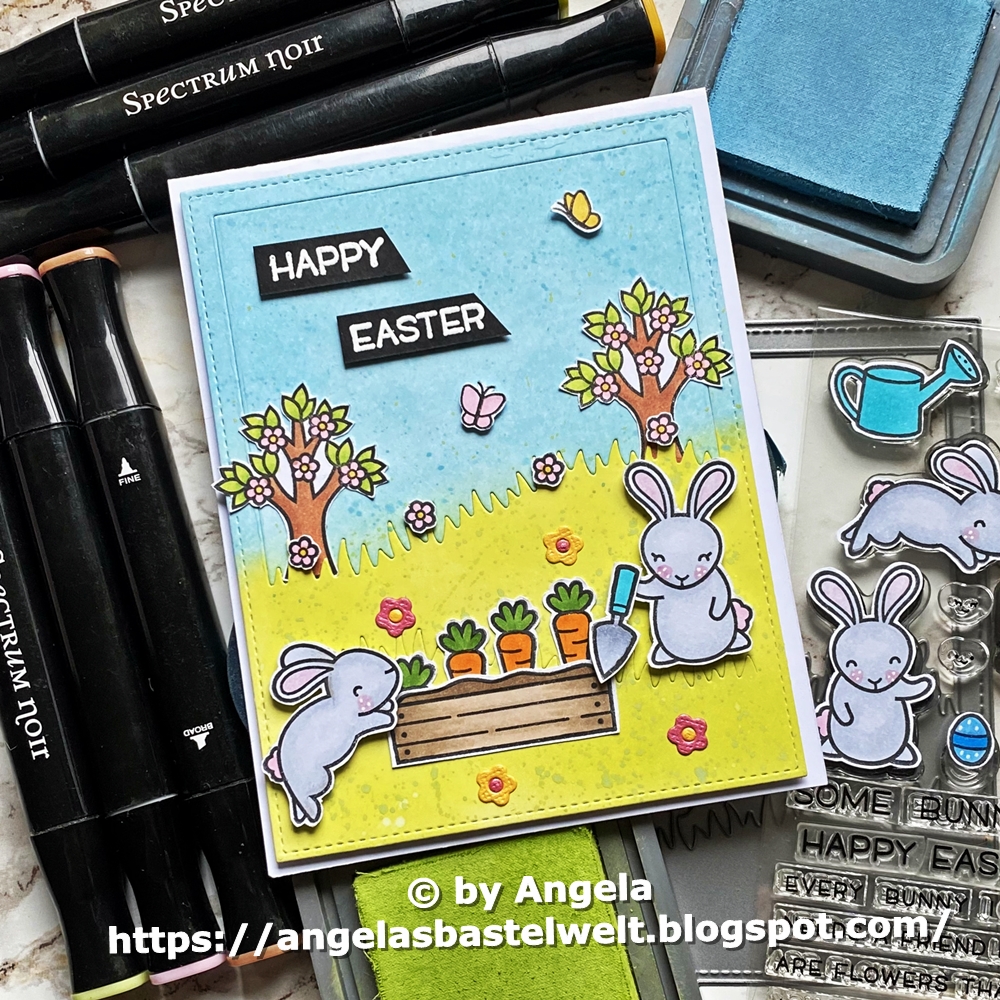
Today I show you an Easter card with the cute stamps and dies from Lawn Fawn.

I start my card as always with creating a Distress Oxide background with Tumbled Glass and Twisted Citron. I also add some soft color splashes on the background and let it dry.

After the background is dry I cut it out with the Meadow Backdrop Portrait die from Lawn Fawn. Then I color all images from the Some Bunny stamp set with my Spectrum Noir and Copic Marker and use my scissors for fussy cutting. I glue the images with liquid glue and some with Foam Tape on the background. For the sentiment I use white embossingpowder for heat embossing on a piece of black cardstock. Then I glue the background with Foam Tape on my white card base and I'm really happy how the card looks like.

 Many thanks for stopping by and hope to see you soon here on my blog.


Dienstag, 8. März 2022

♥ Time For Tea Designs - Sending Bear Hugs ♥

 Hi everyone, 

I wish you a happy Tuesday and I'm really glad to see you here again on my blog.

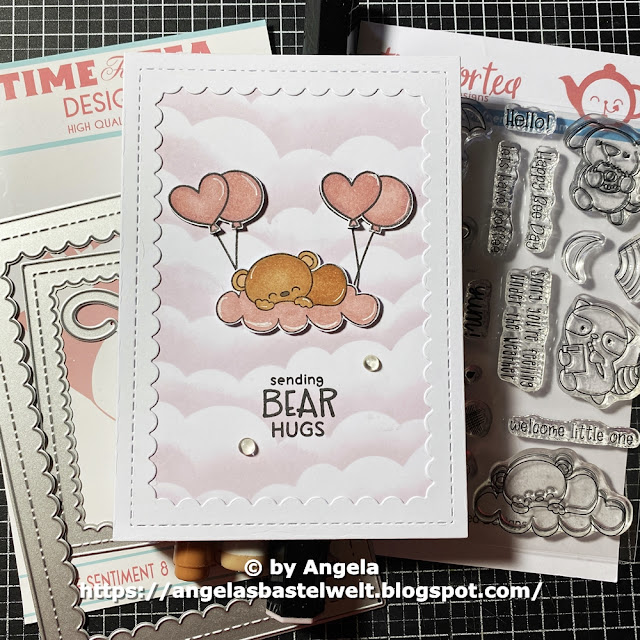
Today I show you a new card I made with stamps and dies from Time for Tea Designs.

For this card I create a cloud background on a piece of Bristol paper with Distress Ink Milled Lavender and the Cloud stencil from My Favorite Things. Then I cut out a white frame with the Scalloped Frame Dies from Time for Tea Designs and glue it with liguid glue on my cloud background and all on my smaller card base.

 I stamp the ballons from the Pandamonium Party Stamp Set directly on the background and use a light grey marker for coloring. Then I stamp them once again, color it with Copic and Spectrum Noir Tri Blend Marker. I fussy cut them out with a scissor and glue them with thin Foam Dots on the background. You find the sentiment also in the Pandamonium Party Stamp Set. For the last step I glue some clear drops on the card and I'm so happy how the card looks like.

Many thanks for stopping by and I hope to see you soon here on my blog. Have a great day. 


Montag, 7. März 2022

♥ DT AAA Birthday Challenge - Game #35 Under the Sea ♥

 Hi everyone, 

I wish you a happy Monday and I'm really glad to see you here again on my blog.

Today we start a new challenge at the

AAA Birthday Challenge 

with the topic


For my card I create a Under the Sea Birthday scene with some Lawn Fawn stamps.

I start my card with creating the background. I use the Nuvo Shimmer Powder Atlantis Burst and Blue Blitz  on a piece of watercolor paper and create the under the sea background. I cut out the background with the Stamp Corner Deckle Frames Die. For the sand hill on the bottom of my card I inked a piece of Neenah Desert Storm cardstock with Distress Ink Tea Dye and add some golden, brown, white and golden splashes on the cardstock. If the splashes are dry I cut out the sand hill with a die from Lawn Fawn and the Deckle Frames die from Stamp Corner. I glue the background on my white card base. I color all Lawn Fawn images with my Copics and fussy cut them out with a scissors. I glue some images with liquid glue and some with Foam Dots on the card. I stamp the sentiment with my Misti Tool on the background. For the last step I glue some clear drops on the card and I'm really happy how it looks like.

 Many thanks for stopping by and I hope to see you soon here on my blog. Have a great day. 


Donnerstag, 17. Februar 2022

♥ Lawn Fawnatics - Challenge #118 Clean and Simple ♥

 Hi everyone,

I wish you a happy Thursday and I'm really glad to see you here again on my blog.

 Today I show you my new card for the current Challenge at

Lawn Fawnatics Challenge #118 - Clean and Simple

For my card I decide to use the cute Scent with Love stamps and the Quilted Heart Backdrop Portrait die for the background.

I start my card with creating a soft blue background with Distress Oxide Tumbled Glass and let it dry. In the meantime I cut out a heart background with the Quilted Heart Backdrop Portrai. Then I create another background with a rectangle die and a heart die in the middle and lay it over the heart background. For the heart in the middle I use Distress Ink Worn Lipstick. I glue both backgrounds together and then on my white cardbase. The sentiment is heat embossed with white Lawn Fawn embossing powder on a piece of black cardstock. I color the cute image with Spectrum Noir Tri Blend Markers, fussy cut it out with my scissors and glue it with Foam Tape in the middle of the heart.

With this card I'll take part at the

Lawn Fawnatics Challenge 118 Clean and Simple

Many thanks for stopping by, wish you an amazing day and hope to see you here again soon.

Mittwoch, 30. Dezember 2020

♥ ATC Verrückte - ATC Adventskalendar - Day 17, Day 18, Day 19 ♥

  Hallo Ihr Lieben,

ich wünsche Euch einen schönen Mittwoch und freue mich sehr, dass Ihr auch heute wieder hier auf meinem Blog vorbei schaut.

Heute geht es weiter mit den ATC's welche für den Adventskalender bei den #ATC Verrückten Mädels entstanden sind.

 
Day 17
 
Für dieses ATC habe ich eins meiner Lieblings Sets von Lawn Fawn verwendet, nämlich das Winter Village Set. Zusätzlich habe ich noch Stempel aus dem Stempel aus dem Over the Mountain Borders Set verwendet. Der Hintergrund ist mit Distress Oxide Tumbled Glass entstanden. Koloriert habe ich die Motive mit Copics, ausgeschnippelt und zum Teil mit Foam Dots aufgeklebt. Den Schriftzug habe ich direkt auf das ATC gestempelt und ein bisschen Stickles Star Dust kam auch zum Einsatz.

Day 18
Für dieses ATC habe ich Stempel aus dem Beary Happy Holidays Set verwendet. Der Hintergrund ist mit Distress Oxides Mermaid Lagoon entstanden. Die weißen Punkte habe ich mit einem Gelstift aufgetragen. Für den Schneehügel habe ich die Forest Border Stanze verwendet. Die Motive sind mit der Schere ausgeschnitten und mit Foam Dots aufgeklebt.
 
Day 19

Bei diesem ATC habe ich Stempel aus dem Peas on Earth Set und Winter Village  verwendet und mit Copics koloriert. Der Hintergrund ist wieder mit den Distress Oxides entstanden. Für die Schneeflocken habe ich ein Stencil und weiße Embossingpaste verwendet. Für den Schriftzug habe ich ein Banner aus dem Simple Wavy Banner Set verwendet und coloriert habe ich wieder mit Copics.
 
Ich hoffe Euch gefallen auch diese ATC's und Ihr schaut auch morgen hier wieder vorbei.
 
Nun sage ich Danke für Euren Besuch und wünsche Euch noch einen schönen Tag. Lasst es Euch gut gehen. Tschüssi bis bald.
 

Montag, 7. Dezember 2020

♥ DT AAA Birthday Challenge - Game #20 Twinkle ♥

 Hi everyone,

I wish you a happy Monday and I'm really glad to see you here again on my blog.

Today it's time for a new challenge at the

AAA Birthday Challenge

For this challenge we have the topic 

Twinkle

You can take part of our challenge until the 3th. January and we can't wait to see your creations.

 I use the cute stamps from My Favorite Things for my card.

I create the background with Distress Oxide Tumbled Glass and Peacock Feathers. After ist is dry I add some silver and sparkle splashes on the background. Then I cut it out with a die from Heffy Doodle and glue it on my white card base. I color the images with Copics and Tri Blend Markers and fussy cut them out with my scissors. I add some shimmer on the birthday cake, on the birthday present and on the balloon. For the final touch I glue some clear drops on the background and stamp the sentiment directly on the card. 

So I hope you'll join our new challenge, but remember it must be a birthday card.

Many thanks for stopping by and I hope to see you soon here on my blog. Have a great day.

Freitag, 7. August 2020

♥ DT Stamp Corner - Drachen Slimline Karte / Du fehlst ♥

Hallo Ihr Lieben,
ich wünsche Euch einen wunderschönen Freitag und freue mich sehr, dass Ihr heute wieder hier auf meinem Blog vorbei schaut.

Heute zeige ich Euch auf dem Blog von Stamp Corner eine neue Karte mit einem neuen Stempelset von Stamp Corner. Habt Ihr schon das süße neue Drachen Set von Stamp Corner im Shop entdeckt? Hach sind das süße Stempel, ich bin total verliebt in die knuffigen Tierchen und zeige Euch heute damit meine erste Karte.

Ich habe mich für eine Slimline Karte entschieden, da ich unbedingt drei der süßen Drachen auf meiner Karte verwenden wollte.

Die Grundform der Slimline Karte habe ich mit der Large Slimlinewith Slider Stanze von Lawn Fawn ausgestanzt und mit Distress Oxide Milled Lavender eingefärbt. Aus dem Mama Elephant Slim Film City Die Set habe ich die mittlere Stanze ausgewählt. Dieses habe ich nach dem ausstanzen mit Distress Oxide Victorian Velvet eingefärbt und mit Craft Emotions Foam Tape auf die größere Slimline Form aufgeklebt. Für die kleinen Kreise habe ich eine Stanze aus meinem Bestand verwendet und diese nach dem einfärben mit Distress Oxide Milled Lavender mit dem Tombow Multi Talent Liquid Glue flach auf die kleinere Slimline Form aufgeklebt. Die Drachen habe ich mit Copics coloriert und nach dem ausschneiden mit Foam Dots auf die Kreise geklebt. Für meine Grundkarte habe ich wieder das Perfect Colouring Paper verwendet. Den Text "Du fehlst" habe ich mit einer Stanze aus dem Mama Elephant Slim Film City ausgestanzt  und mit Victorian Velvet eingefärbt. Die süßen Briefumschläge passen perfekt zu dem kleinen schreibenden Drachen. Zum Abschluss habe ich noch ein paar Papermania Glitzersteine aufgeklebt.

So Ihr Lieben, nun sage ich Danke für Euren Besuch und wünsche Euch noch einen schönen sonnigen Tag. Passt gut auf Euch auf, bleibt gesund und Tschüssi bis morgen.

Materialliste:


Donnerstag, 6. August 2020

♥ ATC Tausch Juli / ATC Verrückte / Thema Elefanten ♥

Hallo Ihr Lieben,
 ich wünsche Euch einen schönen Donnerstag und freue mich sehr, dass Ihr heute wieder hier auf meinem Blog vorbei schaut.

Heute zeige ich Euch mal wieder ein paar ATC's, die ich für ein Tausch mit den Mädels aus der FB Gruppe #ATC Verrückte gewerkelt habe.


Bei diesem Tausch war das Thema
Elefanten
Bei diesen ATC's habe ich Stempel von Stamp Corner, My Favorite Things, Hello Bluebird und Suagr Pea Design verwendet.
Die Hintergründe habe ich mit den Distress Oxides und verschiedenen Stencils gewerkelt. Für die Hügel habe ich eine Stanze von My Favorite Things verwendet. Coloriert habe ich mit Copics und Tri Blend Marker. Einige Motive habe ich ausgeschnippelt und aufgeklebt und einige habe ich direkt gestempelt und maskiert. Die Texte habe ich mit dem Misti Tool direkt auf die Hintergründe gestempelt.

Nun sage ich Danke für Euren Besuch und wünsche Euch noch einen schönen sonnigen Tag. Passt gut auf Euch auf, bleibt gesund und Tschüssi bis morgen.

Samstag, 1. August 2020

♥ DT Sparkles Christmas Challenge - From Our Home to yours at Christmas ♥

Hi everybody,
I wish you a happy Saturday and I'm really happy to see you here again on my blog.

Today we start a new challenge at

Sparkles Christmas Challenge
For the Challenge #115 we have the topic

From Our Home to Your Home at Christmas

For my card I use the cute stamps from the Lawn Fawn Christmas Dreams Stamp Set.
I start my card with creating the wooden floor with Distress Oxide Antique Linen and a Stampin UP wood stamp. For the wallpaper I use a piece of Lawn Fawn designpaper and for the skirting board I use another piece of Lawn Fawn designpaper. I glue all papers togethter and then I cut out a white frame with the My Favorite Things Stitched Rectangle Scallop Frames Die-namics. After that I glue all on my white card base. I color all my images with my Copics and Tri Blend Markers, fussy cut them out with ym scissors and glue them on my card. I stamp the sentiment from the Lawn Fawn Happy Village stamp set on a banner from the Lawn Fawn Simple Wavy Banners Set and glue it with Foam Tape on my card. For the last step I glue some little glimmer stars on the christmas tree and I'm really happy how the card looks like.

So I'll hope you like and join our new challenge.
Many thanks for stopping by and I hope to see you soon here on my blog. Have a great day.

Sonntag, 12. Juli 2020

♥ Lawn Fawnatics - Challenge 80 Fun with Food - Have a Magical Day ♥

Hi everybody,
I wish you a happy Sunday and I'm really happy to see you here again on my blog.

Today I show you my new card for the Lawn Fawnatics Challenge 80 - Fun with Food
For this challenge I create a card with the new Lawn Fawn Unicorn Picnic stamps, the Puffy Cloud Backdrop Die and the Starry Sky Stencil.
I inked a piece of Bristol cardstock with Distress Oxide Tumbled Glass and cut it out with the Puffy Cloud Backdrop Die. Then I inked the clouds with Distress Oxide Peacock Feathers. For the  soft little stars I use the new Starry Sky Stencil. I inked the images with my Copics and Tri Blend Markers. I cut out the images with my scissors and some with the coordinating dies. I arrange my images on the card and glue some with Foam Tape and some with the Lawn Fawn liquid glue on my card. For the sentiment I use stamps from the On the Beach and the Unicorn Picnic stamp sets. Then I glue the background on my white card base. For the final step I cut out some little stars with Glitter Cardstsock and glue them on the card.

With this card I'll take part of this challenge


Many thanks for stopping by and I hope to see you soon here on my blog. Have a great day.

Samstag, 20. Juni 2020

♥ DT Stamp Corner - Sommer Challenge ♥

Hallo Ihr Lieben,
ich wünsche Euch einen schönen Samstag und freue mich sehr, dass Ihr heute wieder hier auf meinem Blog vorbei schaut.

Heute starten wir die neue Challenge #35 auf dem Blog von
Stamp Corner

Diesmal haben wir folgendes Thema für Euch:

SOMMER

Da fällt Euch doch bestimmt etwas zu ein, oder?
 Zeigt uns, was Ihr sommerliches auf Eure Werke zaubern könnt 😉 Karten, Layouts, Boxen oder oder oder.
Natürlich habt Ihr auch wieder die Möglichkeit etwas zu gewinnen:
2x
einen 10,- Euro Gutschein 
 für den Shop www.stampcorner.de
Also, mitmachen und einen von 2 Gutscheinen gewinnen 🙂
Ihr habt nun bis zum 20.07.2020, 23:59 Uhr Zeit uns im Kommentarfeld euren Bloglink/ Instagram/ Facebooklink oder ein Foto von eurem Werk zu posten.
Die Regeln findet Ihr hier.

Bei meiner Karte habe ich mich wieder für eine Slimline Karte mit den neuen Sommer Stempeln von My Favorite Things entschieden.
Den Hintergrund der Karte habe ich mit Distress Oxide Tumbled Glass und Salty Ocean gewischt und nach dem trocknen mit der Lawn Fawn Large Slimline with Borders Die ausgestanzt. Für den Sandhügel habe ich ein Stück Neenah Solar White Cardstock mit Brushed Corduroy eingefärbt, schwarze, braune, goldene und weiße Farbkleckse aufgetragen und trocknen lassen. In der Zwischenzeit habe ich die Motive mit Copics und Tri Blend Marker coloriert und ausgeschnippelt. Den Sandhügel habe ich auf den blauen Hintergrund und dann alles auf meine weiße Grundkarte geklebt. Die Motive habe ich mit Foam Tape und zum Teil mit Flüssigkleber auf meine Karte geklebt. Den Text und die Möwen habe ich wieder mit dem Misti Tool aufgestempelt.

So Ihr Lieben, nun seid Ihr wieder an der Reihe. Wir freuen uns schon sehr auf Eure Werke, die Ihr bis zum 20.07.2020 auf dem Blog zeigen könnt.

Nun wünsche ich Euch noch einen schönen Tag, lasst es gut gehen und passt auf Euch auf.
Tschüssi bis bald.
 

Sonntag, 14. Juni 2020

♥ Lawn Fawnatics - Challenge #78 - Create a Scene ♥

Hi everybody,
I wish you a happy Sunday and I'm really gald to see you here again on my blog.

Today I show you a new card which I made for the current Lawn Fawnatics Challenge #78 with the topic Create a Scene.

For this challenge I create a scene with the stamps from the Ahoy Matey and the Life is Good stamp sets. I also use the new Slimline Dies. 
 
I use the Distress Oxides for the background and cut it out with the new Large Slimline Die with Sliders. For the water I use the new Slimline Stitched Hillside Borders. For the water I use Distress Oxide Salty Ocean. For the sand/Beach I use a piece of Neenah Desert Storm cardstock and add some brown, white, black and golden splashes on the cardstock. For the sky I use Distress Oxide Dried Marigold, Worn Lipstick, Picked Raspberry and Seedles Preserve. I color all images with my Copics and my Spectrum Noir Tri Blend Markers and fussy cut them out with my scissors. Then I glue the water and the beach hill on the background and create my little scene. After that I glue my card panel on the white card base. I stamp the sentiment with my Misti Tool directly on the card. For the final touch I add some sparkle on the diamonds and on the golden coins and I'm really happy how the card looks like.

With this cardI'll take part of this challenge


Many thanks for stopping by and I hope to see you soon here on my blog. Have a great day.

Samstag, 6. Juni 2020

♥ ATC Verrückte - Kartentausch Mai - Out of this world ♥

Hallo Ihr Lieben, 
ich wünsche Euch einen schönen Samstag und freue mich sehr, dass Ihr heute wieder hier auf meinem Blog vorbei schaut.

In der FB Gruppe der #ATC Verrückte(n) Mädels gab es im letzten Monat einen neuen Kartentausch.
 Diesmal  lautete das Thema
Out of this world

Ich habe mich für die Space Explorer Stempel von My Favorite Things entschieden.
Für den "Weltraum" Hintergrund habe ich die Farben aus dem Altenew Watercolor Pan Set verwendet.  Den runden Stern Planeten habe ich mit einer Stanze von Craftin Desert Divas gestaltet. Für den schwarzen Rahmen habe ich die My Favorite Things Stitched Rectangle Scallop Framed Die-namics verwendet und auf den Hintergrund geklebt. Die Motive habe ich mit Copics und Tri Blen Marker coloriert, ausgeschnippelt und aufgeklebt. Der Text habe ich auf eine Bannerstanze gestempelt und schräg auf den Hintergrund geklebt. Anschließend habe ich alles auf meine weiße Grundkarte geklebt. Zum Schluss habe ich noch goldene Glitzer Sterne mit einer Lawn Fawn Stanze für den Weltraum Hintergrund ausgestanzt.

Nun sage ich Danke für Euren Besuch und wünsche ich Euch noch einen schönen kreativen Tag. Tschüssi und bis bald.

Sonntag, 10. Mai 2020

♥ ST Sweet Stampers Challenge - Animals / Birds ♥

Hallo Ihr Lieben,
ich wünsche Euch einen schönen Sonntag / Muttertag und freue mich sehr, dass Ihr heute wieder hier auf meinem Blog vorbei schaut.

Heute starten wir eine neue Challenge auf dem 
 Diesmal haben wir folgendes Thema für Euch
Animals / Birds

Ihr habt bis zum 08.06.2020 Zeit Eure Werke auf dem Challengeblog einzustellen. Wir sind schon ganz gespannt was Euch zu diesem Thema einfällt.

Ich habe mich für die süßen Tiere aus dem My Favorite Things Birthday Buds Set entschieden.

Den Hintergrund habe ich mit Distress Oxide Tumbled Glass eingefärbt und die Wolken mit einem Stencil von My Favorite Things in Peacock Feathers aufgetragen. Für den Grashügel habe ich Shabby Shutters und Peeld Paint verwendet. Die Motive habe ich mit Copics und Tri Blend Marker coloriert, ausgeschnippelt und zum Teil mit Foam Pads aufgeklebt. Den Text habe ich mit dem Misti Tool direkt auf die Karte gestempelt.

Mit meiner Karte nehme ich an folgenden Challenges teil:


Nun sage ich Danke für Euren Besuch und wünsche ich Euch noch einen schönen kreativen Tag. Tschüssi und bis bald.