Posts mit dem Label Geburtstagskarten werden angezeigt. Alle Posts anzeigen

Dienstag, 24. Februar 2026

♥♥ Lawn Fawnatics Challenge 215 - All Things Rainbow ♥♥

  Hi everyone,

I wish you a happy Tuesday and I'm really glad to see you here again on my blog.

Today I show you my new Birthday card for the current

Lawn Fawnatics Challenge #215

All Things Rainbow


 For my card I cut out a rectangle piece of Bristol cardstock and inked it with Distress Oxides dried Marigold, Worn Lipstick, Shaded Lilac, Faded Jeans and Mowed Lawn. After that I added some golden Coliro Pearlcolor splashes and let it dry. Then I cut out some white cardstock with the Giant Hooray die from Lawn Fawn and glue them on top of each other. After my inked background is dry I cut out the Giant Hooray and glue it on the white cardstock. Then I glue the inked rectangle on my white cardstock and then all cut out pieces on the background.


 Then I stamp two butterflies from the I like Big Butterflies stamp set. I colored them with Copic Marker, cut them out with the matching dies and glue them on two edges of the Giant Hooray. Then I stamp the sentiment from the Offsett Sayings Birthday set with a VersaMark ink on a strip black cardstock, use some white Embossing powder from Lawn Fawn for heat embossing and glue it with Foam pads on my card. For the last step I glue some golden rhinestones on my card and I'm very happy how the card looks like.♥

 With my card I'll take part of the challenge

Lawn Fawnatics Challenge #215 - All Things Rainbow

Many thanks for stopping by and I hope to see you soon here on my blog. Have a great day.


Mittwoch, 30. April 2025

♥ Mennys Bastelshop - Backyard Bird Feeder Karte ♥

 Hallo Ihr Lieben,

ich wünsche Euch einen schönen Mittwoch und freue mich sehr, dass Ihr heute wieder hier auf meinem Blog vorbei schaut.

  Heute ist Mittwoch und das bedeutet, dass ich Euch wieder einen DT Beitrag für Mennys Bastelshop zeige.

Für meine heutige Karte habe ich Stempel und Stanzen aus dem neuen Lawn Fawn Release verwendet, die Ihr natürlich auch bei Mennys Bastelshop bestellen könnt. Falls mal ein Artikel nicht vorhanden sein sollte, könnt Ihr Euch jederzeit beachrichtigen lassen oder eine Mail an den Shop schreiben.

Für den Hintergrund der Karte habe ich ein Stück Bristol Cardstock mit der Large Stitched Rectangle Stackables Stanze ausgestanzt und mit Distress Oxide Tumbled Glass eingefärbt. Darüber habe ich das Stratus Cloud Background Stencil von Lawn Fawn gelegt und mit Distress Oxide Salvaged Patina eingefärbt. Die Tree Branches Backdrop Landscape Stanze habe ich aus Perfect Colouring Paper ausgestanzt. Die unteren Äste habe ich mit der Schere vorsichtig abgeschnitten. Die anderen Äste habe ich mit Copics coloriert. Für die Blätter habe ich Bristol Cardstock mit Distress Oxide Mowed Lawn und mit Rustic Wilderness eingefärbt und mit der Blätterstanze aus dem Tree Branches Backdrop Landscape Set ausgestanzt und aufgeklebt. Am unteren Rand habe ich noch einen schmalen Streifen Gras aufgeklebt und alles auf den Wolken Hintergrund geklebt. Zusätzlich habe ich noch einen weißen Rahmen mit der Stitched Rectangle Frames Stanze von Lawn Fawn ausgestanzt und aufgeklebt. 

Die Vögel, das Vogelhäuschen, die Eichhörnchen, die Schmetterlinge, die Blumen und die Grasbüschel habe ich mit den passenden Stanzen ausgestanzt und mit Copics und Ohuhu Markern coloriert. Zum aufkleben habe ich Foam Pads verwendet.  Danach habe ich alles noch auf ein Stück Tide Pool Cardstock aufgeklebt, bei dem ich den Rand wieder mit dem Distress Tool aufgeraut habe und dann alles auf  meine weiße Grundkarte geklebt.

Ich hoffe Euch gefällt meine Karte und wünsche Euch noch einen schönen Tag.

Sonntag, 27. April 2025

♥ Coloring Club Challenge Instagram - Things with Wings ♥

 Hallo Ihr Lieben,

ich wünsche Euch einen schönen Sonntag und freue mich sehr, dass Ihr heute wieder hier auf meinem Blog vorbei schaut.

Im April gibt es bei Instagram die 

#ColoringClubChallenge

Alle drei Tage gibt es ein neues Thema. Das Thema lautet diesmal

Things with Wings

Auch diesmal habe ich versucht eine Karte zum Thema zu werkeln.

Für meine Karte habe ich Stempel und Stanzen von Lawn Fawn verwendet, ein paar ältere Stempel und ganz neue aus dem neuen Release.

Für die Karte habe ich ein Stück Bristol Cardstock mit Distress Oxide Tumbled Glass eingefärbt. Darauf habe ich das neue Wolken Stencil von Lawn Fawn gelegt und die Wolken mit Distress Oxide Salvaged Patina eingefärbt. Anschließend habe ich den Cardstock mit der Large Stitched Rectangle Stackables Stanze ausgestanzt. für den Rasen habe ich ein Stück Bristol Cardstock mit Distress Oxide mit Mowed Lawn eingefärbt und mit einer Stanze aus dem Simply Grassy Hillsides Set ausgestanzt und aufgeklebt. Für den weißen Rahmen habe ich die größte Stanze aus dem Stitched Rectangel Farmes Set aus weißem Cardstock ausgestanzt.

 Die Motive sind aus dem neuen Backyard Bird Feeder und dem Add on und die Mäuse sind aus dem It's a Bird Set von Lawn Fawn. Coloriert habe ich die Motive mit Copics und Ohuhu Markern. Zum stanzen habe ich zum Teil die dazugehörigen Stanzen verwendet und zum Teil mit der Schere ausgeschnitten. Zum aufkleben habe ich dünne und etwas dickere Foam Pads verwendet. Der Text ist ebenfalls in dem neuen Backyard Bird Feeder Set enthalten. Zum Schluss habe ich noch kleine goldene Noten ausgestanzt und aufgeklebt.

Ich hoffe Euch gefällt meine Karte und wünsche Euch noch einen schönen Tag.

Donnerstag, 24. April 2025

♥ Mennys Bastelshop - Happy Wishes ♥

 Hallo Ihr Lieben,

ich wünsche Euch einen schönen Donnerstag und freue mich sehr, dass Ihr heute wieder hier auf meinem Blog vorbei schaut.

Leider hatte ich gestern einige Internet Probleme und konnte Euch gestern nicht meine DT Karte für Mennys Bastelshop zeigen. Dann hole ich das eben jetzt nach. *hihi*

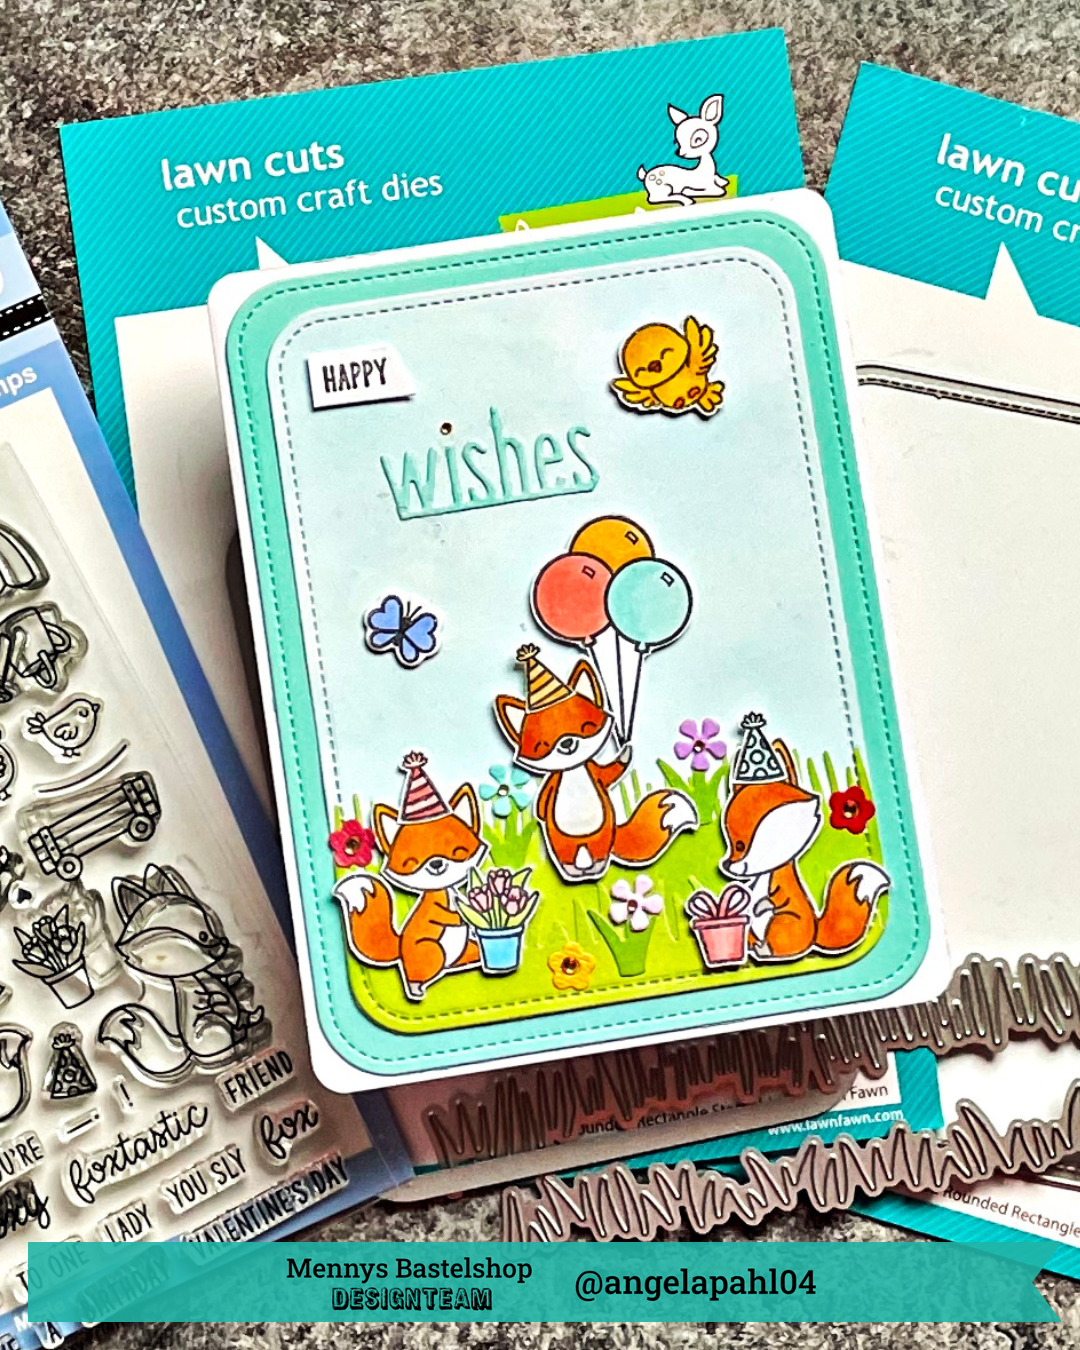
Für die Karte habe ich ein Stück Bristol Cardstock mit der Small Sticthed Rounded Rectangle Stackables Stanze von Lawn Fawn ausgestanzt und mit Distress Oxide Tumbled Glass eingefärbt. Für den unteren Teil habe ich zwei Grasbordüren ausgestanzt und mit Distress Oxide Mowed Lawn eingefärbt und aufgeklebt. Als Motive habe ich die süßen Füchse aus dem Foxy Friends von Sunnystudio Stamps verwendet. Zum Colorieren habe ich Copics und Ohuhu Marker verwendet.


Nachdem ich mit der Szene zufrieden war, habe ich alles auf ein Stück farblich passenden Lawn Fawn Cardstock geklebt, den ich mit der größten Stanze aus dem Large Sticthed Rounded Rectangle Stackables Set ausgestanzt und dann alles auf meine weiße Grundkarte geklebt habe. Der Schmetterling ist aus dem I heart Panda Set von Lawn Fawn und der Vogel aus dem Majestic Meadow Stamps Set von Sunny Studio Stamps. Das Happy ist aus dem Foxy Friends Set und das gestanzte Wishes ist von Lawn Fawn. Die Blümchen und die Grasbüschel sind ebenfalls von Lawn Fawn. Zum Schluss habe ich noch kleine Glitzersteine aus meinem Bestand aufgeklebt.

Ich hoffe Euch gefällt meine Karte und wünsche Euch noch einen schönen Tag.

Mittwoch, 16. April 2025

♥ Mennys Bastelshop - Geburtstagskarte mit Impronte d'Autore ♥

 Hallo Ihr Lieben,

ich wünsche Euch einen schönen Mittwoch und freue mich sehr, dass Ihr heute wieder hier auf meinem Blog vorbei schaut.

  Heute ist Mittwoch und das bedeutet, dass ich Euch wieder einen DT Beitrag für Mennys Bastelshop zeige.

Für meine heutige Karte habe ich mich für eine Geburtstagskarte mit Stempeln aus dem Party Time Set von Impronte d'Autore  und einer Stanze von Lawn Fawn entschieden.

Für den Hintergrund der Karte habe ich ein Stück Bristol Cardstock mit Distress Oxide Spun Sugar und Picked Raspberry eingefärbt. Danach habe ich den Hintergrund mit der Quilted Backdrop Stanze von Lawn Fawn ausgestanzt und auf ein Stück braunen Cardstock geklebt und dann auf meine weiße Grundkarte geklebt. Den Rand des braunen Cardstocks habe ich wieder mit dem Distress Tool aufgeraut.

Die Motive aus dem Party Time Set von Impronte d'Autore habe ich mit Copics und Ohuhu Markern coloriert, mit der Schere ausgeschnitten und mit Foam Pads aufgeklebt. Der Text ist ebenfalls im Set enthalten. Ich habe ihn mit einer Bannerstanze aus dem Everyday Sentiment Banners - Lawn Cuts von Lawn Fawn ausgestanzt und auch mit Foam Pads aufgeklebt. Als Deko habe ich diesmal kleine goldene Noten ausgestanzt und goldene Glitzersteine aufgeklebt.

Falls irgendein Produkt im Shop mal nicht verfügbar sein sollte, denkt bitte dran, dass Ihr Euch im Shop auch benachrichtigen lassen könnt oder Ihr schreibt eine Mail direkt an den Shop.

Ich hoffe Euch gefällt meine Karte und wünsche Euch noch einen schönen Tag.

Donnerstag, 5. September 2024

♥ Clearly Besotted - Happy Birthday Einhörner ♥

 Hallo Ihr Lieben,

ich wünsche Euch einen schönen Donnerstag und freue mich sehr, dass Ihr heute wieder hier auf meinem Blog vorbei schaut.

Heute zeige ich Euch eine Karte bei der ich die süßen Einhörner von Clearly Besotted verwendet habe.

Für die Karte habe ich einen Hintergrund in Regenbogen Farben hergestellt. Dafür habe ich die Distress Oxide Stempelkissen verwendet. Darauf habe ich einen weißen Rahmen geklebt, den ich mit einer Lawn Fawn Stanze aus Perfect Colouring Paper ausgestanzt habe. Gemattet habe ich den Hintergund mit einem Stück dunkelblauen Cardstock, bei dem ich wieder den Rand mit dem Distress Tool aufgeraut habe.


 Anschließend habe ich alles auf meine weiße Grundkarte geklebt. Auf den unteren Teil des Rahmens habe ich noch Happy Birthday aus blauen Cardstock aufgeklebt und farblich passende Glitzersteine aufgeklebt. Die süßen Einhörner habe ich mit Copics und Ohuhu Markern coloriert, mit der Schere ausgeschnitten und mit Foam Tape aufgeklebt.

Ich hoffe Euch gefällt meine neue Geburtstags Karte und wünsche Euch noch einen schönen Tag. Tschüssi, bis morgen.

Montag, 15. Juli 2024

♥ DT Stamp Corner - Wir Gratulieren Dir ♥

 Hallo Ihr Lieben,

ich wünsche Euch einen schönen Sonntag und freue mich sehr, dass Ihr heute wieder hier auf meinem Blog vorbei schaut.

Heute zeige ich Euch endlich wieder eine Karte auf dem Blog von Stamp Corner.  Nachdem ich seit einer Woche komplett flach lag, habe ich es am Samstag endlich mal wieder an meinen Basteltisch geschafft und habe eine Geburtstagskarte mit dem süßen Stamp Corner Stempelset Wir Gratulieren gewerkelt. Für die Karte habe ich die drei süßen Tiere und drei Geschenke mit Copics coloriert und mit der Schere ausgeschnitten. Für den Hintergrund habe ich ein Stück Perfect Colouring Paper mit der zweitgrößten Stanze aus dem Stamp Corner - A6 DIE - Wave Set ausgestanzt. Bevor ich die drei Tiere mit Foam Dots aufgeklebt habe, habe ich mit dem Stamp Corner Stencil Sprechblasen noch drei Sprechblasen mit Distress Oxide - Saltwater Taffy eingefärbt und glitzernde Herzen aus meinem Bestand aufgeklebt.


Gemattet habe ich den Hintergrund mit einem Stück Perfect Colouring Paper, bei dem ich den Rand ebenfalls mit Distress Oxide Saltwater Taffy eingefärbt habe und dann alles auf meine weiße Grundkarte geklebt habe.

Ich hoffe Euch gefällt diese Karte und wünsche Euch noch einen schönen Montag. Tschüssi, bis nächste Woche.

Freitag, 26. April 2024

♥ Gerda Steiner Designs - Let the sun shine on you! GD card ♥

 Hi everyone,

 I wish you a happy Friday and I'm really glad to see you here again on my  blog.

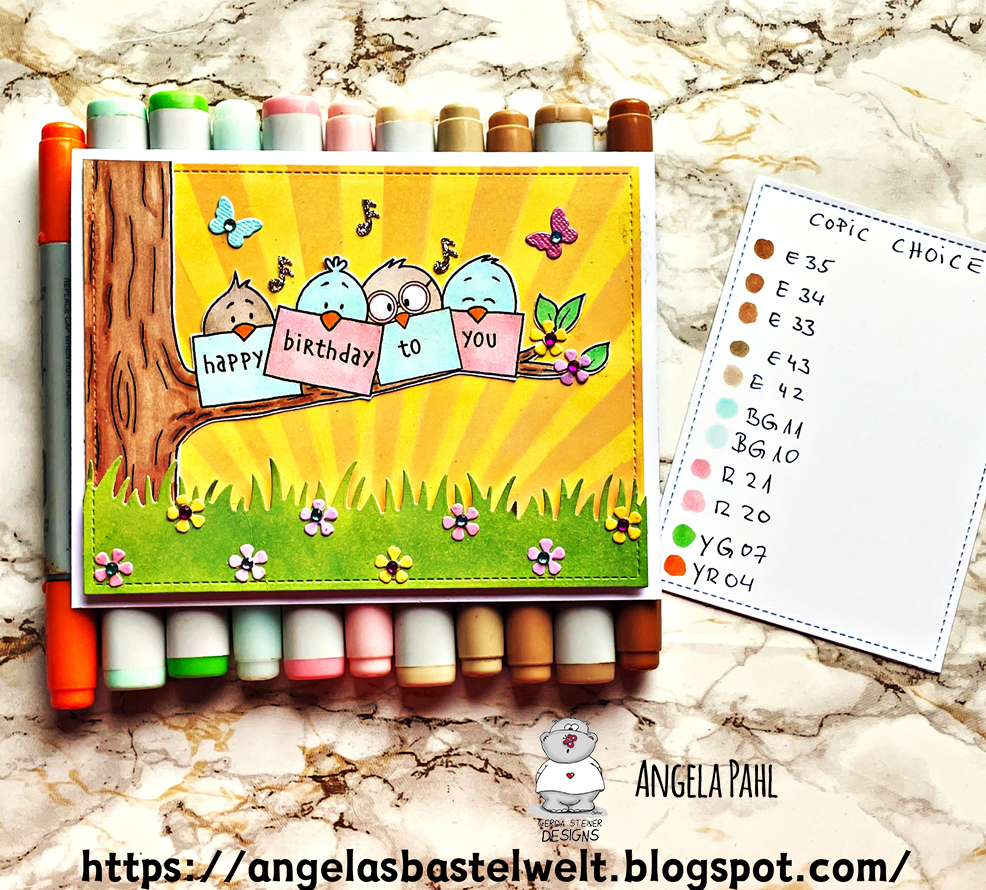
Today I have the honor to show you my guest design card on the Gerda Steiner Designs Blog. For this card I use the cute Gerda Steiner Designs digital stamp Happy Birthday birds.


I start my card as always with creating the background. I cut out a piece of Bristol cardstock with a rectangle stitched die and use Distress Oxide Fossilized Amber for inking. After that I lay a Sunray stencil over the rectangle and inked it with Distress Oxide Dried Marigold.

 I printed out the digital stamp on a Copic Marker friendly paper and color the digital stamp with my Copic Marker

.Let the sun shine on you!

E35/34/33       E42/43

BG10/BG11      R 20/21

YG 07            YR 04

After I’m happy with the result I fussy cut out the image with my scissors and glue it on my background. Then I cut out a grass border and inked it with Distress Oxide Twisted Citron and Peeled Paint. I glue the grass border at the bottom of the background and then all on my white card base. I also glue some tiny flowers on the grass and some butterflies over the birds and decorate them with some rhinestones. For the last step I glue three golden glitter notes over the birds.

 Many thanks for stopping by and I hope to see you soon here on my blog. Have a great day.

Donnerstag, 18. April 2024

♥ My Favorite Things - Let's Celebrate YOU ♥

Hallo Ihr Lieben,

ich wünsche Euch einen schönen Donnerstag und freue mich sehr, dass Ihr wieder hier auf meinem Blog vorbei schaut.

Heute zeige ich Euch eine Geburtstagskarte, bei der ich Stanzen und Stempel von My Favorite Things verwendet habe. Für die Karte habe ich Stempel aus dem Birth-Yah Set verwendet. 

Für den Hintergrund habe ich ein Stück Bristol Cardstock mit Distress Oxide Spun Sugar eingefärbt und goldene Farbkleckse mit Coliro Pearlcolor aufgetragen und trocknen lassen. Anschließend habe ich den Hintergrund mit der MFT Stanze Stitched Eyelet Lace Rectangle ausgestanzt und auf ein Stück Kraft Cardstock geklebt. Den Rand habe ich mit dem Distress Tool wieder aufgeraut. Für den unteren Teil habe ich noch ein Stück Bristol Cardstock mit Distress Oxide Mowed Lawn eingefäbt und hellgrüne Coliro Pearlcolor aufgetragen und trocknen lassen.

Zum ausstanzen habe ich wieder die MFT Stanze Stitched Eyelet Lace Rectangle und eine Lawn Fawn Grasstanze verwendet und aufgeklebt. Die Motive habe ich mit Copics koloriert, mit der Schere ausgeschnitten und mit Foam Pads aufgeklebt. Für den Text habe ich eine Bannerstanze von Lawn Fawn und für die Blumen ebenfalls eine Stanze von Lawn Fawn verwendet. Für die Schmetterlinge habe ich einen älteren Martha Stewart Stanzer verwendet. Zum Schluss habe ich noch Glitzersteine auf die Blumen und Schmetterlinge aufgeklebt.

Ich hoffe meine Karte gefällt Euch und Ihr schaut demnächst hier wieder vorbei.

Nun wünsche ich Euch noch einen schönen Donnerstag, Tschüssi und bis bald.

Freitag, 12. April 2024

♥ Lawn Fawnatics -Challenge 170 - Patterned Paper ♥

 Hi everyone,

 I wish you a happy Friday and I'm really glad to see you here again on my blog.

Today I show you my next two cards for the current 

Lawn Fawnatics Challenge 170 - Patterned Paper

 For my cards I use the Giant Happy Birthday and the Giant Happy Birthday To You dies and Design paper from the Spiffier Speckles Paper Pad and different rainbow papers from Lawn Fawn.

I start the cards with cutting out the Sentiment dies with the white cardstock and for the last layer the rainbow and the Spiffier Speckles design papers.


After that I create many backgrounds with Brusho and Nuvo Shimmer powders and let them dry. After they're dry I had to iron them until the're smooth. Then I apply some golden Coliro Pearlcolor on the backgrounds and let them dry again.


Then I stamp many images from the Tiny Birthday stamp set, the Birthday Unicorn and the Birthday Panda and color them with my Copic Marker and fussy cut them out with my scissors.

 Then I create the first two cards and Im really happy how they looks like.


With my cards I'll take part of the current challenge

Lawn Fawnatics Challenge 170 Patterned Paper

 Many thanks for stopping by and I hope to see you soon here on my blog. Have a great day.

Montag, 26. Februar 2024

♥ DT Stamp Corner - Hasengrüße zum Geburtstag ♥


Hallo Ihr Lieben,

ich wünsche Euch einen schönen Montag und freue mich sehr, dass Ihr heute wieder hier auf meinem Blog vorbei schaut.

Heute zeige ich Euch hier und auf dem Stamp Corner Blog eine Vorschau auf ein neues Produkt aus dem März Release. Für die Karte habe ich ein Stück Bristol Cardstock mit der Wave Stanze ausgestanzt. Darüber habe ich das neue Wolken Stencil gelegt und den Hintergrund mit Distress Oxide Tumbled Glass eingefärbt. Am unteren Rand habe ich ein Stück Rasen mit einer Grasstanze aus meinem Bestand aufgeklebt. Den Rasen habe ich mit Distress Oxide Mowed Lawn eingefärbt. Der Text Hasengrüße ist aus dem neuen Stempelset, welches in Kooperation mit Stuff deluxe entstanden ist. Der Text "zum Geburtstag" ist aus dem Stamp Corner - Stempel Set - Kleine Worte 2.


Den süßen Hasen habe ich mit Copics koloriert, mit der Schere ausgeschnitten und mit Foam Pads aufgeklebt. Für die Schmetterlinge und die Blumen habe ich Stanzen aus meinem Bestand verwendet und mit kleinen Perlen aus meinem Bestand dekoriert. Den Hintergrund habe ich auf ein Stück Kraft Cardstock geklebt,bei dem ich den Rand wieder mit dem Distress Tool aufgeraut habe. Anschließend habe ich dann alles auf meine weiße Grundkarte geklebt.

Nun wünsche ich Euch noch einen schönen Tag, Tschüssi bis nächste Woche.


Montag, 27. November 2023

♥ DT Stamp Corner - Für Dich ♥

 Hallo Ihr Lieben,

ich wünsche Euch einen schönen Montag und freue mich sehr, dass Ihr heute wieder hier auf meinem Blog vorbei schaut.

Heute zeige ich Euch auf dem Stamp Corner Blog eine Karte mit einer Vorschau auf eine neue Stanze, die ab dem 01. Dezember im Stamp Corner Shop erhältlich sein wird. Für die Karte habe ich ein Stück Bristol Cardstock mit Distress Oxides in Regenbogen Farben eingefärbt. Die neue Klecks Stanze (wie meine liebe DT Kollegin Kathrin sie nannte) habe ich zweimal aus Perfect Colouring Paper ausgestanzt, übereinander geklebt und auf den Hintergrund geklebt. Anschließend habe ich alles auf meine weiße Grundkarte geklebt.


Die süße Maus aus dem Stamp Corner - Stempelset - Fienchen mit Blume habe ich mit Copics koloriert, ausgeschnitten und mit Foam Dots ausgeklebt. Der Spruch Für Dich ist ebenfalls im Set enthalten. Zum Schluss habe ich noch ein paar Glitzersteine aus meinem Bestand aufgeklebt.

Nun wünsche ich Euch noch einen schönen Tag, Tschüssi bis nächste Woche.

Donnerstag, 12. Oktober 2023

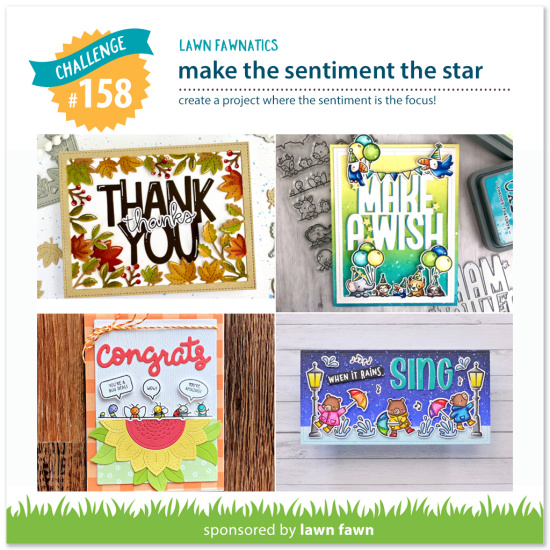
♥ Lawn Fawnatics - Challenge 158 – Make the Sentiment the Star ♥

 Hi everyone,

I wish you a happy Thursday and I'm really glad to see you here again on my blog.

Today I show you my new card for the current

Lawn Fawnatics Challenge 158 – Make the Sentiment the Star


 I use the Scripty enjoy die for my card and create a winter birthday scene with the cute Yeti or Not stamp Set.

I start the card with creating the background with Distress Oxides Peacock Feathers and Broken China. If I'm happy with the result, I add some color splashes on the background and let it dry. In the meantime I cut out two snow hills and use an dot embossingfolder for more texture. At the edge of the snow hills I add some Stickles Star Dust and let it also dry. Then I cut out two white frames with the Stitched Scalloped Rectangle Frames and glue them on my dry background. If the edges of the snow hills are dry I glue them also on the background. 

I cut out the Scripty Enjoy with white and mint cardstock and glue them slightly on top of each other. Then I stamp the sentiment Your Birthday with VersaMark on the background and use white embossing powder for heat embossing. I stamp all images on a Copic friendly paper and use my Copic Marker for coloring. I cut them out with my scissors and glue them with Foam Tape and with liquid glue on the snow hills. For the last step I glue white enamel dots on the card and I'm really happy how the card looks like.

With this card I'll take part of the 

Lawn Fawnatics Challenge 158 – Make the Sentiment the Star

Many thanks for stopping by and I hope to see you here again on my blog.  Have a great day.

Dienstag, 10. Oktober 2023

♥ DT Magengo - Alles Gute zum Geburtstag ♥

 Hi everyone,

I wish you a happy Tuesday and I'm really glad to see you here again on my blog.

Today I show you a Birthday card with stamps and dies from Magengo Designs.

I use these stamps from my card

- The mama elephant from the Lucky you are my Mom stamps set

- The guitar playing fox from the Our memories stamp set

- The giraffe from the My canvas stamps set

 I also use for the grass hills the Grass borders Die cut set and for my card base the In-out stitched rectangles die cut set.

I start my card as always with creating the background. I cut out a piece of Bristol cardstock with the In-out stitched rectangles die cut set and use Distress Oxide Salvaged Patina for inking. I cut out two grass borders with the Grass borders Die cut set and ink them with Distress Oxide Shabby Shutters and Twisted Citron. I glue the grass borders on the sky rectangle and put it aside.Then I stamp the images on a Copic Marker friendly paper and color all images with my Copics. I fussy cut them out with my scisoors and glue them on background. I stamp the sentiment from the It's your day stamps set on a small banner from my stash and glue it on the card. I also use the small grass bunches and glue them on the grass hills. For the last step I cut out 4 small butterflies, glue them on the background and add small green pearls on the butterflies. 

Then I glue all on my white card base and I'm really happy how the card looks like and I I hope you like it also.

Many thanks for stopping by and hope to see you soon here on my blog.

Sonntag, 1. Oktober 2023

♥ DT Magengo - I WOOF you so much ♥

  Hi everyone,

 this is my second posting for today and here I show you my new inspiration card with stamps and dies from Magengo Designs.

 I use stamps from these Stamp Sets for my card:

-Granny's house stamp set

-I Woof You stamp set

-Home Sweet Home stamp set.

I start my card with coloring the images from the different Stamp Sets. I stamp them on a Copic friendly paper, my favorite is the Transotype Perfect Coloring Paper. I use my Copic Marker for coloring and fussy cut out all images with my scissors.

Then I cut out a two pieces of different design papers from my stash with the  In-out stitched rectangles die cut set  and glue them on my white card base. 


 I glue the images with liquid glue and with thin Foam Tape on the card. I stamp the sentiment on a small white cardstock stripe and glue it with liquid glue on the card.

Many thanks for stopping by and hope to see you soon here on my blog.

Donnerstag, 21. September 2023

♥ My Favorite Things - Happy Birthday for 2023 Card Design Superstar ♥

 Hi everyone,

I wish you a happy Thursday and I'm really glad to see you here again on my blog.

Every year My Favorite Things organized the Card Design Superstar contest. 


As every year are three different categories for joining:

Clean & Simple Genius, Coloring Virtuoso and Box Card Master.
 
Today I show you my card for the Clean & Simple Genius categorie.
 
For this card I start with creating a rainbow background with Distress Oxides Picked Raspberry, Carved Pumpkin, Fossilized Amber,Twisted Citron, Salvaged Patina, Salty Ocean and Wilted Violet on a piece pf Bristol cardstock. Then I cut out the letters with the Bold Happy Birthday Die-namics and put them aside. Then I stamp the ballon and the Toucan from the Birth-Yah Stamp Set on a Copic friendly paper and color the images with my Copic Marker. I fussy cut them out with my scissors and put them also aside. I cut out a piece of white cardstock and glue the letters and the images on the cardstock. I also cut out a piece of Caribbean Sea Card Stock from My Favorite Things and use my Distress Tool for roughen the edges. Then I glue all on my white cardbase and I'm really happy how my Clean & Simple card looks like.
 
With this card I'll take part of the  

Many thanks for stopping by and hope to see you soon here on my blog.
 

Sonntag, 17. September 2023

♥ DT Stamp Corner - Herzlichen Glückwunsch zum Geburtstag ♥

Hallo Ihr Lieben,

ich wünsche Euch einen schönen Sonntag und freue mich sehr, dass Ihr heute wieder hier auf meinem Blog vorbei schaut. 

Heute zeige ich Euch auf dem Stamp Corner Blog eine Geburtstagskarte mit dem süßen Stamp Corner - Stempelset - Nervensäge (Illustration & Design by Schnubbirella). Mit der Stamp Corner - A6 DIE - Rectangle Stitch habe ich ein Stück Bristol Cardstock ausgestanzt und mittig etwas Distress Oxide Kitsch Flamingo aufgetragen. Darauf habe ich mit dem Pinsel noch ein paar goldene und weiße Pearlcolor Farbkleckse aufgetragen.

Anschließend habe ich ein Stück Perfect Colouring Paper zurecht geschnitten und den Rand ebenfalls mit Distress Oxide Kitsch Flamingo eingefärbt und auf meine weiße Grundkarte geklebt. Die süßen Hamster aus dem  Stamp Corner - Stempelset - Nervensäge (Illustration & Design by Schnubbirella) habe ich mit Copics koloriert und mit der Schere ausgeschnitten. Zum aufkleben habe ich wieder dünne Foam Dots verwendet. Die Texte habe ich mit dem Memento - Stempelkissen - Tuxedo Black auf schmale Banner von Lawn Fawn gestempelt. Ihr findet die Texte im Stamp Corner - Stempel Set - Kleine Worte und im Stamp Corner - Stempel Set - Kleine Worte 2. Auf die rechte Seite habe ich farblich passend eingefärbte Enamel Dots aufgeklebt.

Nun wünsche ich Euch noch einen schönen Sonntag, Tschüssi bis nächste Woche.

Mittwoch, 6. September 2023

♥ Lawn Fawn - Happy Birthday to YOOOOU ♥

 Hallo Ihr Lieben,

ich wünsche Euch einen schönen Mittwoch und freue mich sehr, dass Ihr heute wieder hier auf meinem Blog vorbei schaut.

Heute zeige ich Euch noch eine Grburtstgaskarte die mit dem süßen Yappy Birthday Stempel Set von Lawn Fawn entstanden ist. 

Für die Karte heute habe ich die Meadow Backdrop Portait Stanze verwendet und aus einem Stück Bristol Cardstock ausgestanzt. Zum einfärben habe ich für den Himmel Distress Oxide Tumbled Glass und Mowed Lawn für den Rasen verwendet. Die Motive habe ich wieder mit Copics koloriert , mit der Schere ausgeschnitten und mit Foam Dots und Flüssigkleber aufgeklebt.

Für den weißen Rahmen habe ich die Stitched Rectangle Frames Stanze verwendet. Aufgeklebt habe ich alles auf ein Stück türkisen Cardstock, bei dem ich den Rand wieder mit dem Distress Tool aufgeraut habe und dann auf meine weiße Grundkarte geklebt. Die kleinen Noten habe ich wieder mit einem Stanzer aus goldenem Glitzerkarton ausgestanzt. Für den Text habe ich wieder mein Misti Tool verwendet.
 
Ich wünsche Euch noch einen schönen Tag, Tschüssi und bis bald.


Montag, 4. September 2023

♥ Lawn Fawn - Have A Yappy Birthday! ♥

 Hallo Ihr Lieben,

ich wünsche Euch einen schönen Montag und freue mich sehr, dass Ihr heute wieder hier auf meinem Blog vorbei schaut.

Heute an meinem Geburtstag zeige ich Euch natürlich eine Geburtstagskarte mit dem süßen Yappy Birthday Stamp Set von Lawn Fawn.

Für die Karte habe ich den Hintergrund mit der Stitched Hillside Backdrop Landscape Stanze ausgestanzt. Den Himmel habe ich mit Distress Oxide Tumbled Glass und den Rasen mit Mowed Lawn eingefärbt. Den weißen Rahmen habe ich ebenfalls mit einer Stanze von Lawn Fawn ausgestanzt.

Die Motive habe ich mit Copics koloriert, mit der Schere ausgeschnitten und mit Foam Dots und Flüssigkleber aufgeklebt. Die kleinen Noten habe ich mit einem Stanzer aus goldenem Glitzerkarton ausgestanzt. Für den Text habe ich mein Misti Tool verwendet. Anschließend habe ich alles alles auf ein Stück Kraft Cardstock aufgeklebt, den Rand habe ich mit dem Distress Tool wieder aufgeraut und dann alles auf meine weiße Grundkarte geklebt.
 
Ich wünsche Euch noch einen schönen Tag, ich lass mir jetzt mein Geburtstags Frühstück schmecken. Tschüssi und bis bald.


Dienstag, 29. August 2023

♥ DT Stamp Corner - Vorschau Nr. 4 September Release ♥

 Hallo Ihr Lieben,

ich wünsche Euch einen schönen Dienstag und freue mich sehr, dass Ihr heute wieder hier auf meinem Blog vorbei schaut.

Heute zeige ich Euch die nächste Karte mit einer Vorschau auf den neuen Stamp Corner September Release.

Bei dieser Karte habe ich mich noch einmal für das Texte Stempel Set entschieden.

Für die Karte habe ich ein Stück Bristol Cardstock mit der Stamp Corner - A6 DIE - Rectangle Stitch ausgestanzt. Den unteren Teil des Cardstocks habe ich mit Distress Oxide - Peacock Feathers​ und Distress Oxide - Salvaged Patina eingefärbt und zusätzlich noch weiße und mintfarbene Pearlcolor Splashes aufgetragen und trocknen lassen. 

In der Zwischenzeit habe ich ein Stück türkisfarbenen Cardstock zurecht geschnitten und den Rand mit dem Distress Tool aufgeraut und auf meine weiße Grundkarte geklebt. Den süßen Ernst von Oma Plott habe ich mit Copics koloriert, ausgeschnitten und mit dünnen Foam Dots aufgeklebt. Ein paar kleine ausgestanzte Herzen habe ich noch auf den Ballon und in die Torte geklebt. Anschließend habe ich mit dem Misti Tool den Text aus dem neuen Stempel Set auf den oberen Teil der Karte gestempelt und dann auf den türkisfarbenen Cardstock geklebt.

Ich hoffe Euch gefällt auch diese Vorschau Karte und wünsche Euch noch einen schönen Tag.