Freitag, 13. August 2021

♥ DT Magengo - Made with Love Card ♥

  Hi everyone,

I wish you a happy Friday and I'm really glad to see you here again on my blog.

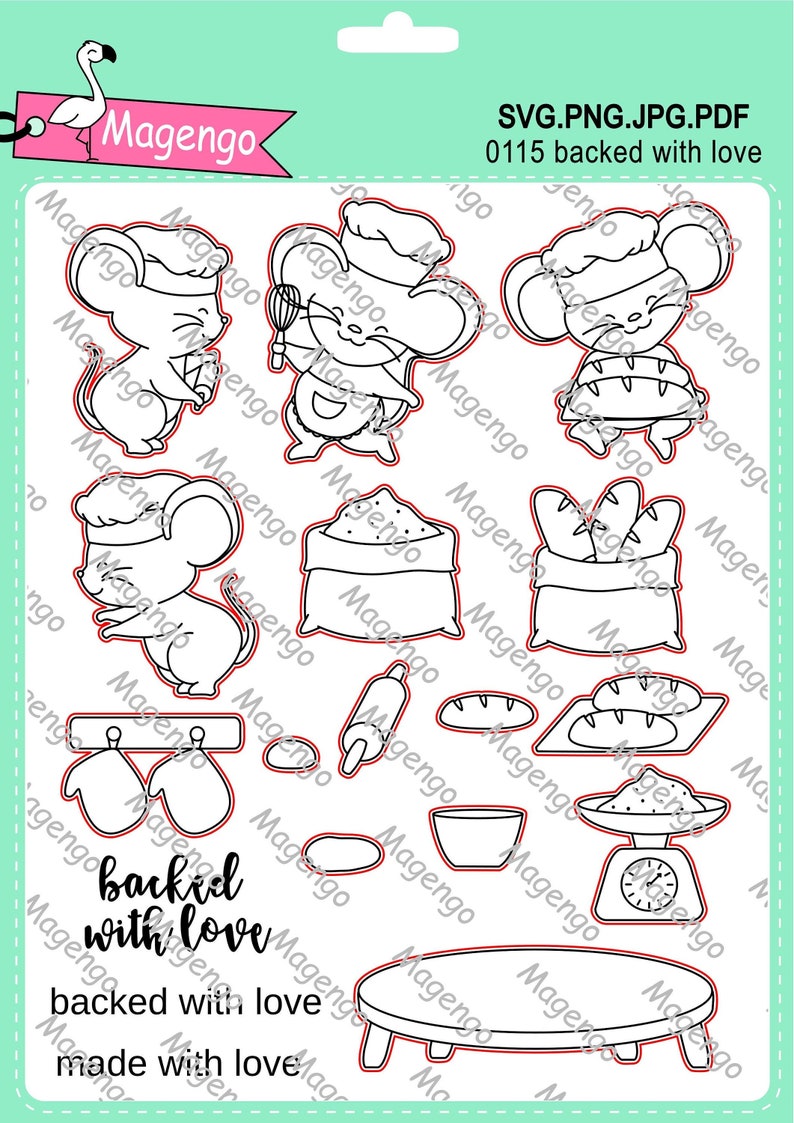
Today Ishow you on the Magengo Design blog a new inspiration card. For today I use stamps from the cute Backed with Love digital stamp set.

I create my scene with Word on my PC and if I'm happy with the result I printed it out with my laser printeron a Copic friendly paper. I color all images with my Copic Markers, fussy cut them out with a scissors and lay them aside. I cut out a piece of Bristol Smooth cardstock with a stitched rectangle die and use some masking paper for the bottom. Then I inked the upper part with Distress Oxide Tumbled Glass. After that I use a plaid stencil and use Distress Oxide Peacock Feathers for inking. I remove the masking paper and cover the upper part with my masking paper. I inked the bottom with Distress Ink Tea dye and stamp with a wood stamp and Distress Ink Walnut Stain the bottom of my card panel. I remove the masking paper and draw a black line between the  bottom and the upper part of my background panel. 

For more dimension on my card I glue the images with Foam Tape on my card panel and then all on my white card base. The sentiment is also included in this set, I cut it in two small stripes and glue them on my card. Then I cut out some tiny hearts on glue them on the dough. For the last step I glue some tiny pearls and clear drops on the card.

You find the Backed with Love set here in the Magengo Etsy shop.

 Gesichert mit Liebe Stempel Set SVG-Dateien druckbare Foto Bild 0

Many thanks for stopping by and hope to see you soon here on the blog.

Donnerstag, 12. August 2021

♥ DT Stamp Corner - Happy Halloween Karte ♥

 Hallo Ihr Lieben,

ich wünsche Euch einen schönen Donnerstag und freue mich sehr, dass Ihr heute wieder hier auf meinem Blog vorbei schaut.

Heute zeige ich Euch auf dem Blog von Stamp Corner eine neue Inspiration für Euch. Habt Ihr schon das neue Stamp Corner Happy Halloween Set im Shop entdeckt? Natürlich musste ich damit gleich eine Halloween Karte werkeln, okay es haben sich noch Stempel von Purple Onion Designs dazu geschmuggelt, aber sie passen meiner Meinung nach alle perfekt zusammen.

Als erstes habe ich den Birch Tree Background Stempel auf ein Stück Bristol Smooth Cardstock gestempelt und mit Masking Papier maskiert. Eingefärbt habe ich den Hintergrund dann mit Distress Oxide Peeled Paint, Seedless Preserve, Wilted Violet und mIt Distress Ink Black Soot und den Taylored Expressions Blender Brushes Pastel. Nachdem entfernen des Masking Papers, habe ich die Bäume mit den Copics C3 und C2 coloriert. Die Motive habe ich ebenfalls mit Copics coloriert, mit der Schere ausgeschnitten und mit Foam Dots auf den Hintergrund geklebt. Den Schriftzug habe ich mit dem VersaMark Embossingkissen direkt auf den Hintergrund gestempelt und mit dem Wow Embossing Puder Gold Rich Ultra High heiß embosst. Den Hintergrund habe ich auf ein Stück schwarzen Cardstock geklebt, die Ränder mit dem Distress Tool aufgeraut und anschließend mit dem Tonic Studios Nuvo Deluxe Adhesive auf meine weiße Grundkarte geklebt.

Ich wünsche Euch noch einen kreativen Tag, Tschüssi und bis bald.

Materialliste:


Montag, 9. August 2021

♥ DT Magengo - You are sea-mazing card ♥

 Hi everyone,

I wish you a happy Monday and I'm really glad to see you here again on my blog.

 Today I show you on the Magengo Design Blog a card with the cute You are sea-mazing digital stamp set.

I start my card as always with printing out the images with my laser printer. I color them with my Copics and fussy cut them out with a scissors. For my background I inked a piece of Bristol Smooth cardstock with Distress Oxide Tumbled Glass. Then I use a Mermaid Scale Stencil and inked the background again. I arrange my images on the background and glue some with liquid glue and some with Foam Tape on the background. Then I cut out a white scalopped frame and glue it on the background. I cut out another card panel and inked it with Distress Oxide Tumbled Glass and Mermaid Lagoon and glue it on my white card base. I stamp a sentiment from a Lawn Fawn set with my Misti Tool directly on my card and glue my mermaid scene on the blue card panel. For the last step I apply some clear Nuvo drops on the background.

You find the You are sea-mazing set here in the Magengo Etsy shop.

Meerjungfrau Briefmarken Svg-Dateien druckbare Foto Bild 0

Many thanks for stopping by and hope to see you soon here on the blog.

Sonntag, 8. August 2021

♥ Rachelle Anne Miller - Birthday Owls Digital Stamp ♥

 Hi everyone,

I wish you a happy Sunday and I'm really glad to see you here again on my blog.

Today I show you a new birthday card with a digital stamp from Rachelle Anne Miller. I really love this cute Birthday Owls digital stamp.

I colored this cute digi stamp for #thedailymarker30day coloring challenge hosted by Kathy Rac with my Copic markers and fussy cut it out with a scissors.

And here I show you the card I made with these cute Birthday Owls.

For the background I inked a piece of Bristol Smooth cardstock with Distress Oxide Fossilized Amber and Dired Marigold. Then I use the Distressed Stamp from Stamp Corner and stamp it with Distress Oxed Dried Marigold all over the background. After it is dry I cut it out with the My Favorite Things Stitched Rectangle Scallop Frames Die-namics and glue it on my white card base. For more dimension I glue the image with Foam Tape on the card. I stamp another sentiment from My Favorite Things under the image. For the last step I glue some sequins on my card and I'm really happy how the card looks like.


So that's all for today, I'll hope you join also this fun coloring challenge.


Many thanks for stopping by and I hope to see you soon here on my blog. Have a great day.

Donnerstag, 5. August 2021

♥ DT Stempelgarten - Challenge #107 Party ♥

 Hallo Ihr Lieben,

ich wünsche Euch einen schönen Donnerstag und freue mich sehr, dass Ihr heute wieder hier auf meinem Blog vorbei schaut.

Heute startet auf dem Blog der 

Stempelgarten Challenge

Für diese Challenge haben wir uns folgendes Thema ausgesucht

PARTY

 Dieses tolle Bastelpaket könnt Ihr gewinnen.


Ich habe mich bei meiner Karte für das Penguin Party Stempel Set von My Favorite Things entschieden.


Den Hintergrund habe ich mit dem Grassy Edges Stencil und Distress Oxide Twisted Citron und dem Cloud Stencil mit Distress Oxide Tumbled Glass  eingefärbt. Zum ausstanzen habe ich die My Favorite Things Stitched Rectangle Scallop Frames Die-namics verwendet und auf meine weiße Grundkarte geklebt. Den Text habe ich mit meinem Misti Tool direkt aufgestempelt. Die Motive habe ich mit Copics coloriert, mit der Schere ausgeschnitten und auf den Hintergrund geklebt. Zum Schluss habe ich noch kleine gestanzte Blümchen aufgeklebt.

So nun seid Ihr wieder an der Reihe, zeigt uns Eure Werke, wir sind schon ganz gespannt auf Eure Umsetzungen. 

Nun sage ich Danke für Euren Besuch und wünsche ich Euch noch einen schönen kreatives Wochenende. Tschüssi und bis bald.

Mittwoch, 4. August 2021

♥ DT Stamp Corner - Wish Big mit Baby Bunny Stempel Set ♥

 Hallo Ihr Lieben,

 ich wünsche Euch einen schönen Mittwoch und freue mich sehr, dass Ihr heute wieder hier auf meinem Blog vorbei schaut.

Heute zeige ich Euch auf dem Blog von Stamp Corner eine neue Karte mit dem süßen Stamp Corner Baby Bunny Set.


Ich finde dieses Set so süß,vor allem wie der kleine schlafende Hase auf dem großen Sessel sitzt und schläft. Auf meiner Karte haben sich noch seine Freunde (Hund und Katze) dazu gesellt und im Traum denkt er bestimmt an seine Hasen Freunde und schickt ganz dicke Wünsche an die beiden. Für den Hintergrund habe ich ein Stück Bristol Smooth Cardstock mit Distress Oxide Spun Sugar eingefärbt. Nachdem trocknen habe ich das Stamp Corner Stencil 19 mit den kleinen Quadraten drüber gelegt und den Hintergrund noch mal mit Distress Oxide Spun Sugar eingfärbt,so dass man denken könnte es wäre eine Tapete. Für den Boden habe ich ein Stück Cardstock mit einem Holzstempel in Distress Ink Walnut Stain eingefärbt und nach dem trocknen mit einer Stanze aus dem My Favorite Things Stitched Basic Edges Set ausgestanzt. Den Hintergrund habe ich dann mit der größten Stanze aus dem Heffy Doodle Imperial Stitched Rectangle Die Set ausgestanzt und den Boden mit Tombow Multi Talent Liquid Glue aufgeklebt. Die Motive habe ich nach dem Stempeln mit Copics coloriert, mit der Schere ausgeschnitten und auf den Hintergrund geklebt. Für die Sprech / Gedankenblase  habe ich das Häschen mit dem Bär erst auf Perfect Colouring Paper gestempelt , mit Masking Papier abgedeckt und das Papier mit Distress Oxide Tumbled Glass eingefärbt. Nachdem ich das Maskinpapier wieder von dem Motiv entfernt habe, habe ich es mit Copics coloriert und anschließend mit der Lawn Fawn Outside in Stitched Thought Bubbles Stackables Stanze ausgestanzt. und auf den Hintergrund geklebt. Den Hintergrund habe ich dann mit dem Stamp Corner Sticky Tape auf meine weiße Grundkarte geklebt. Den Text aus dem Elphie Selfie Set von Lawn Fawn habe ich mit einer Stempelhilfe direkt auf den Hintergrund gestempelt. Zum Schluss habe ich noch Papermania Glitzersteine und kleine Herzchen aufgeklebt.

Ich wünsche Euch noch einen kreativen Tag, Tschüssi und bis bald.

Materialliste:

Dienstag, 3. August 2021

♥ #thedailymarker30day - Day2 and Day3 / Let's Take an Adventure ♥

 Hallo Ihr Lieben,

ich wünsche Euch einen schönen Dienstag und freue mich sehr, dass Ihr heute wieder hier auf meinem Blog vorbei schaut.♥

Heute zeige ich Euch meine Colorationen für Tag2 und Tag3 der 

#thedailymarker30day

Colouring Challenge hosted by Kathy Rac.

Für den zweiten Tag habe ich den Süßen Let's take an adventure Digital Stamp  von Rachelle Anne Miller mit Copics coloriert.


Für Tag3 habe ich dann einen Hintergrund, die Tropical Leaves Backdrop Stanze von Lawn Fawn eingefärbt und noch ein paar kleine Motive aus dem Lawn Fawn Toucan Do It Stempel Set coloriert. Daraus habe ich dann diese Karte gewerkelt.


So das wars erstmal für heute, ich hoffe Euch gefällt mein Kärtchen und Ihr schaut auch morgen hier wieder vorbei.

Montag, 2. August 2021

♥ AAA Birthday Challenge - Game #28 - Photo Inspiration ♥

 Hi everyone,

 I wish you a happy Monday and I'm really glad to see you here again on my blog.

Today we start a new challenge at the

AAA Birthday Challenge

For this month we have a beautiful Photo inspiration and we have 

Varada Sharma as a sponsor for our challenge.


 One lucky winner, picked randomly, will receive a $10 credit to spend on Varada Sharma's awesome digi stamps.

And here is our amazing photo inspiration for you.


For my card I decided to use the A corner in my garden digital stamp.

I start my card with cutting out a piece of Neenah Solar white cardstock with a die from Heffy Doodle. Then I inked a part of the rectangle with Distress Oxide Salvaged Patina and add some water and color splashes on the rectangle. After it is dry I glue it on my white card base.


I printed out the image with my laser printer and color it with my Copics. I fussy cut it out with a scissors and glue it with Foam Tape on my background. I stamp the sentiment with my Misti Tool directly on the card. For the last step I glue some colour matching pearls on my card panel and I'm really happy how the card looks like.

 
So now it's your turn, I'll hope I could inspire you and you join our new photo inspiration challenge until the 29th August.
Many thanks for stopping by and have a great day. I hope to see you soon here on my blog.

Sonntag, 1. August 2021

♥ #thedailymarker30day - Day 1 of the coloring challenge with Rachelle Anne Miller digital stamp ♥

 Hi everyone,

I wish you a happy Sunday and I'm really glad to see you here again on my blog.

Today start the new 

#thedailymarker30day

coloring challenge hosted by the wonderful Kathy Rac.

If you don't know anything about this coloring challenge, take a look here,  where you can find many information about this fun challenge.

For Day1 I decided to use the Birthday Mouse digital stamp from Rachelle Anne Miller.

I printed the image with my laser printer, colored the image with my Copic Marker and cut it out with a stitched die from Heffy Doodle.


Over the next days / weeks I'll show you some colored images for #thedailymarker30days coloring challenge.

So that's all for today, I'll hope you join also this fun coloring challenge.


Many thanks for stopping by and I hope to see you soon here on my blog. Have a great day.