Posts mit dem Label Herbstkarten werden angezeigt. Alle Posts anzeigen

Mittwoch, 29. Oktober 2025

♥♥ Mennys Bastelshop - Purple Onions Designs Herbstkarte ♥♥

 Hallo Ihr Lieben,

ich wünsche Euch einen schönen Mittwoch und freue mich sehr, dass Ihr heute wieder hier auf meinem Blog vorbei schaut.

  Heute ist Mittwoch und das bedeutet, dass ich Euch wieder einen neuen DT Beitrag für Mennys Bastelshop zeige.

Für meinen heutigen Beitrag habe ich eine Herbstkarte mit Stempeln von Purple Onions Designs und Stanzen von Lawn Fawn gewerkelt.

 Für die Karte habe ich ein Stück Bristol Cardstock mit Distress Oxides Tumbled Glass, Scorched Timber, Lost Shadow und Twisted Citron eingefärbt. Den Hintergrund habe ich mit der Large Stitched Rectangle Stackables Stanze von Lawn Fawn ausgestanzt. Darauf habe ich einen hellbraunen Rahmen aufgeklebt, den ich mit der Stitched Rectangle Frames Stanze von Lawn Fawn ausgestanzt habe und dann alles auf meine weiße Grundkarte geklebt.


Das Motiv von Purple Onions Designs heißt Autumn Greetings. Ich habe es mit Copics und Ohuhu Markern coloriert und mit der Schere ausgeschnitten. Zum aufkleben habe ich Foam Pads verwendet. Der Text ist aus dem Henry's Build A Sentiment: Fall Set von Lawn Fawn und ich habe ihn mit einer Stanze aus dem Everyday Sentiment Banner Set von Lawn Fawn ausgestanzt und ebenfalls mit Foam Pads aufgeklebt. Zum Schluss habe ich noch kleine goldene Glitzersteine aufgeklebt. 

Falls Ihr etwas im Shop bestellen wollt und das ist nicht vorrätig, könnt Ihr Euch benachrichtigen lassen oder Ihr schreibt eine Mail mit Euren Wünschen an den Shop.♥  

Ich hoffe Euch gefällt meine Karte und wünsche Euch noch einen schönen Tag.


Mittwoch, 8. Oktober 2025

♥♥ Mennys Bastelshop - Inspirationswoche. Aquarell ♥♥

 Hallo Ihr Lieben,

ich wünsche Euch einen schönen Mittwoch und freue mich sehr, dass Ihr heute wieder hier auf meinem Blog vorbei schaut.

Diese Woche ist wieder Inspirations Woche bei Mennys Bastelshop und das gesamte Team zeigt Euch an den einzelnen Tagen tolle Werke zum entsprechenden Thema. 

Im Mai lautet das Thema:

Aquarell

Ich habe mich für Farben aus dem Altenew Vibrant Watercolor 36 Pan Set entschieden und damit ein paar Hintergründe auf Aquarellpapier eingefärbt. Nach dem trocknen habe ich die Hintergründe mit den einzelnen Stanzen ausgestanzt. Für den Hintergrund meiner Karte habe ich mich für leicht türkis blaue Farben entschieden und mit der größten Stanze aus dem Large Stitched Rounded Rectangle Stackables von Lawn Fawn ausgestanzt. Anschließend habe ich mit der B2B Oval Cuts Stanze von Mama Elephant einen schmalen Rahmen aus Woodgrain Cardstock von Lawn Fawn ausgesatnzt. Danach habe ich viele Blätter mit Stanzen aus dem Fall Leaves Border Stanzen Set von Lawn Fawn ausgestanzt und abwechselnd auf den schmalen Rahmen geklebt. Dann habe ich den Rahmen auf den eingefärbten Hintergrund geklebt.


Dann habe ich alles auf ein Stück Kraft Cardstock von Lawn Fawn geklebt, bei dem ich den Rand mit dem Distress Tool wieder aufgeraut habe und dann auf meine weiße Grundkarte geklebt. Die Scripty Fall Outline Stanze und die Add on Stanze von Lawn Fawn habe ich aus Kraft und Glitzer Cardstock ausgestanzt und mit Foam Pads aufgeklebt. Die zwei kleinen Mäuse sind aus dem Lawn Fawn You Autumn Know Stempel Set und sind ebenfalls mit Foam Pads aufgeklebt. Das Happy ist aus dem Henry's Buld A Sentiment Fall Set von Lawn Fawn. Zum Schluss habe ich noch kleine goldene Glitzersteine aus meinem Bestand aufgeklebt. 
 

Schaut unbedingt mal bei den anderen DT Mädels vorbei, es gibt wirklich tolle Werke zu sehen.

Ich hoffe Euch gefällt meine Karte und wünsche Euch noch einen schönen Tag.

Sonntag, 8. Oktober 2023

♥ DT Stamp Corner - Herbstkarte ♥

 Hallo Ihr Lieben, 

ich wünsche Euch einen schönen Sonntag und freue mich sehr, dass Ihr heute wieder hier auf meinem Blog vorbei schaut.

Heute zeige ich Euch auf dem Stamp Corner Blog eine herbstliche Karte mit dem Stamp Corner – Stempel Set – Mia (Illustration & Design by Stuff-Deluxe) und Stanzen von Lawn Fawn und My Favorite Things. Als Kind habe ich es ja geliebt bei Waldspaziergängen durch einen Blätterhaufen zu rennen und die Blätter durch die Luft zu wirbeln. Das fiel mir ein als ich die süße Mia gesehen habe und diente als Inspiration für meine heutige Karte.

Für den Hintergrund habe ich ein Stück Bristol Cardstock mit den Distress Oxides  Shabby Shutters, Wild Honey, Fossilized Amber und Kitsch Flamingo eingefärbt. Dann habe ich mit der Lawn Fawn Tree Backdrop Stanze ein Stück Woodgrain Whimsy Design Paper von My Favorite Things ausgestanzt und auf den eingefärbten Hintergrund geklebt.

Die Blätter habe ich mit einer Blätter Stanze von My Favorite Things ausgestanzt, die Blätter aus dem Stempelset habe ich mit Copics koloriert, mit der Schere ausgeschnitten und aufgeklebt. Die süße Mia habe ich ebenfalls mit Copics koloriert, mit der Schere ausgeschnitten und mit dünnen Foam Dots auf den Blätterhaufen geklebt. Den Text aus dem Set habe ich mit meiner Stempelhilfe direkt auf den Hintergund gestempelt. Anschließend habe ich alles auf meine weiße Grundkarte aus Perfect Colouring Paper geklebt.

Nun wünsche ich Euch noch einen schönen Sonntag, Tschüssi bis nächste Woche.

Donnerstag, 5. Oktober 2023

♥ Lawn Fawn - Slimline Card / Hope your day is filled with fun ♥

 Hallo Ihr  Lieben,

ich wünsche Euch einen schönen Donnerstag und freue mich sehr über Euren Besuch hier auf meinem Blog.

Heute zeige ich Euch eine Slimline Karte mit dem süßen Hay there, hayrides! Stempel Set von Lawn Fawn.

Für die Slimline Karte habe ich die passenden Stanzen von Lawn Fawn verwendet. Den Himmel habe ich mit Distress Oxide Tumbled Glass eingefärbt und für den Rasen habe ich Twisted Citron verwendet.


 Die Motive habe ich mit Copic Markern koloriert, mit der Schere ausgeschnitten und mit Foam Dots und Flüssigkleber aufgeklebt. Den Text habe ich mit dem Misti Tool direkt auf den Cardstock gestempelt. Die kleinen dunkelgrünen Grasbüschel habe ich mit Polychromos aufgemalt.

Nun sage ich Danke für Euren Besuch und wünsche Euch noch einen schönen Tag, Tschüssi bis bald.


Sonntag, 24. September 2023

♥ DT Stamp Corner - Herbstliche Grüße / Release Vorschau ♥

Hallo ihr Lieben,

ich wünsche Euch einen schönen Sonntag und freue mich sehr, dass Ihr heute wieder hier auf meinem Blog vorbei schaut.

Es dauert nicht mehr lange und es zieht ein neuer Release in den Stamp Corner Online Shop ein. Heute zeige ich Euch auf dem Stamp Corner Blog eine Karte bei der ich ein neues Motiv verwendet habe. Das Motiv ist aus einem Set, welches in Zusammenarbeit mit Stuff-Deluxe entstanden ist.

Für die Karte habe ich ein Stück Bristol Cardstock mit den Distress Oxides Faded Jeans und Speckled Egg eingefärbt. Darüber habe ich ein Regentropfen Stencil von Lawn Fawn gelegt und darauf die Nuvo - Glacier Paste Frostbite mit einem Spatel aus dem Hobby & Crafting Fun - Painting Knives Set 5 Spatel Set aufgetragen und trocknen lassen.

In der Zwischenzeit habe ich das süße Mädchen mit dem Regenparka und dem Schirm auf ein Stück Perfect Coloring Paper gestempelt, mit Copics koloriert, mit der Schere ausgeschnitten und zur Seite gelegt.

Anschließend habe ich den getrockneten Hintergrund mit der Stamp Corner - A6 DIE - Wonky ausgestanzt und mit CraftEmotions - 3D Foam Tape 2 mm auf ein Stück Perfect Colouting Paper geklebt, welches ich mit der größten Stanze aus dem Stamp Corner - A6 DIE - Wonky Set ausgestanzt habe.

Auf die weiße Grundkarte habe ich noch ein Stück Perfect Colouring Paper geklebt, bei dem ich den Rand mit dem Copic BG11 eingefärbt habe. Darauf habe ich die ausgestanzten Hintergründe mit dem Tombow - Multi Talent Liquid Glue aufgeklebt. Das süße Mädchen mit dem Regenparka habe ich mit dünnen Foam Dots mittig aufgeklebt. Drumherum habe ich ein ausgestanztes Oval aus Vellum aufgeklebt. Darauf habe ich noch Enamel Dots aufgeklebt, die ich mit den farblich passenden Copics eingefärbt habe. Den Text findet Ihr ebenfalls in dem neuen Stempelset.

Nun wünsche ich Euch noch einen schönen Sonntag, Tschüssi bis nächste Woche.

Freitag, 15. September 2023

♥ DT Magengo - Sending you Love and Blessings ♥


 Hi everyone,

 I wish you a happy Friday and I'm really glad to see you here again on my blog.

Today I'm on the  Magengo Designs Blog with another Inspiration card with the cute Happy Fall stamp set, the Fall leaves stencil and the In-out stitched rectangles die cut set.

 I start with creating the Stencil background. I cut out a piece of white cardstock, lay the stencil over the cardstock and ink the paper with Distress Oxide Twisted Citron, Wild Honey and Picked Raspberry. Then I ink the stencil with the Versamark Embossing Pad, add some Hologramm Embossing Powder and use my heat tool for embossing. 

If I'm happy with the result I cut out a stripe and use my Distress paper trimmer for the edge. Then I cut it out with a die from the In-out stitched rectangles die cut set, I also cut out a piece of white cardstock with the In-out stitched rectangles die cut set and glue the leaves stripe on the white cardstock. I also cut out a piece of Kraft Cardstock and use again my Distress paper trimmer for the edges and glue all on my white card base.


I stamp the cute deer and the squirrel on a Copic friendly paper and color them with Copic Marker. I fussy cut them out and glue them for more dimension with Foam Tape on the card. I stamp the sentiment with my Misti Tool directly on the card. For the last step I glue some rhinestones on the card and I'm really happy how the card looks like.

Many thanks for stopping by and hope to see you soon here on the blog.


Sonntag, 10. September 2023

♥ DT Stampcorner - Herbstliebe ♥

Hallo Ihr Lieben,

ich wünsche Euch einen schönen Sonntag und freue mich sehr, dass Ihr heute wieder hier auf meinem Blog vorbei schaut.

Auch wenn draußen ja noch sommerliche Temperaturen herrschen, zeige ich Euch heute auf dem Stamp Corner Blog eine Karte in herbstlichen Farben. Dafür habe ich auf ein Stück Bristol Cardstock das Stamp Corner - Stencil - Stencil 1 gelegt und mit etwas Washi Tape befestigt. Dann habe ich das Stencil mit Distress Oxide Wild Honey, Picked Raspberry und Twisted Citron eingefärbt. Darauf habe ich dann eine farblose Embossingpaste von Ranger aufgetragen und alles trocknen lassen.

In der Zwischenzeit habe ich ein Stück Joy! Crafts Kraft Papier A5 mit der größten Stanze der Stamp Corner - A6 DIE - Postage Stitch ausgestanzt und auf meine weiße Grundkarte geklebt.Den süßen Luis aus dem Stamp Corner - Stempel Set - Luis, Mümmel & Pippa habe ich mit Copics koloriert und mit der Schere ausgeschnitten.

Den getrockneten Stencil Hintergrund habe ich dann mit der zweit größten Stanze der Stamp Corner - A6 DIE - Postage Stitch ausgestanzt und auf das Kraft Papier geklebt. Der Text ist aus dem Stamp Corner - Stempelset - Herbstbär. Den süßen Luis habe ich mit Foam Pads aufgeklebt und zum Schluss ein paar Glitzersteine aufgeklebt.

Nun wünsche ich Euch noch einen schönen sonnigen Sonntag, Tschüssi bis nächste Woche.

Dienstag, 15. August 2023

♥ DT Magengo - Sending You Some Autumn Greetings ♥


 Hi everyone,

I wish you a happy Tuesday and I'm really happy to see you here again on my blog.

Today I'm on the Magengo Designs Blog with a new Fall inspiration card with the Good vibes stamp set and the In-out stitched rectangles die cut set

For this card I cut out a stitched rectangle of Neenah Solar White cardstock. I use Distress Oxide Peeled Paint, Wild Honey and Fossilized Amber for inking the background. If I'm happy with the result I add some golden pearlcolor splashes ond the background and let it dry.


In the meantime I stamp some images from the Good vipes stamp set on a Copic Marker friendly paper and color them with my Copic Marker. I fussy cut them out with my sciccors and glue  them with liquid glue and with Foam Tape on the background.

Then I cut out a rectangle with Craft cardstock and ink the edges with Distress Ink Vintage Photo. After that I use my Distress Tool for the edges and glue it on my white card base.


I stamp the sentiment with my Misti Tool on the inked background and glue the background with Foam Tape on the Craft cardstock. For the last step I glue some golden sequins on the card and I'm really happy how the card looks like.

Many thanks for stopping by and hope to see you here again on the blog.

Freitag, 21. Oktober 2022

♥ Lawn Fawn - Happy Fall ♥

 Hi everyone,

I wish you a happy Friday and I'm really glad to see you here again on my blog.

Today I show you a new Fall card with stamps and dies from Lawn Fawn.

As like every card I start with creating the background. For this background I create another splash background with Distress Oxide Dried Marigold and Distress Oxide Spray Fossilized Amber. After it is dry I cut it out with a sticthed rectangle die from Lawn Fawn. 

Then I cut out the giant Happy Fall with brown glitter cardstock and glue it with a white shadow on the inked background. I color the cute mice from the You Autumn Know stamp set with my Copics, fussy cut them out with my scissors and glue them on the background and then all on my white cardbase. For the last step I glue some golden sequins on the card and I'm really happy how it looks like.

Hope you like this Fall card also and hope to see you soon here on my blog.

Sonntag, 16. Oktober 2022

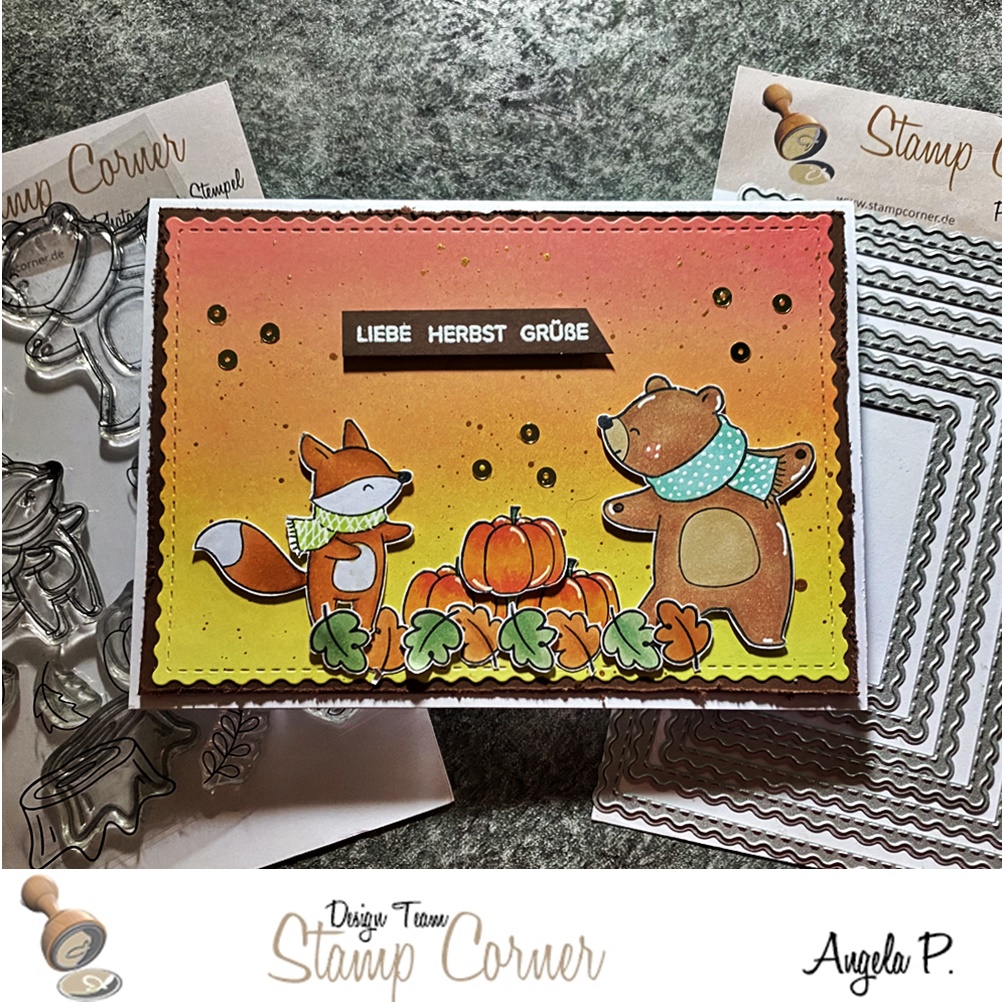
♥ DT Stamp Corner - Liebe Herbst Grüße ♥

 Hallo Ihr Lieben,

ich wünsche Euch einen schönen Sonntag und freue mich sehr, dass Ihr heute wieder hier auf meinem Blog vorbei schaut.

Heute zeige ich Euch auf dem Stamp Corner Blog noch mal eine Herbstkarte mit den süßen Stempeln aus dem Stamp Corner - Stempel Set - Herbst Tiere und der Stamp Corner - A6 DIE - Wave. Für den Hintergrund habe ich ein Stück Bristol Paper mit Distress Oxide Twisted Citron, Squeezed Lemonade, Carved Pumpkin, Dried Marigold, Saltwater Taffy und Abandoned Coral eingefärbt. Nachdem ich mit dem Farbübergang zufrieden war, habe ich mit den Gansai Tambi - Starry Colors 6 colors Set und einem dünnen Pinsel goldene Farbkleckse aufgetragen und trocknen lassen. Anschließend habe ich den Hintergrund mit der größten Stanze aus dem Stamp Corner - A6 DIE - Wave Set ausgestanzt und auf braunen Cardstock geklebt. Bei dem Cardstock habe ich mit dem Distresser noch den Rand aufgeraut, bevor ich alles auf meine weiße Grundkarte geklebt habe.

Die Motive habe ich mit dem Memento Fade restistant Dye Ink - Tuxedo Black auf das Perfect Colouring Paper gestempelt, mit Copics koloriert und mit der Schere ausgeschnippelt. Zum aufkleben habe ich Foam Dots und Tombow Multi Talent Liquid Glue verwendet. Für den Text habe ich einzelne Wörter aus dem Stamp Corner - Stempel Set - Kleine Worte und dem Stamp Corner - Stempel Set - Kleine Worte 2 mit dem VersaMark Stempelkissen auf einen schmalen Streifen braunen Cardstock gestempelt und mit weißem Embossingpulver heiß embosst und ebenfalls mit Foam Dots aufgeklebt. Zum Schluss habe ich noch ein paar goldene Sequins aus meinem Bestand aufgeklebt.

Nun wünsche ich Euch noch einen schönen Sonntag, Tschüssi bis bald.

Montag, 3. Oktober 2022

♥ DT Magengo - Sending you some Autumn greetings ♥

 Hi everyone,

I wish you a happy Monday and I'm really glad to see you here again on my blog.

Today I'm on the Magengo Designs Blog with another inspiration card. For this card today I use the cute Good Vibes stamp set.

I start the card as always with creating the background, I cut a piece of Bristol paper and use Distress Ink Squeezed Lemonade for inking. Then I put  a Sunray stencil over the inked paper and use Distress Oxide Dried Marigold and Saltwater Taffy for inking the sunray stencil and let it dry. 


In the meanwhile I stamp all images with a Copic Marker friendly stamp pad and color all images with my Copics and fussy cut them out with a scissor. After that I glue the background on a piece of Kraft Cardstock and distress all the edges and glue it then on my white card base. I cut out a craft scalloped circle with a die from my stash and glue it with Foam Tape on my card.

I arrange and glue all images on and in the craft circle. I stamp the sentiment with my Misti tool directly on the card. For the last step I glue some golden sequins on the card and I'm really happy how it looks like.

Good Vibes Stamp Set

Many thanks for stopping by and hope to see you soon here on the blog.

Sonntag, 11. September 2022

♥ DT Stamp Corner - Herbst Tiere senden Liebe Grüße ♥

Hallo Ihr Lieben,

ich wünsche Euch einen schönen Sonntag und freue mich sehr, dass Ihr heute wieder hier auf meinem Blog vorbei schaut.

Schon wieder ist eine Woche vorbei und ich darf Euch heute auf dem Stamp Corner Blog wieder ein Inspirationswerk zeigen. Diesmal habe ich mich für das Stamp Corner - Stempel Set - Herbst Tiere entschieden. Außerdem habe ich die Stamp Corner - A6 DIE - Deckle Frames und die Lawn Fawn Tree House Stanze verwendet. Für den Hintergrund habe ich ein Stück Perfect Colouring Paper mit Distress Oxide Tumbled Glass eingefärbt und mit der Deckle Frames Stanze ausgestanzt. Zusätzlich habe ich noch ein Stück mit Distress Oxide Peeled Paint eingefärbt und darauf farblich passende Farbkleckse aufgetragen, trocknen lassen und mit einer Grasstanze aus meinem Bestand ausgestanzt. In der Zwischenzeit habe ich die Stamp Corner Herbst Tiere auf Perfect Colouring Paper gestempelt, mit Copic Marker coloriert und mit der Schere ausgeschnitten. Nach dem die Hintergründe trocken waren, habe ich sie mit dem Tombow Multi Talent Liquid Glue zusammen geklebt und auf meine weiße Grundkarte geklebt..

Das Lawn Fawn Tree House habe ich aus Distress Woodgrain Cardstock gestanzt, mit Distress Ink Vintage Photo eingefärbt und mit Tombow Multi Talent Liquid Glue mittig auf den Hintergrund geklebt. Anschließend habe ich die Motive mit Foam Pads und mit Tombow Kleber aufgeklebt. Die Texte aus dem Stamp Corner - Stempel Set - Kleine Worte habe ich mit dem VersaMark Stempelkissen auf einen schmalen Streifen schwarzen Cardstock gestempelt und mit weißem Embossingpulver heiß embosst und mit Foam Pads aufgeklebt. Zum Schluss habe ich noch ein paar goldene Pailetten aus meinem Bestand aufgeklebt.

Ich wünsche Euch noch einen schönen Sonntag, Tschüssi und bis bald.


Materialliste:


Montag, 5. September 2022

♥ LTTS Doodles - Little Scarecrow / Sending you some Autumn greetings ♥

 Hi everyone, 

I wish you a happy Monday and I'm really glad to see you here again on my blog.

Today I show you a new card with the cute Digital Stamp from LTTS Doodles, called Little Scarecrow.

 I create a splash background for my card with Distress Oxide Fossilized Amber, Dried Marigold, Carved Pumpkin, Picked Raspberry and for the grass border Crushed Olive and Forest Moss. I also apply some golden and green splashes with my Coliro Pearlcolors on the background.


I cut all out with the Wave Border Die from Stamp Corner and glue the grass border on the card panel and then all on my white card base. I printed the images with my laser printer on a Copic friendly paper and color them with my Copic marker. After that I fussy cut them out with a scissors and glue them on my card. For the sentiment I use a stamp from Magengo Designs. I stamp the sentiment with a VersaMark embossing pad on a thin paper stripe and use white embossing powder for heat embossing. I glue the sentiment with Foam Tape on the card. For the last step I apply some clear Nuvo Chrystal drops on the card. 

I hope you like this Autumn card and hope to see you soon here on my blog.

Donnerstag, 1. September 2022

♥ DT Magengo - Sending you Love and Blessings / Happy Fall ♥

 Hi everyone,

I wish you a happy Thursday and I'm really glad to see you here again on my blog.♥  

Today I'm on the Magengo Designs Blog with another inspiration for the cute Happy Fall stamp set and the Fall Leaves stencil.

I create a Leaves background with the Fall Leaves stencil. I inked the stencil with Distress Oxides Wild Honey, Picked Raspberry and Twisted Citron. After it is dry I cut it out with a die from my stash. In the middle I cut out an oval. Behind the oval I glue a piece of Bristol Paper and inked it with Distress Oxide Tumbled Glass. I add some Coliro Pearlcolor splashes on the blue sky. For the grass I use the Distress Oxide Peeled Paint and add also some Coliro Pearlcolor splashes on the grass.

Then I glue the background on a piece of soft brown cardstock and then on my white card base. I color all images with my Copics, fussy cut them out with a scissor and glue them all in the oval. I stamp the sentiment on a small stripe of black cardstock with a VersaMark embossing stamp pad and use a white embossing powder for heat embossing. Then I glue it for more dimension with Foam Tape on the card. For the last step I glue some rhinestones on the card and I'm really happy how it looks like.

I use these Magengo Designs products for my card

Fall Leaves Stencil


Happy Fall Stamp Set

Many thanks for stopping by and hope to see you soon here on the blog.