Posts mit dem Label Studio Katia werden angezeigt. Alle Posts anzeigen

Montag, 7. März 2022

♥ DT AAA Birthday Challenge - Game #35 Under the Sea ♥

 Hi everyone, 

I wish you a happy Monday and I'm really glad to see you here again on my blog.

Today we start a new challenge at the

AAA Birthday Challenge 

with the topic


For my card I create a Under the Sea Birthday scene with some Lawn Fawn stamps.

I start my card with creating the background. I use the Nuvo Shimmer Powder Atlantis Burst and Blue Blitz  on a piece of watercolor paper and create the under the sea background. I cut out the background with the Stamp Corner Deckle Frames Die. For the sand hill on the bottom of my card I inked a piece of Neenah Desert Storm cardstock with Distress Ink Tea Dye and add some golden, brown, white and golden splashes on the cardstock. If the splashes are dry I cut out the sand hill with a die from Lawn Fawn and the Deckle Frames die from Stamp Corner. I glue the background on my white card base. I color all Lawn Fawn images with my Copics and fussy cut them out with a scissors. I glue some images with liquid glue and some with Foam Dots on the card. I stamp the sentiment with my Misti Tool on the background. For the last step I glue some clear drops on the card and I'm really happy how it looks like.

 Many thanks for stopping by and I hope to see you soon here on my blog. Have a great day. 


Donnerstag, 13. Januar 2022

♥ Lawn Fawnatics - Challenge #116 - Let's Celebrate! ♥

 Hi everyone, 

I wish you a happy Thursday and I'm really glad to see you here again on my blog.

 Today I show you my new card for the current Challenge at

Lawn Fawnatics Challenge 116 -Let's Celebrate


I created a birthday card in rainbow colors with the Simple Stripes Diagonal Die.

I start to create 9 different backgrounds with Distress Oxides:

Spun Sugar, Picked Raspberry, Carved pumpkin, Fossilized Amber, Shabby Shutters, Tumbled Glass, Mermaid Lagoon, Chipped Sappihre and Wilted Violet

After the backgrounds are dry I cut them out with the Lawn Fawn Simple Stripes Diagonal Die.


 Then I arrange one rainbow background to see how it looks like.


 After I'm happy with the look I glue all the stripes on a white background and my card base behind the card panel. Then I color all images with my Copic Marker, fussy cut them out and glue them on the background. For the sentiment I use the happy stamp from the Scripty Bubble Sentiments Set and cut them out with the coordinating die. For a bit more dimension I cut out 5 layers of the sentiment and glue them all together. The birthday sentiment is from the Giant Birthday Messages stamp set and I use the Lawn Fawn white Embossing powder for heat embossing. 


For the last step I glue some cleardrops from Studio Katia on the card and I'm really happy about the card looks like.

With this card I'll take part at the

Lawn Fawnatics challenge 116 Let's Celebrate

Many thanks for stopping by and I wish you an amzing day.


Freitag, 9. Juli 2021

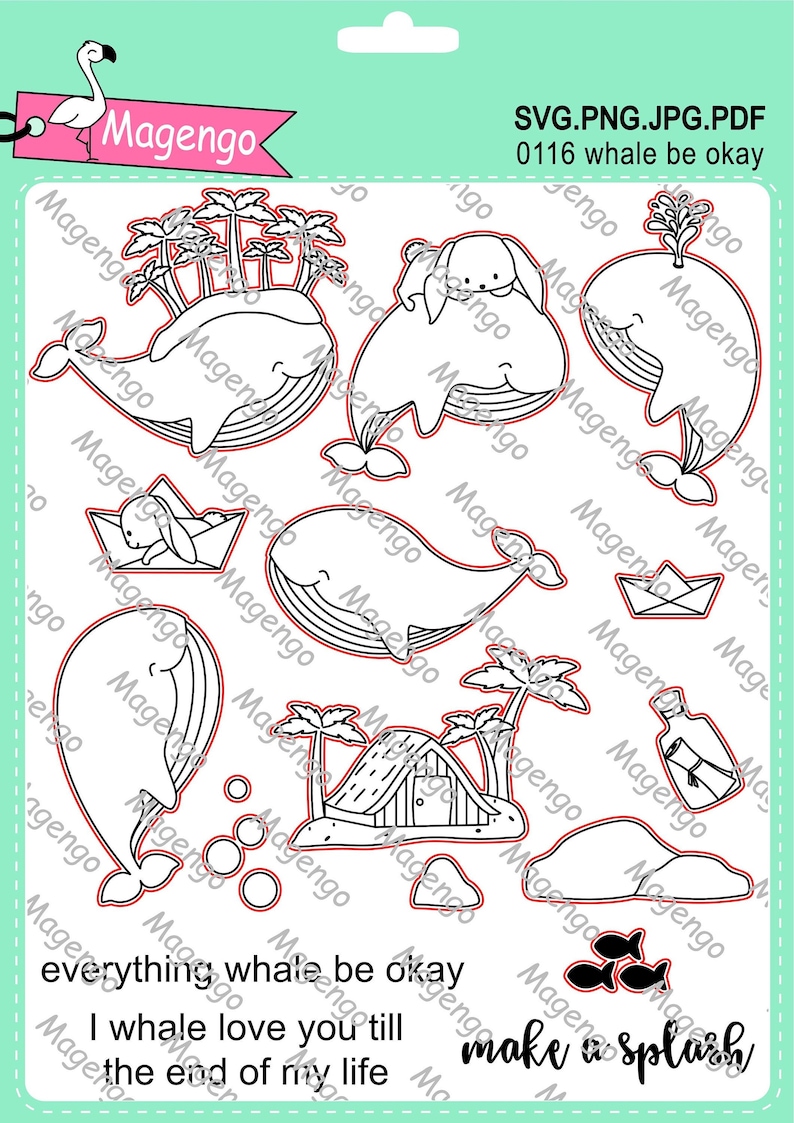
♥ DT Magengo - I whale love you with the Whale be okay digital stamps ♥

 Hi everyone,

I wish you a happy Friday and I'm really glad to see you here again on my blog.

Today I show you a new inspiration card with the cute Whale be Okay digital stamp set on the Magengo Design blog.  You'll find the set here in the Magengo Etsy shop.

 As always I start my card with printing out the images with my laser printer and fussy cut them out with a scissors. For coloring I use some Copic Marker.

Then I lay them aside and create my underwater background. I printed the sentiment on a piece of Bristol Smooth cardstock and cut it out with a stitched rectangle die. For inking I use Distress Oxide Tumbled Glass, Mermaid Lagoon and Chipped Sapphire. Then I glue the underwater plants border with Foam tape on the bottom of the card panel and then on my white card base.

I glue the little whale with liquid glue on the background. For the right whale I glue a Wobbler behind the image.

For the last step I glue some small clear drops fromStudio Katia on the card and I'm really happy how it looks like.

You find the Whale be Okay set here in the Magengo Etsy shop.

Wal be okay Stempel set SVG Dateien druckbares Foto Wal Bild 0

I wish you an amazing day and hope you like my new inspiration card.

Many thanks for stopping by and hope to see you soon here on the blog.


Montag, 4. Januar 2021

♥ DT AAA Birthday Challenge - Game 21 #Stencil Background ♥

 Hi everyone,

I wish you a happy Monday and I'm really glad to see you here again on my blog.

Today we start a new challenge at the

AAA Birthday Challenge

For this challenge we have the topic

Stencil Background

You can take part of our challenge until the 31th. January. We can't wait to see your creations.

For my card I use a stencil from Studio Katia and the image is from Newtons Nook Designs.

I start my card with creating the background. I inked a piece of Bristol Smooth Cardstock with Distress Oxide Tumbled Glass. Then I place the stencil over the background and inked it with Distress Oxide Peacock Feathers. I also add some golden watercolor splashes on the background. After it is dry I cut it out with the Crazy Stitched Frame Die and glue it on a piece of golden glitter cardstock and then on my white card base. I colored the images from Newtons Nook Designs with my Copic Markers and fussy cut it out with my scissors. I glue it with Foam Dots on my card. For the sentiment I use a banner and glue it under the image. For the final touch I glue some clear drops from Studio Katia on the card.

So I hope you'll join our new challenge, but remember it must be a birthday card.

Many thanks for stopping by and I hope to see you soon here on my blog. Have a great day.

Dienstag, 21. Januar 2020

♥ Whimsy Stamps - Love for Australia Digital Set / Koala Card ♥

Hi everybody,
 I wish you a happy Tuesday and I'm really glad to see you here again on my blog.

Today I show you a card which I made with a Digital stamp from Whimsy Stamps.
I've seen the Love for Australia Set from Whimsy Stamps for the first time on Instagram in a story from my friend Crystal and I decide to order this cute set. 

For my card I create a background with the leaves from the set and the little Koala on the tree trunk.
I printed out the image with my laser printer and use my Copics and Spectrum Noir Tri Blend Marker for coloring. For the final touch of coloring I use some of my Prismacolor pencils.

Then I cut out the image with a die from Craftin Desert Divas and glue it on a piece of dark blue cardstock and then on a piece of Craft cardstock. After that I glue all on my white card base. For the sentiment I use a stamp from Lawn Fawns Butterfly Kisses stamp set and a banner from the Simply Wavy Banners from Lawn Fawn. For the final touch I glue some clear drops from Studio Katia on the card.
I'm so happy how the card looks like and I hope you'll like it also.

With my card I'll take part of these challenges:


So that's it for today. Many thanks for stopping by and I hope to see you soon here on my blog. Have a great day.

Montag, 10. Juni 2019

♥ Sweet Stampers Challenge - Challenge 33 / Anything Goes ♥


Hallo Ihr Lieben,
 da bin ich wieder mit meinem zweiten Posting für heute.

Heute starten wir wieder eine neue Challenge auf dem
Sweet Stampers Challengeblog
Diesmal haben wit folgendes Thema für Euch:
Anything Goes
Na da fällt Euch doch bestimmt etwas ein, oder? Ihr habt bis zum 08.Juli 2019 Zeit EUre Werke auf dem Challengeblog einzustellen. Wir freuen uns schon sehr auf Eure Werke.

Ich habe mich für eine Karte mit den süßen Hippos von Clearly Besotted entschieden. 
Den Hintergrund habe ich mit dem Burst Stencil von Craftin Desert Divas gestaltet. Dafür habe ich Distress Oxides Picked Raspberry, Dried Marigold and Fossilized Amber verwendet.
Nach dem trocknen habe ich den Hintergrund mit der Crazy Stitched Frame Dies ausgestanzt und auf meine weiße Grundkarte geklebt. In der Mitte habe ich einen kleinen Kreis aufgeklebt, den ich mit einer Stanze aus dem Inside Scalloped Circle Dies Set ausgestanzt und mit Distress Oxide Tumbled Glass eingefärbt habe. Die süßen Hippos aus dem Cooling Off Stamp Set von Clearly Besotted habe ich mit Copics coloriert, mit der Schere ausgeschnippelt und mit Foam Tape aufgeklebt.  Den Text habe ich mit dem Misti Tool direkt auf die Karte gestempelt. Zum Schluss habe ich noch ein paar Clear Drops von Studio Katia aufgeklebt.

So ich hoffe, ich konnte Euch mit meiner Karte inspirieren und Ihr nehmt an unserer neuen Challenge teil. Wir sind schon ganz gespannt auf Eure Kreationen.

Mit meiner Karte nehme ich an folgenden Challenges teil:

Craft Rocket Challenge: CH #60 Summer is coming

Lemon Shortbread Challenge: CH #95 Anything Goes

Cute Card Thursday: CH #585 Anything Goes

Crafty Animals: CH #27 Anything Goes

Nun sage ich Danke für Euren Besuch und wünsche ich Euch noch einen schönen Tag, lasst es Euch gut gehen. Tschüssi bis bald.

Donnerstag, 23. Mai 2019

♥ Clearly Besotted - Birthday Card with On Your Day Stamp ♥

Hi everybody,
I wish you a happy Thursday and I'm really glad to see you here again on my blog.

Because my stock of birthday cards is almost empty I show you today another new birthday card. For this card I use the On Your Day Stamp and the Diamond Lattice Stencil from Clearly Besotted.

I started first to create my background. I use a peace of Bristol Smooth Cardstock and inked it with Distress Oxide Tumbled Glass. Then I lay the Diamond Lattice Stencil from Clearly Besotted over the cardstock, inked it with Distress Oxide Peacock Feathers and let it dry. After my background is dry I cut it out with Craftin Desert Divas Inside Scalloped Rectangle Dies. Then I cut out a white frame with the largest Die from the Inside Scalloped Rectangle Dies, glue it on my background and then on my card base.
Now I stamp the flowers from Clearly Besotted On Your Day Stamp Set and color it with my Copic Markers. After my coloring is done I fussy cut out the flowers with my scissors. For more dimension I glue the flowers with Foam Tape on the card. For the sentiment from the Blossoms in Bloom Stamps I use a banner from Craftin Desert Divas Flag Banner Dies Set and glue it also with Foam Tape on my card. For the final touch I glue some Clear Drops from Studio Katia on my card.

So I'll hope you like my new birthday card and enjoy this posting.
With my card I'll take part of these Challenges:


So that's it for today. Many thanks for stopping by and I hope to see you soon here on my blog. Have a great day.

Mittwoch, 15. Mai 2019

♥ Gina K. Designs - Mother Day's card with Vibrant Blooms ♥

Hi everybody,
I wish you a happy Wednesday and I'm really glad to see you here again on my blog.

Today I show a card which I create for my mother for Mother's Day.

For this card I use the Vibrant Blooms Stamp Set from Gina K. Designs.
I started first with stamping the first flower in the middle of the lower row. Then I make some masks of this flower and lay the first one of the flower. Now I stamp the other flowers on the right and left site. Then I use the second flower and make also some masks for the yellow flowers. I stamp the first one, lay my mask on it and stamp the others yellow flowers. I also stamp some of the leaves and some of the stems.
I color all flowers and leaves with the following ZIG Clean Color Real Brush Marker:
- 052 Bright Yellow
- 046 Mid Green 
- 043 Olive Green
- 230 Pale Rose
- 200 Almond Pink
 For the background I use the BG 11 Copic Marker. After my coloring is done I cut it out with the Crazy Stitched Frame Dies from Craftin Desert Divas. Then I stamp the sentiment from the Happy Sentiment Stamps from Craftin Desert Divas directly on the card. I glue my panel on my card base. For the final touch I glue some Clear Drops from Studio Katia on the pink flowers. On the yellow flowers I add some NUVO Crystal Drops Morning Dew and let it dry.

My mother was really happy about this card  and I hope you like my new card also.

With this card I'll take part of these challenges:

Die Cuttin Divas: CH #420 Flowers and / or Mother's Day

Crafty Sentiments Designs: Pastel color Challenge

Stempelgarten Challenge: CH #80 Blumen

Many thanks for stopping by and I hope to see you soon here on my blog. Have a great day.

Freitag, 3. Mai 2019

♥ Simply Create Too - CH #149 Anything Goes ♥

Hi everybody,
I wish you a happy Friday and I'm really glad to see you here again on my blog.

Today starts a new challenge at
Simply Create Too
For this challenge we have this theme for you
Anything Goes
 You'll have time until the 31. May to show us your creations on the challenge blog.

I decide to create a Birthday Card with the Japanese Peony Stamp from Studio Katia.

I start with ink blending a piece of Bristol Smooth Cardstock with Distress Oxides Peeled Paint and let it dry. Then I cut out a piece of craft cardstock with the largest Die from Craftin Desert Divas Fancy Frame Dies and in the middle I cut out an oval with the Inside Scalloped Oval Dies. I glue it on my background and add some golden splashes on the background. After it is dry I glue all on my card base.
I stamp the sentiment from Clearly Besotted with my Misti Tool directly on the oval. Now I color the Japanese Peony and some extra leaves from Studio Katia with my ZIG Clean Color Real Brush Marker and let it dry. After it is dry I cut all out with my scissors and glue it for more dimensions with Foam Tape on my card.
For the final touch I glue some Coffee Break Sequins on my card.

So I'll hope you like my new card like I do and I hope you'll join our new challenge.

 I'll take part with my card on these challenges:

Colour Crazy Craft Challenge: Week 17 Anything Goes

Krafty Chicks Challenge: CH #453 Celebration

Moving Along With The Times: CH #96 Floral

Seize the Birthday: CH #164 AG with optional Texture

Through The Craft Room Door: Anything Goes

Many thanks for stopping by and I hope to see you soon here on my blog. 
Have a great day.

Freitag, 19. April 2019

♥ Newtons Nook Design - Welcome Spring ♥

Hallo Ihr Lieben, 
ich wünsche Euch einen schönen Karfreitag und freue mich sehr, dass Ihr heute wieder hier auf meinem Blog vorbei schaut.
Ich hoffe, Ihr genießt das schöne Wetter und lasst es Euch gut gehen. Es ist ja wirklich traumhaft schönes Wetter und so werde ich es mir später mit einem Buch auf unserem Balkon in der Sonne gemütlich machen.

So nun aber zum eigentlichen Grund meines Postings. Ich möchte Euch heute ein neues Kärtchen zeigen, dass ich mit dem süßen Lamm/ Schaf aus dem Woodland Spring Stamp Set von Newtons Nook gewerkelt habe.
Coloriert habe ich das süße Schaf / Lamm mit meinen Copics und mit der Schere ausgeschnippelt. Für den Hintergrund habe ich ein Tag mit der Tag it Die ausgestanzt und mit Distress Oxides Tumbled Glass und Peacock Feathers eingefärbt. 
Damit das Schäfchen / Lamm nicht so in der Luft steht, habe ich am unteren Rand noch eine Grassbordüre aufgeklebt. Den Text habe ich direkt auf das Tag gestempelt und noch ein paar NUVO Clear Drops aufgetragen.
Für den Kartenhintergrund habe ich das Burst Stencil verwendet und das Papier ebenfalls mit Distress Oxides Tumbled Glass und Peacock Feathers eingefärbt. Nach dem trocknen habe ich alles auf meine weiße Grundkarte geklebt und für die Dekoration ein paar Clear Drops von Studio Katia verwendet.

So Ihr Lieben, ich hoffe mein Kärtchen gefällt Euch ein bisschen.

Mit meiner Karte nehme ich an folgenden Challenges teil:


Nun sage ich Danke für Euren Besuch und wünsche Euch noch einen schönen Tag. Lasst es Euch gut gehen. Tschüssi bis bald.
 

Mittwoch, 10. April 2019

♥ Sweet Stampers Challenge - Birthday / Celebrate ♥

Hallo Ihr Lieben,
einen wunderschönen Mittwoch wünsche ich Euch und freue mich sehr, dass Ihr heute wieder hier auf meinem Blog vorbei schaut.

Heute starten wir wieder eine neue Challenge auf dem 

Sweet Stampers Challengeblog


Diesmal haben wir folgendes Thema für Euch:

Birthday / Celebrate

Na da fällt Euch doch bestimmt etwas zu ein, oder? Ihr köönt Eure Werke bis zum 08. Mai 2019 auf dem Challengeblog einstellen. Wir freuen uns schon sehr auf Eure Werke.

Zum Geburtstag gibt es ja meistens Geschenke und so habe ich den süßen Kobi von Studio Katia für meine Karte verwendet. Ist er nicht knuffig, wie er den riesigen Berg von Geschenken vor sich her trägt?
Für den Hintergrund habe ich zuerst die Lustballons gestempelt und dann mit Maskingpapier maskiert. Anschließend habe ich das Papier mit Distress Oxides Tumbled Glass und Peacock Feathers eingefärbt. Danach habe ich den Hintergrund mit den Inside Scalloped Rectangle Dies ausgestanzt und auf meine weiße Grundkarte geklebt. 
Den süßen Kobi mit den Geschenken habe ich mit Copics coloriert, ausgeschnippelt und mit Foam Tape passend (mittig) auf die Karte geklebt. Der Text ist aus dem Craftin Desert Divas Sweetest Birthday Stamp Set. Als Dekoration habe ich noch ein paar Cleardrops von Studio Katia auf die Karte geklebt.

So Ihr Lieben, nun seid Ihr an der Reihe. Zeigt uns bis zum 08. Mai 2019 Eure Werke auf dem Sweet Stampers Challengeblog. Wir sind schon ganz gespannt auf Eure Kreationen.

Mit meiner Karte nehme ich an folgenden Challenges teil:

Colour Crazy Craft Challenge: Week 13 Anything Goes

QKR Stampede: CH #342 Anything Goes

 Crafty Friends Challenge: CH #107 Happy Birthday

Creative Fingers Challenge: CH #161 Anything Goes

Nun sage ich Danke für Euren Besuch und wünsche Euch noch einen schönen Tag. Lasst es Euch gut gehen.Tschüssi bis bald.
   A
 

Montag, 8. April 2019

♥ Newtons Nook Design - Spring Card with Woodland Spring Stamps ♥

Hi everybody,
I wish you a happy Monday and I'm really glad to see you here again on my blog.

Today I show you a new Spring Card with the cute Woodland Spring Stamp Set from Newtons Nook Design.

Because I really love all the images from the Woodland Spring Stamp Set I decided to use all these cuties for my card.

I stamp the images on a piece of Copic paper and color them with my Copic Markers.
I inked a piece of Bristol Smooth Paper with Distress Oxides Fossilized Amber and Picked Raspberry and let it dry. In the meantime I color another paper with Distress Oxides Twisted Citron and let it also dry.
  I also cut out a white frame with Craftin Desert Divas Window Pane Die.
Now I cut out the grass with a border from Newtons Nook Designs Land Border Die Set and glue the grass borders behind the little windows. After that I glue my window frame on my inked background and on black cardstock. Then I glue the images in the windows and glue all on my white card base.  I stamp the sentiment on white cardstock, fussy cut it out with my scissors and glue it in the middle of the window frame. 
For the final touch I glue some Studio Katia Clear Drops on the images.

So I'll hope you like my new card like I do. 

 With my card I'll take part of these challenges:


 Many thanks for stopping by and I hope to see you soon here on my blog. Have a great day.
 

Montag, 1. April 2019

♥ Creative with Stamps - Birthday card for Challenge #37 Birthday ♥

Hi everybody,
I'm here again with my second posting for today and another new card.

Today starts a new challenge at

Creative with Stamps 

And this challenge it's really a special one, because it's our 3rd Anniversary!
Sponsor:
(3 images to Random Winner)
*** Because it is our 3r Anniversary Monika will also added an extra Prize for one more winner of this challenge (we use Random.org)***

1 Gift Voucher from Create A Smile (15 Euro)


For my card I decided to use my new Lovely Blooms Stamp from STUDIO KATIA.
I stamp the image with Memento Ink Desert Sand in my Misti Tool on a piece of Neenah Desert Storm Cardstock.
I color the flowers and leaves with my Prismacolor Pencils.
I use these Prismacolor Pencil colors for my coloring:

Flower1: 938,930,929,928
 Flower2:938,195,994,1014
Leaves: 908,1096,912

Because I want to emboss the image, I use my Misti Tool again and inked the stamp with a VersaMark Embossing stamp pad and use golden WOW Embossing powder.
I hope you can see how it sparkle, it's really adorable.
 Then I cut out the image with the Craftin Desert Divas Crazy Stitched Frame Dies and glue it on my black card base. I use a banner from the Flag Banner Dies Set for the sentiment from the Happy Sentiment Stamp Set.
For the final touch I glue some Clear Raindrops from STUDIO KATIA on my card. 

So I'll hope you like my inspiration card and you join our Birthday Challenge.

With my card I'll take part of these challenges:

Crafty Friends Challenge: CH #106 Spring

Seize the Birthday Challenge: CH #162 Spring

Crafty Creations Challenge: CH #387 Anything Goes

Colour Crazy Craft Challenge: Week 12 Anything Goes

Crafty Catz Challenge: CH #455 Anything Goes

Many thanks for stopping by and I hope to see you soon here on my blog. Have a great day.

Sonntag, 10. März 2019

♥ Sweet Stampers Challenge - Easter / Spring Challenge ♥

Hallo Ihr Lieben,
ich wünsche Euch einen wunderschönen Sonntag und freue mich sehr, dass Ihr heute wieder hier auf meinem Blog vorbei schaut.

Heute starten wir wieder eine neue Challenge auf dem

Sweet Stampers Challengeblog

Diesmal haben wir uns folgendes Thema für Euch ausgesucht:

Easter / Spring

Ihr habt bis zum 08.April Zeit Eure Werke auf dem Challengeblog einzustellen. Wir sind schon ganz gespannt auf Eure Kreationen.

Ich habe mich bei meiner heutigen Karte für Spring entschieden und habe meine neuen Spring Blossoms Stempel von Honey Bee Stamps eingeweiht.
Den Hintergund habe ich mit Distress Oxides Tumbled Glass und Peacock Feathers eingefärbt. Nach dem trocknen habe ich den Hintergrund mit der Crazy Stitched Frame Dies ausgestanzt und auf meine weiße Grundarte geklebt.
Die Blumen habe ich mit meinen Copics coloriert, ausgeschnippelt und auf meinem Hintergrund angeordnet. Für den Text von Whimsy Stamps habe ich eine Bannerstanze aus dem Flag Banner Dies Set von Craftin Desert Divas verwendet. Zum Schluss habe ich die Karte mit ein paar Clear Drops von Studio Katia deoriert.


So ich hoffe ich konnte Euch mit meiner Karte etwas inspirieren und Ihr nehmt an unserer Easter / Spring Challenge teil. Wir freuen uns schon sehr auf Eure Werke.

Ich nehme mit meiner Karte an folgenden Challenges teil:

Make My Monday: CH #91 Something New ( the HoneyBee Stamps)


Nun sage ich Danke für Euren Besuch und wünsche Euch noch einen schönen Sonntag. Lasst es Euch gut gehen.Tschüssi bis bald.

Freitag, 1. Februar 2019

♥ Sparkles Christmas Challenge - Poinsettia Challenge ♥

Hi everybody,
I wish you a happy Friday and I'm really glad to see you here again on my blog.

Today we start a new challenge at

Sparkles Christmas Challenge
Challenge Blog
For the #97 challenge we choose this theme for your creations:

POINSETTIAS

I really love them so much, so I choose this theme for this challenge.

For my card I use the Merry Poinsettia Stamp Set from Studio Katia.
I start first to create my background with the Distress Oxides Tumbled Glass and Peacock Feathers and after it is dry I cut it out with Craftin Desert Divas Inside Scalloped Rectangle Dies.
Then I cut out the Grateful Lattice Background from Spellbinder with golden mirror cardstock and glue it on my inked background.
Now it's time to color the images. For my coloring I use my Polychromo pencils. I cut the Poinsettias and the leaves out with my scissors and glue them on my card. For the sentiment I use a stamp from Craftin Desert Divas Oh What Fun Stamp Set. I stamp the sentiment with a Versamark Stamp pad on a piece of black cardstock and use some golden WOW Embossing powder.  For the final touch I glue some Jingle Berries Sequins on my card.
So I'll hope you like my new Christmas card and you join our new Poinsettia Challenge.

Many thanks for stopping by and I hope to see you soon.

Montag, 27. November 2017

♥ Christmas Wishes Card mit Studio Katia Poinsettia ♥

Hallo Ihr Lieben,
einen schönen Montag wünsche ich Euch und freue mich sehr, dass Ihr heute wieder hier auf meinem Blog vorbei schaut.

Ich hatte ja im September auf Instagram den tollen Weihnachtsstern Stempel von Studio Katia gesehen und war so begeistert, dass ich ihn unbedingt haben musste. Für die laufende Challenge von Simply Create Too hatte ich ihn ja auch hier schon mal verwendet. Nun hatte ich am Wochenende auf dem Intagram Account von Yana Smakula eine wunderschöne Karte entdeckt und habe mir dazu auf Ihrer Seite das Video dazu angeschaut.
Da ich ja schon seit ewigen Zeiten im Besitz der Polychromos bin, sie aber nur selten verwende, dachte ich mir es wäre eine gute Gelegenheit sie mal wieder zu reaktivieren und dafür den schönen Weihnachtsstern Stempel von Studio Katia zu verwenden. Meinen ersten Versuch dazu möchte ich euch natürlich auch nicht vorenthalten.
Da ich für mich beschlossen hatte, dass der Versuch gelungen war, habe ich mich dann daran gewagt, dass ganze mal auf Kraft Cardstock zu versuchen und hier ist nun meine fertige Karte.
 Bei dieser Karte habe ich die Stempelabdrücke mit dem Staz On Dove Gray (das einzige graue Stempelkissen was ich besitzte *hihi*) gestempelt, maskiert und weiter gestempelt. Anschließend habe ich die Motive mit meinen Polychromos coloriert und versucht dabei drei farblich unterschiedliche Weihnachtssterne entstehen zu lassen. Der Trick an dieser Technik ist, dass man erst nach dem Colorieren den Stempelabdruck embosst und somit keine Farbe aus den weißen Embossinglinien hat.
Leider habe ich rechts und links unten doch etwas zu viel Embossingpulver aufgetragen und des erst nach dem heiß embossen gesehen. Aber gut das ist halt meine künstlerische Freiheit und mit den kleinen Steinchen von Studio Katia fällt es nicht ganz so doll auf. Der Schriftzug ist aus dem Craftin Desert Divas Sending Sentiments Set. Übrigens könnt Ihr bei Craftin Desert Divas auch heute noch Geld sparen. Schaut mal hier.
Viel Spaß beim shoppen.

Einreichen möchte ich meine Karte bei folgenden Challenges:


Ich hoffe meine Karte gefällt Euch ein bisschen und sage Danke für Euren Besuch. Tschüssi bis bald.