Posts mit dem Label Nuvo werden angezeigt. Alle Posts anzeigen

Montag, 16. September 2024

♥ DT Stamp Corner - Ich stehe nicht im Regen,...♥

Hallo Ihr Lieben,

ich wünsche Euch einen schönen Montag und freue mich sehr, dass Ihr heute wieder hier auf meinem Blog vorbei schaut.

Heute zeige ich Euch eine Karte, bei der ich das süße Häschen aus dem Stamp Corner - Stempelset - Gute Laune verwendet habe. Coloriert habe ich den Hasen mit Copics und mit der Schere ausgeschnitten. Für den Hintergrund habe ich einen Streifen Bristol Cardstock mit Shimmer Powder eingefärbt und nach dem trocknen noch goldene Pearl Color Kleckse aufgetragen. Aufgeklebt habe ich den Streifen auf ein Stück CraftEmotions - Kraft Papier welches ich mit einer Stanze aus dem Stamp Corner - A6 DIE - Rectangle Stitch Set ausgestanzt und auf ein Stück Perfect Colouring Paper geklebt habe.

Gemattet habe ich es dann wieder mit einem Stück CraftEmotions - Kraft Papier bevor ich es dann auf meine weiße Grundkarte geklebt habe. Die kleinen Wolken sind mit einer Stanze aus meinem Bestand gestanzt. Den Text und den Hasen habe ich mit Foam Dots aufgeklebt. Zum Schluss habe ich noch Glitztersteine aus meinem Bestand aufgeklebt.

Ich wünsche Euch noch einen schönen Montag und einen guten Wochenstart.Tschüssi, bis nächste Woche.

Montag, 13. Mai 2024

♥ DT Stamp Corner - Meeresbrise ♥

 Hallo Ihr Lieben,

ich wünsche Euch einen schönen Montag und freue mich sehr, dass Ihr heute wieder hier auf meinem Blog vorbei schaut.

Heute zeige ich Euch auf dem Stamp Corner Blog eine maritime Wackel Karte mit dem süßen Stamp Corner Stempelset Fanti und dem Stamp Corner Stencil 52. Für die Karte habe ich mir ein Stück dunkelbraunen Cardstock mit zwei Kreisstanzen ausgestanzt, so dass ich nur einen schmalen Kreis hatte, der mein "Bullauge" sein sollte. Darauf habe ich Nuvo Crystal Drops - Morning Dew als Schrauben aufgetragen und trocknen lassen. In der Zwischenzeit habe ich mir ein Stück Perfect Coloung Paper und ein Stück Maskingpapier in quadratischer Form zurecht geschnitten. Bei dem Maskingpapier habe ich mir ebenfalls mit den Kreisstanzen die Mitte ausgestanzt und dann auf das Perfect Colouring Paper geklebt.. Das Stencil 52 habe ich auf das Maskingpapier gelegt und die Wellen mit Distress Oxide Tumbled Glass eingefärbt..Den schmalen braunen Kreis habe ich dann auf den eingefärbten Hintergrund geklebt und das Maskingpapier entfernt und so sieht man den Stencil Hintergrund nur in dem "Bullauge". Die Ränder des Quadrats habe ich mit dem Distress Tool wieder aufgeraut. In zwei Ecken habe ich noch kleine Rechtecke aus dunkebraunem Cardstock geklebt und unten rechts den Schriftzug Meeresbrise, der ebenfalls in dem Stempelset enthalten ist. Als Hintergrund habe ich noch ein Quadrat zurecht geschnitten, dass etwas größer ist und habe die Ränder mit Distress Oxide Tumbled Glass eingefärbt. Anschließend habe ich alles auf meine weiße Grundkarte geklebt,

Den süßen Elefant habe ich mit Copics coloriert und mit der Schere ausgeschnitten. Da ich ihn nicht einfach so aufkleben wollte, habe ich ihn auf ein Wackel Element geklebt und nun wackelt er hin und her und hat richtig Spaß dabei.


Nun wünsche ich Euch noch einen schönen Tag, Tschüssi bis nächste Woche.


Freitag, 12. April 2024

♥ Lawn Fawnatics -Challenge 170 - Patterned Paper ♥

 Hi everyone,

 I wish you a happy Friday and I'm really glad to see you here again on my blog.

Today I show you my next two cards for the current 

Lawn Fawnatics Challenge 170 - Patterned Paper

 For my cards I use the Giant Happy Birthday and the Giant Happy Birthday To You dies and Design paper from the Spiffier Speckles Paper Pad and different rainbow papers from Lawn Fawn.

I start the cards with cutting out the Sentiment dies with the white cardstock and for the last layer the rainbow and the Spiffier Speckles design papers.


After that I create many backgrounds with Brusho and Nuvo Shimmer powders and let them dry. After they're dry I had to iron them until the're smooth. Then I apply some golden Coliro Pearlcolor on the backgrounds and let them dry again.


Then I stamp many images from the Tiny Birthday stamp set, the Birthday Unicorn and the Birthday Panda and color them with my Copic Marker and fussy cut them out with my scissors.

 Then I create the first two cards and Im really happy how they looks like.


With my cards I'll take part of the current challenge

Lawn Fawnatics Challenge 170 Patterned Paper

 Many thanks for stopping by and I hope to see you soon here on my blog. Have a great day.

Samstag, 23. März 2024

♥ Frühlings / Oster Challenge Instagram - vierte Karte mit Sizzix Dies / Frühlingskranz ♥

Hallo Ihr Lieben,

ich wünsche Euch einen schönen Samstag und freue mich sehr, dass Ihr heute wieder hier auf meinem Blog vorbei schaut.

Heute am Samstag ist es wieder Zeit für die neue Instagram Challenge.

Thema Frühling / Ostern

Für meine Karte habe ich mich für eine Frühlingskarte entschieden. Für die Karte bzw. den Frühlingskranz habe ich Stanzen von Sizzix / Tim Holtz verwendet und viele verschiedene Farben / Puder / Spray Farben verwendet. Unter anderem Nuvo Shimmer Powder und Brusho Puder, Distress Oxide Spray, Distress Mica Stain. 

Für den Hintergrund habe ich ein Stück Distress Watercolor Cardstock mit Nuvo Shimmer Atlantis Burst Powder und Wasser eingefärbt, trocknen lassen und anschließend mit der Double Stitched Rectangle Stanze von My Favorite Things ausgestanzt. Für den Kranz habe ich Distress Watercolor Cardstock mit Distress Oxide Scorched Timber eingefärbt und nach dem trocknen mit der Kranz Stanze ausgestanzt. Die Blumen und Blätter habe ich mit verschiedenen Brusho und Nuvo Puder eingefärbt, trocken lassen und dann ausgestanzt.


 Die Blumen und Blätter habe ich dann auf den Kranz geklebt und anschließend den Kranz auf den getrockneten Hintergrund. Für den Text habe ich Stempel von Lawn Fawn verwendet, ausgestanzt und mit Foam Tape aufgeklebt. Anschließend habe ich den Hintergrund auf meine weiße Grundkarte geklebt und zum Schluss noch farbige Perlen aufgeklebt.

Ich hoffe meine Karte gefällt Euch und Ihr schaut mal auf Instagram bei all den schönen Beiträgen vorbei.

Nun wünsche ich Euch noch einen schönen Samstag, Tschüssi und bis morgen.

Sonntag, 24. September 2023

♥ DT Stamp Corner - Herbstliche Grüße / Release Vorschau ♥

Hallo ihr Lieben,

ich wünsche Euch einen schönen Sonntag und freue mich sehr, dass Ihr heute wieder hier auf meinem Blog vorbei schaut.

Es dauert nicht mehr lange und es zieht ein neuer Release in den Stamp Corner Online Shop ein. Heute zeige ich Euch auf dem Stamp Corner Blog eine Karte bei der ich ein neues Motiv verwendet habe. Das Motiv ist aus einem Set, welches in Zusammenarbeit mit Stuff-Deluxe entstanden ist.

Für die Karte habe ich ein Stück Bristol Cardstock mit den Distress Oxides Faded Jeans und Speckled Egg eingefärbt. Darüber habe ich ein Regentropfen Stencil von Lawn Fawn gelegt und darauf die Nuvo - Glacier Paste Frostbite mit einem Spatel aus dem Hobby & Crafting Fun - Painting Knives Set 5 Spatel Set aufgetragen und trocknen lassen.

In der Zwischenzeit habe ich das süße Mädchen mit dem Regenparka und dem Schirm auf ein Stück Perfect Coloring Paper gestempelt, mit Copics koloriert, mit der Schere ausgeschnitten und zur Seite gelegt.

Anschließend habe ich den getrockneten Hintergrund mit der Stamp Corner - A6 DIE - Wonky ausgestanzt und mit CraftEmotions - 3D Foam Tape 2 mm auf ein Stück Perfect Colouting Paper geklebt, welches ich mit der größten Stanze aus dem Stamp Corner - A6 DIE - Wonky Set ausgestanzt habe.

Auf die weiße Grundkarte habe ich noch ein Stück Perfect Colouring Paper geklebt, bei dem ich den Rand mit dem Copic BG11 eingefärbt habe. Darauf habe ich die ausgestanzten Hintergründe mit dem Tombow - Multi Talent Liquid Glue aufgeklebt. Das süße Mädchen mit dem Regenparka habe ich mit dünnen Foam Dots mittig aufgeklebt. Drumherum habe ich ein ausgestanztes Oval aus Vellum aufgeklebt. Darauf habe ich noch Enamel Dots aufgeklebt, die ich mit den farblich passenden Copics eingefärbt habe. Den Text findet Ihr ebenfalls in dem neuen Stempelset.

Nun wünsche ich Euch noch einen schönen Sonntag, Tschüssi bis nächste Woche.

Sonntag, 21. Mai 2023

♥ DT Stamp Corner - Dein Herz ist bei mir sicher ♥

 Hallo Ihr Lieben,

ich wünsche Euch einen schönen Sonntag und freue mich sehr, dass ihr heute wieder hier auf meinem Blog vorbei schaut.

Heute zeige ich Euch auf dem Stamp Corner Blog eine Karte mit dem süßen Stamp Corner - Stempelset - Glücksdrache, welches in Kooperation von Stamp Corner und Peaky Needles enstanden ist. Für die Karte habe ich ein Stück Bristol Cardstock mit der Wave Stanze ausgestanzt und mit Distress Oxide Tumbled Glass eingefärbt. Anschließend habe ich das Wolkenstencil von Lawn Fawn über den Hintergrund gelegt und mit Distress Oxide Peacock Feathers die Wolken aufgetragen. Dann habe ich die Wolken mit einer Stanze von Lawn Fawn aus Perfect Colouring Paper ausgestanzt und auf den Hintergrund geklebt.

Den süßen Drachen habe ich mit Copics koloriert, mit der Schere ausgeschnitten und mit Foam Dots aufgeklebt. Das süße Mädchen ist aus einem älteren My Favorite Things Stempel Set und ist ebenfalls mit Copics koloriert, ausgeschnitten und mit Foam Dots aufgeklebt. Den Text der sich ebenfalls im Glücksdrachen Stempel Set befindet, habe ich mit einer Stempelhilfe direkt in die Wolken gestempelt. Ein paar Simple and Basic - Enamel Dots Mint habe ich noch auf die weißen Wolken geklebt und im oberen Teil noch ein paar Nuvo Crystal Clear Drops aufgetragen, sowie kleine gestanzte Herzen. Zum Schluss habe ich alles auf meine weiße Grundkarte geklebt.

Nun wünsche ich Euch noch einen schönen Sonntag,Tschüssi und bis bald.

Donnerstag, 6. April 2023

♥ My Enchanted Colors - Slimline Birthday Card ♥

 Hi everyone, 

I wish you a happy Thursday and I'm really happy to see you here again on my blog.

Today I show you a slimline rainbow Birthday card with the cute stamps from My Enchanted Colors. I started my card with creating the rainbow background. I cut out a piece of Bristol Cardstock with a Lawn Fawn Slimline die and use the Lawn Fawn Cloudy stencil on the background. For inking I use Distress Oxide Picked Raspberry, Spun Sugar, Dried Marigold, Fossilized Amber, Twisted Citron, Peeled Paint, Tumbled Glass, Mermaid Lagoon, Wilted Violet and Seedles Preserves. If I'm happy with the result, I glue the background on my white card base.


Then I stamp the images on a Copic friendly paper and color all images with my Copic Marker. I fussy cut them out with a scissors and glue them with Foam Dots on the card. For the sentiment I use a stamp from Lawn. For the last step I add some Nuvo Chrystal drops on the background and I'm really happy how the card lokks like.

Many thanks for stopping by and I hope to see you soon here on my blog. Have a great day.

Mittwoch, 11. Januar 2023

♥ DT Christmas Craft Creations Challenge - January Challenge / Snippets ♥

 Hi everyone,

I wish you a happy Wednesday and I'm really glad to see you here again on my blog.

This is really a special posting for me, because it's the first posting as a new Design Team member for the

 Christmas Craft Creations Challenge. 

So now let's start the new chapter and for this month we have the topic

Snippets

 For my DT card I use a leftover from a turquoise background and a leftover piece of a Christmas Text paper from My Favorite Things. I cut these leftovers out with a scalloped die from Stamp Corner and glue them on a white scalloped cutting background. My card base is a little bit smaller and I glue it behind the papers.

The image is a Digital stamp from amandajaynedesigns, you'll find her Etsy Shop here with many cute Digital Stamps. I printed out the image on a piece of Copic friendly paper and use my Copics for coloring. Then I fussy cut it out with my scissors and glue it with Foam tape on the card. I stamp a sentiment from Lawn Fawn with my Misty Tool directly on the card. for the last step I glue some color matching pearls on the card and I'm really happy how the card looks like.♥ 

So now it's your turn, I can't wait to see your creations and we hope you join our new challenge.
Many thanks for stopping by and I hope to see you soon here on my blog.Have a great day.

Freitag, 23. Dezember 2022

♥ ATC Advent calendar - Day 23 with My Favorite Things stamps ♥

 Hi everyone,

 I wish you a happy Friday and I'm really glad to see you here again on my blog.

Today and I show you my ATC for Day 23 of the ATC Advent calendar.

For this day I use the cute reindeer stamps from My favorite Things. I create a watercolored background with my Kuretake Gansai Tambi Watercolors and add some white color splashes on the background.


I cut out a hill with the forest border die from Lawn Fawn and glue it on the background. I also cut out a smaller snow hill with a die from My Favorite Things and glue it on the forest border hill. I stamp the sentiment directly on the background. I color the cute reindeers with my Copics, fussy cut them out with my scissors and glue them with Foam Dots on the background. For the last step I add some Nuvo Crystal drops on the background.
 
Many thanks for stopping by and I hope to see you soon here on my blog. Have a great day.

Dienstag, 20. Dezember 2022

♥ ATC Advent calendar - Day 20 with Lawn Fawn ♥

 Hi everyone,

I wish you a happy Tuesday and I'm really happy to see you here again on my blog.

Today I show you the ATC 20 from my ATC Advent calendar.

For DAY 20 I use again stamps from Lawn Fawn.

For this ATC I create a background with Distress Oxide Evergreen Bough. I cut out a snow hill with a die from My Favorite Things and glue it on the background. I stamp the images from Lawn Fawn on a Copic friendly paper and use my Copics for coloring. I fussy cut them out with my scissors and glue them on the background. I stamp the sentiment with my Misti Tool directly on the snow hill. For the last step I add some Nuvo Crystal Drops on the background.
 
Many thanks for stopping by and I hope to see you soon here on my blog. Have a great day.

Montag, 19. Dezember 2022

♥ ATC Advent calendar - Day 19 with Lawn Fawn ♥

 Hi everyone,

I wish you a happy Monday and I'm really glad to see you here again on my blog.

Today I show you the ATC 19 from my ATC Advent calendar.

For DAY 19 I use again stamps from Lawn Fawn.

I create a Distress Oxide background with Faded Jeans and add some Nuvo Crystal Drops on the background. I cut out a snow hill with a My Favorite Things die and I cut out a tree forest border hill and glue both on the background. I color all images from Lawn Fawn with my Copics and glue them with liquid glue on the background. For the last step I add some Nuvo Crystal Drops on the background.
 
Many thanks for stopping by and I hope to see you soon here on my blog. Have a great day.

Sonntag, 18. Dezember 2022

♥ ATC Advent calendar - Day 18 with Lawn Fawn ♥

 Hi everyone,

I wish you a happy Sunday and I'm really glad to see you here again on my blog.

Today I show you the next ATC from my ATC Advent calendar.

For DAY 18 I use stamps from Lawn Fawn.

I create a Distress Oxide Tumbled Glass background and add some Nuvo Crystal Drops on the background. I cut out a snow hill with a My Favorite Things die and glue it on the background. I color all images from Lawn Fawn with my Copics and glue them with Foam tape on the background. I stamp the sentiment with my Misti Tool directly on the background. 
 
Many thanks for stopping by and I hope to see you soon here on my blog. Have a great day.


Samstag, 17. Dezember 2022

♥ ATC Advent calendar - Day 17 with Magengo Designs ♥

 Hi everyone,

I wish you a happy Saturday and I'm really glad to see you here again on my blog.

Today I show you the next ATC's from my ATC Advent calendar.

Day17

 For Day 17 I use stamps from the Magengo Designs Santa on the rooftop stamp set.


I create a Tumbled Glass Distress Oxide background. I cut out a snow hill with a My Favorite Things die and use also a dot embossing folder. Then I cut out another border with the tree border die from Lawn Fawn and glue both on the background. I color the images with my Copics, fussy cut them out with my scissors and glue them with Foam Dots on the background. You'll find the sentiment also in the stamp set. For the last step I add some clear Nuvo Crystal Drops on the sky.

I'll hope you like this ATC and you'll come back tomorrow for the next ATC from the Advent calendar.

Many thanks for stopping by and I hope to see you soon here on my blog. Have a great day.

Montag, 5. Dezember 2022

♥ ATC Advent calendar - Day 5 with Purple Onion Designs ♥

 Hi everyone,

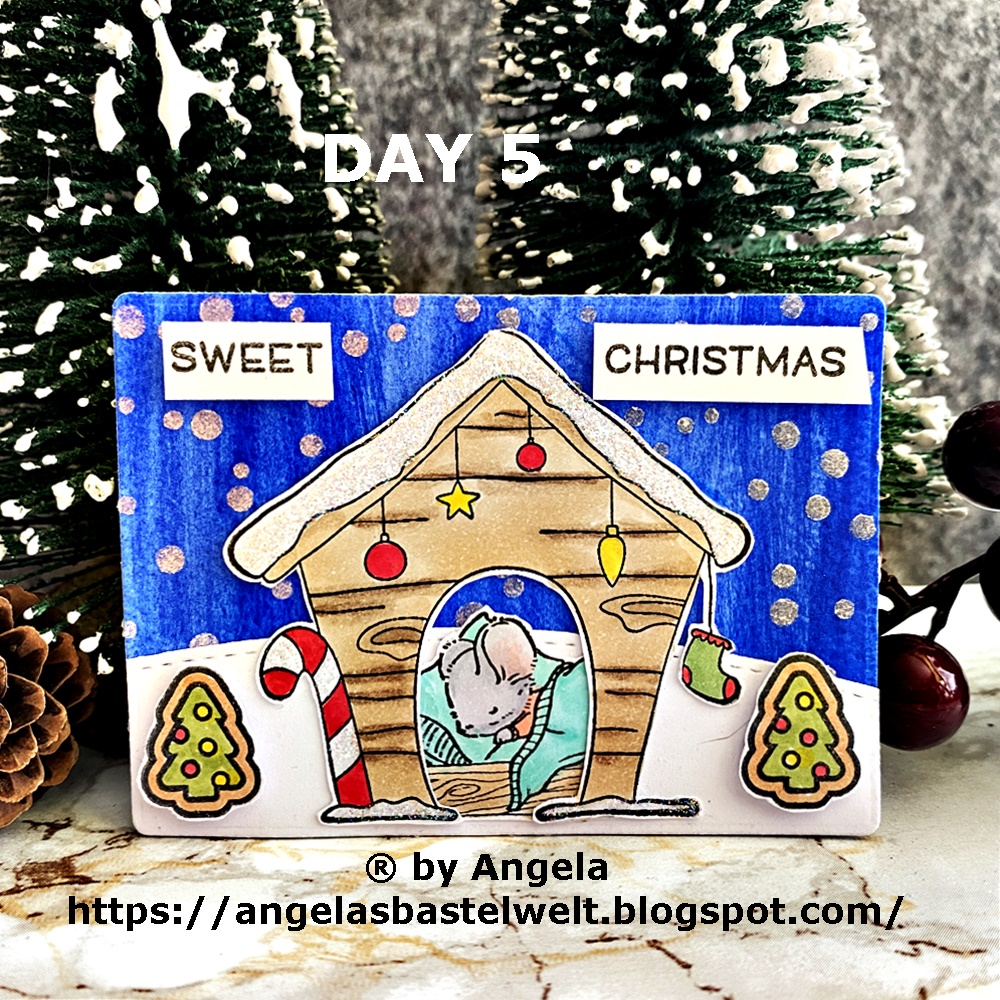
this is my third posting for today and I show you my ATC for Day 5 of the ATC Advent calendar.

For this day I use the cute stamps from Purple Onion Designs. You'll find many stamps here by Stamp Corner.

For this ATC i start creating a watercolor background with my Kuretake Gansai Tambi Watercolors an let it dry. When it is dry I lay a snow fall stencil over the background and add some Nuvo Glacier Paste Winter White on the background and let it dry. In the meanwhile I stamp the images from Purple Onion Designs, color them with Copics and fussy cut them out with my scissors.

I cut out a snow hill with a die from My Favorite Things and glue it on the background. I glue the sleeping mouse behind the Fido's House and then on the snow hill. I glue Christmas tree cookies from Lawn Fawn with Foam Dots besides the dog house. On the top of the little house I add some Stickles Star Dust for shimmering. I think the sentiment is also from Lawn Fawn.
 
Many thanks for stopping by and I hope to see you soon here on my blog. Have a great day.

Sonntag, 27. November 2022

♥ DT Stamp Corner - Winter / Weihnachts / Silvester Tags ♥

 Hallo Ihr Lieben,

ich wünsche Euch einen schönen Sonntag und freue mich sehr, dass Ihr heute wieder hier auf meinem Blog vorbei schaut.

Heute bin ich wieder an der Reihe Euch eine Inspiration auf dem Stamp Corner Blog zu zeigen. Dafür habe ich eine der neuen Stanzen und einen neuen Stempel verwendet, die es ab dem 01.12.2022 im Shop geben wird. Ihr dürft gespannt sein.

Die Tags habe ich ausgestanzt und mit den verschiedenen Motiven dekoriert und gestaltet. 

Bei dem linken Tag habe ich den Hintergrund mit Aquarellfarbe eingefärbt und nachdem trocknen die Nuvo Glacier Paste Winter White aufgetragen und trocknen lassen. In der Zwischenzeit habe ich den süßen Pinguin aus dem Geschenkebox Set gestempelt, mit Copics koloriert und ausgeschnitten. Auf den Rand der Mütze und auf die Bommel habe ich etwas Stickles Star Dust aufgetragen. Den Schneehügel habe ich mit einer Stanze von My Favorite Things ausgestanzt und mit einem Punkte Embossingfolder geprägt. Der Text ist ebenfalls in dem Stempel Set enthalten.

Für das mittlere Tag habe ich verschiedene kleine weihnachtliche Motive auf ein Stück Perfect Colouring Paper gestempelt, mit Copics koloriert und mit der Tag Stanze ausgstanzt. Der süße Hase und der Text ist aus dem Hasenküche Set und ist ebenfalls mit Copics koloriert und ausgeschnitten.

Auf dem rechten Tag seht Ihr eine weitere Neuheit, die am 01.12.2022 einziehen wird. Die süße Ernestine von Oma Plott hat es sich in dem Martini Glas bequem gemacht und stimmt sich schon mal auf den Jahreswechsel ein. Die Motive habe ich auf einem Stück Bristol Paper mit dem VersaMark Embossingkissen gestempelt und mit weißem Embossingpulver heiß embosst. Zum einfärben habe ich Distress Oxide Peacock Feathers verwendet und kleine Glitzersteinchen aufgeklebt.

Alle Motive habe ich mit Foam Dots auf die Tags geklebt. Am oberen Rand habe ich noch ein Eyelet für ein dünnes Band angebracht.

Nun wünsche ich Euch noch einen schönen Sonntag, Tschüssi bis bald.

Materialliste:

.

Sonntag, 9. Oktober 2022

♥ DT Stamp Corner - Let it Snow Drache ♥

 Hallo Ihr Lieben,

ich wünsche Euch einen schönen Sonntag und freue mich sehr, dass Ihr heute wieder hier auf meinem Blog vorbei schaut.

Heute zeige ich Euch auf dem Stamp Corner Blog eine Karte mit dem süßen Drachen aus dem Stamp Corner - Stempel Set - Schnubbis. Der kleine Drache hat sich richtig dick angezogen, damit er nicht so friert bei den vielen Schneeflocken die vom Himmel fallen. Für den Karten Hintergrund habe ich ein Stück Bristol Paper mit Distress Oxide Peacock Feathers und Salvaged Patina eingefärbt und mit der Stamp Corner - A6 DIE - Wave ausgestanzt. Anschließend habe ich das Snowy Sky Stencil von Lawn Fawn über den Hintergrund gelegt und die Nuvo - Glacier Paste Winter White mit einem Spachtel aufgetragen und trocknen lassen.

In der Zwischenzeit habe ich den süßen Drachen auf das Perfect Colouring Paper gestempelt, mit Copics koloriert und mit der Schere ausggeschnitten. Nachdem die Glacier Paste getrocknet war, habe ich den Hintergrund quer durchgeschnitten und die eine Hälfte auf einen weißen ausgestanzten Hintergrund geklebt und anschließend auf meine weiße Grundkarte geklebt. Den  Drachen habe ich dann mit Foam Dots auf den Hintergrund geklebt. Den Text habe ich auf einen schwarzen schmalen Streifen Cardstock mit dem VersaMark Stempelkissen gestempelt, mit weißem Embossingpulver heiß embosst und ebenfalls mit Foam Dots auf den unteren Teil der Karte geklebt. Zum Schluß habe ich noch farblich passende Perlen aus meinem Bestand aufgeklebt.

Nun wünsche ich Euch noch einen schönen Sonntag, Tschüssi bis bald.

Donnerstag, 4. August 2022

♥ Newtons Nook Designs - Abkühlung gefällig?/ Slimline Eiskarte ♥

 Hallo Ihr Lieben, 

ich wünsche Euch einen schönen Donnerstag und freue mich sehr, dass Ihr heute wieder hier auf meinem Blog vorbei schaut.

Heute zeige ich Euch eine Karte mit Stempeln aus dem Summer Scoops Set von Newtons Nook Designs. Da ich unbedingt die kleinen Eis am Stil verwenden wollte und sie in Regenbogenfarben colorieren wollte, habe ich die Stamp Corner - Slimline DIE - Deckle Edge verwendet. Für den Hintergrund habe ich ein Stück Bristol Paper  mit Distress Oxide Salvaged Patina eingefärbt und anschließend mit der Deckle Edge Stanze ausgestanzt.

Zusätzlich habe ich noch goldene und mint farbene Kleckse mit den Coliro Pearlcolors aufgetragen und trocknen lassen. In der Zwischenzeit habe ich die Eis am Stil mit Copics coloriert und mit der Schere ausgeschnitten. Den Hintergrund habe ich danach auf einen weißen gestanzten Hintergrund geklebt. Die Grundkarte ist etwas kleiner. Der Text ist aus dem Love & Chocolate und aus dem Summer Scoops Set. Beide Texte habe ich mit weißem Embossingpulver auf schwarzem Cardstock heiß embosst. Die Regenbogen Eis am Stil habe ich mit Foam Tape aufgeklebt. Zum Schluss habe ich noch ein paar Nuvo Crystal Clear Drops aufgetragen.

So nun sage ich Danke für Euren Besuch und ich hoffe Euch gefällt meine heutige Karte.

 Ich wünsche Euch noch einen schönen und kreativen Tag.

Tschüssi und bis bald.
 

Montag, 7. März 2022

♥ DT AAA Birthday Challenge - Game #35 Under the Sea ♥

 Hi everyone, 

I wish you a happy Monday and I'm really glad to see you here again on my blog.

Today we start a new challenge at the

AAA Birthday Challenge 

with the topic


For my card I create a Under the Sea Birthday scene with some Lawn Fawn stamps.

I start my card with creating the background. I use the Nuvo Shimmer Powder Atlantis Burst and Blue Blitz  on a piece of watercolor paper and create the under the sea background. I cut out the background with the Stamp Corner Deckle Frames Die. For the sand hill on the bottom of my card I inked a piece of Neenah Desert Storm cardstock with Distress Ink Tea Dye and add some golden, brown, white and golden splashes on the cardstock. If the splashes are dry I cut out the sand hill with a die from Lawn Fawn and the Deckle Frames die from Stamp Corner. I glue the background on my white card base. I color all Lawn Fawn images with my Copics and fussy cut them out with a scissors. I glue some images with liquid glue and some with Foam Dots on the card. I stamp the sentiment with my Misti Tool on the background. For the last step I glue some clear drops on the card and I'm really happy how it looks like.

 Many thanks for stopping by and I hope to see you soon here on my blog. Have a great day. 


Dienstag, 25. Januar 2022

♥ Lawn Fawn - Let it Snow ♥

 Hallo Ihr Lieben,

ich wünsche Euch einen schönen Dienstag und freue mich sehr, dass Ihr heute wieder hier auf meinem Blog vorbei schaut.

Heute zeige ich Euch eine weitere Winterkarte, diesmal mit Stanzen und Stempeln von Lawn Fawn. 

Für den Hintergrund habe ich ein Stück Aquarellpapier mit Wasser angefeuchtet und dann die Nuvo Shimmer Powder Blue Blitz und Atlantis Burst  aufgetragen. Da mir der fleckige Hintergrund nicht ganz so gefallen hat, habe ich die Farbe mit einem Pinsel gleichmäßig auf dem Papier verteilt, bis ich mit dem Ergebnis zufrieden war. Nach dem das Papier getrocknet war, habe ich ein Stencil aus dem Snowflake Background Stencil Set von Lawn Fawn über dem Papier mit Washi Tape fest geklebt und mit einem Spachtel die Altenew weiße Embossingpaste aufgetragen.

Nachdem die Embossingpaste getrocknet war, habe ich alles mit einer rechteckigen Stanze von Lawn Fawn ausgestanzt und auf dunkelblauen Shimmer Cardstock und anschließend auf meine weiße Grundkarte geklebt. Der Schriftzug Let it Snow ist von Lawn Fawn. Ich habe ihn mehrmals aus Cardstock Resten ausgestanzt und zum Schluss den dunkelblauen Shimmer Cardstock etwas versetzt aufgeklebt und anschließend mittig auf die Karte geklebt. Die beiden kleine Elfen sind aus dem Frosty Fairy Firends Set von Lawn Fawn, koloriert habe ich die Motive mit Copics. Zum Schluss habe ich noch ein paar farblich passende Glitzersteine aufgeklebt.

Nun sage ich Danke für Euren Besuch und wünsche Euch noch einen schönen kreativen Tag. Tschüssi und bis bald.

Montag, 9. August 2021

♥ DT Magengo - You are sea-mazing card ♥

 Hi everyone,

I wish you a happy Monday and I'm really glad to see you here again on my blog.

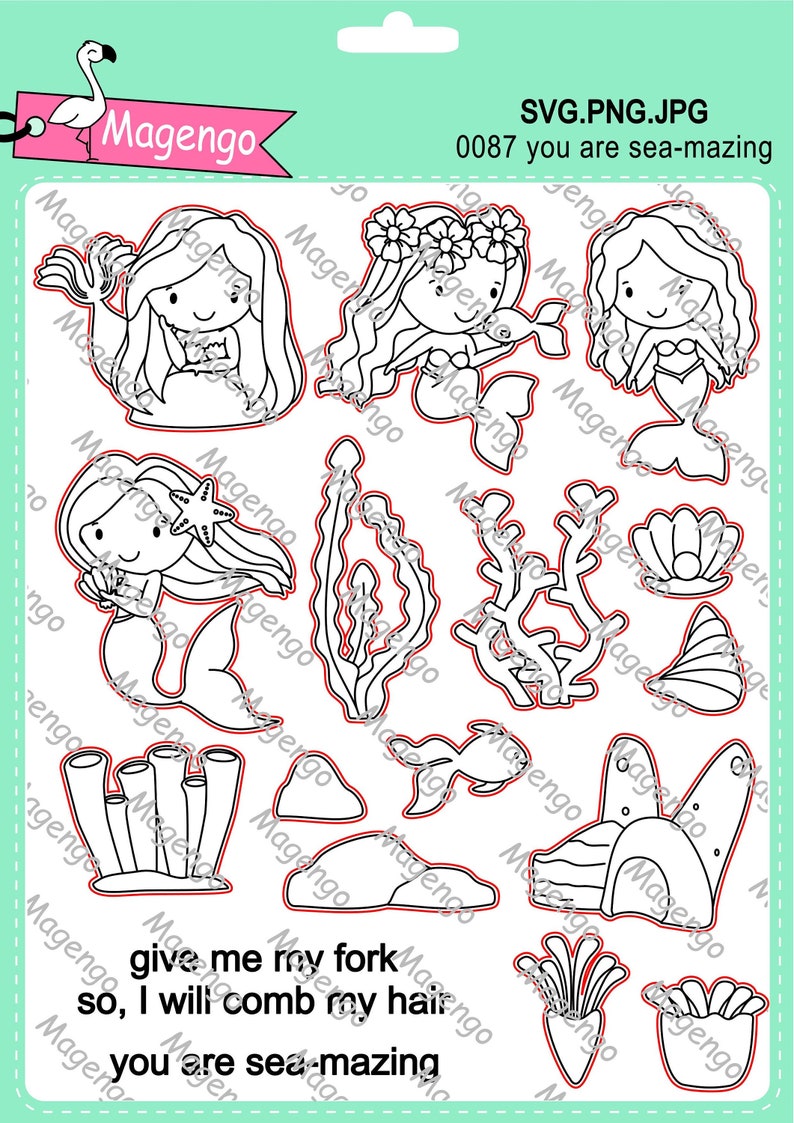
 Today I show you on the Magengo Design Blog a card with the cute You are sea-mazing digital stamp set.

I start my card as always with printing out the images with my laser printer. I color them with my Copics and fussy cut them out with a scissors. For my background I inked a piece of Bristol Smooth cardstock with Distress Oxide Tumbled Glass. Then I use a Mermaid Scale Stencil and inked the background again. I arrange my images on the background and glue some with liquid glue and some with Foam Tape on the background. Then I cut out a white scalopped frame and glue it on the background. I cut out another card panel and inked it with Distress Oxide Tumbled Glass and Mermaid Lagoon and glue it on my white card base. I stamp a sentiment from a Lawn Fawn set with my Misti Tool directly on my card and glue my mermaid scene on the blue card panel. For the last step I apply some clear Nuvo drops on the background.

You find the You are sea-mazing set here in the Magengo Etsy shop.

Meerjungfrau Briefmarken Svg-Dateien druckbare Foto Bild 0

Many thanks for stopping by and hope to see you soon here on the blog.