Posts mit dem Label Guest Design werden angezeigt. Alle Posts anzeigen

Freitag, 26. April 2024

♥ Gerda Steiner Designs - Let the sun shine on you! GD card ♥

 Hi everyone,

 I wish you a happy Friday and I'm really glad to see you here again on my  blog.

Today I have the honor to show you my guest design card on the Gerda Steiner Designs Blog. For this card I use the cute Gerda Steiner Designs digital stamp Happy Birthday birds.


I start my card as always with creating the background. I cut out a piece of Bristol cardstock with a rectangle stitched die and use Distress Oxide Fossilized Amber for inking. After that I lay a Sunray stencil over the rectangle and inked it with Distress Oxide Dried Marigold.

 I printed out the digital stamp on a Copic Marker friendly paper and color the digital stamp with my Copic Marker

.Let the sun shine on you!
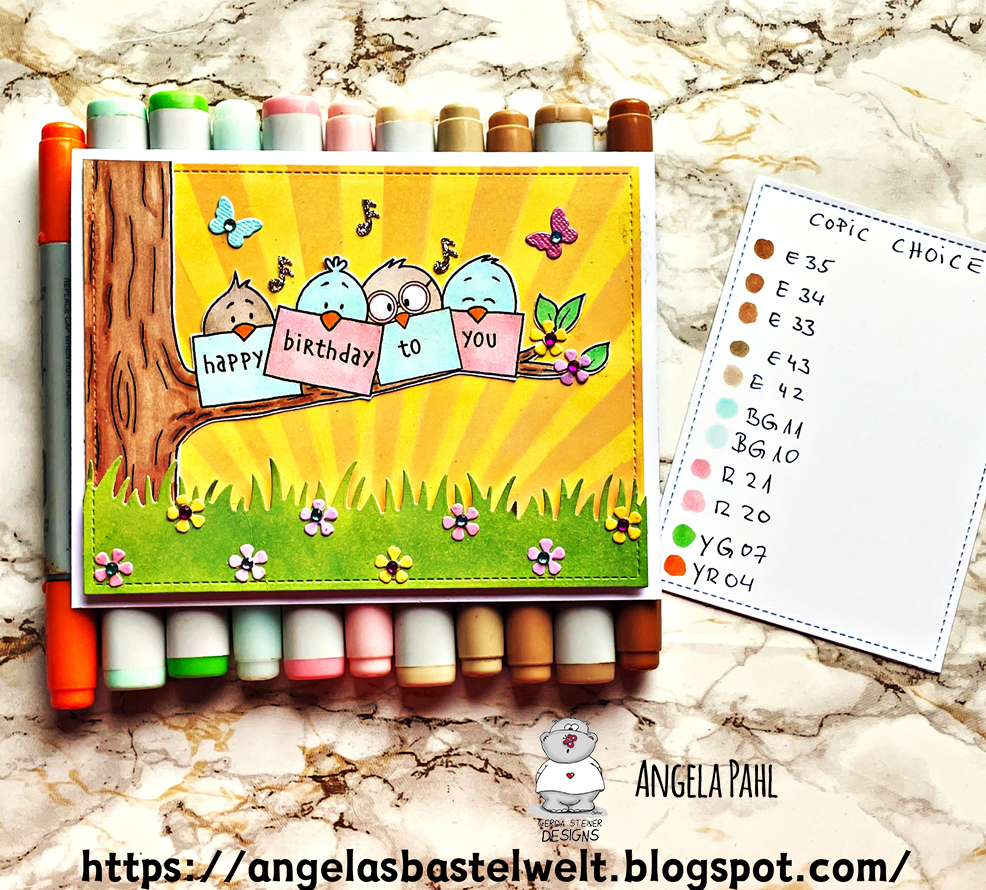
E35/34/33       E42/43

BG10/BG11      R 20/21

YG 07            YR 04

After I’m happy with the result I fussy cut out the image with my scissors and glue it on my background. Then I cut out a grass border and inked it with Distress Oxide Twisted Citron and Peeled Paint. I glue the grass border at the bottom of the background and then all on my white card base. I also glue some tiny flowers on the grass and some butterflies over the birds and decorate them with some rhinestones. For the last step I glue three golden glitter notes over the birds.

 Many thanks for stopping by and I hope to see you soon here on my blog. Have a great day.

Montag, 5. August 2019

♥ Gastdesign Stempelgarten - Sonne, Strand und Meer ♥

Hallo Ihr Lieben,
ich wünsche Euch einen schönen Montag und freue mich sehr, dass Ihr heute wieder auf meinem Blog vorbei schaut.

Heute startet eine neue Challenge auf dem Blog von 
Stempelgarten Challenge

Logo
Das Thema für die August Challenge lautet:
Sonne, Strand und Meer 
 Da ich bei der letzten Challenge als Top 1 ausgewählt wurde, darf ich das Team heute als Gastdesigner unterstützen. *juchu*

Für den Gewinner gibt es ein Bastelset im Wert von über CHF 20.00 zu gewinnen.
Ich habe für meine Karte das Stempelset Smooth Sailing von Lawn Fawn verwendet und eine Interaktive Karte gewerkelt.
 Für den Hintergrund habe ich die Distress Oxides Fozzilized Amber, Dried Marigold und Picked Raspberry verwendet. Außerdem habe ich Stanzen von Lawn Fawn und My favorite Things verwendet. 

Mit meiner Karte nehme ich an folgenden Challenges teil:

CCC Digi Creations: CH #106 Summer

Lemon Shortbread Challenge: CH #99 Anything Goes

Crafty Friends: CH #115 Summer Colours

 Nun sage ich Danke für Euren Besuch und wünsche Euch noch einen schönen Tag.Tschüssi bis bald.


Donnerstag, 5. Oktober 2017

♥ Craftin Desert Divas - Fifth Guest Designing with 3 Harvest WishesTags ♥

Hi everybody,
I wish you a happy Thursday and I'm really glad to see you here again on my blog.

Today I show you my last project as a Craftin Desert Divas guest designer for the stamp team.
For my last project I've decided to make some tags with the Shaker Tag Dies and the cute Harvest Wishes stamp set. 

I've stamped many images from the Harvest Wishes stamp set and cut them out with my scissors. I've cut out three tags with the Shaker Tag Dies and draw the outline from the tag die on another pieces of black cardstock.
For the first tag I made a Distress Oxide background with Salty Ocean and Peeled Paint and splash some water drops on the background. I've cut out the tree with the Outdoor Landscape 2 dies, inked it with Distress Ink Tea Dye, glue it on my background and positioned my images on this tag.
For the second tag I stamp the cute little mice in the middle on the tag and some leaves from the Timber stamp set around the images. I've colored all images with my Copic markers and glue some Glossy Accents on the leaves. For the sentiment (which is also included in the Harvest Wishes stamp set) I cut out a banner with the Flag Banner Dies and glue it on my tag.
For the last tag I decided to make a shaker tag with a Distress Oxide background. I cut out a little square in the middle of the tag (which is also included in the Shaker Tag Dies) and glue some acetate on the background. I filled the shaker element with some sequins from the Fall Harvest Sequins set and glue the shaker element with Fun Foam on my background tag.
I decided to use the two little mice with the pumpkins and two owls and positioned them on the shaker tag. I've distressed all borders from the black cardstock.
So these are my last projects as as Craftin Desert Divas guest designer for the stamp team.

 Here I show all my projects which I made with the Harvest Wishes Stamp Set.
I would like to thank Tara, the owner from Craftin Desert Divas so much for this wonderful chance to be a guest designer of the stamp team. I'll have so many fun to create these projects and it was really a big honor to be a guest designer for the Craftin Desert Divas stamp team.♥♥♥

Mittwoch, 4. Oktober 2017

♥ Craftin Desert Divas - Fourth Guest Designing with Harvest Wishes Stamp Set

Hi everbody,
I wish you a wonderful wednesday and I'm very happy to see you here again on my blog.
Today I show you my fourth card as a Craftin Desert Divas guest designer for the stamp team.

For this card I decided to make a card with many pumpkin images from the Harvest Wishes Stamp Set.
For the background I colored a piece of Canson Watercolor Paper with my Kuretake Gansai Tambi Watercolors in blue and another piece of the Watercolor paper in green and let them dry. Meanwhile I colored all my Harvest Wishes images with Copic and Spectrum Noir Markers and cut them out.
I think it would be fun to use the hill die from the Fall Border Dies and for the grass a die from the Outdoor Landscape 2 Dies. I cut them out and glue them on my blue background. The tree is also a die from the Outdoor Landscape 2 Dies. I ink the tree with Distress Ink Tea Dye and glue it on the left side of my background. I cut out a white frame with the Inside Scalloped Rectangle Dies, glue it on my hillscene and positioned my images on the background. For more dimension I decided to glue the whole scene with Fun Foam on a piece of light green cardstock. The sequins are from the Fall Harvest Sequins set.

I'll hope you like my scene card. Many thanks for stopping by and I'll hope to see you here again soon on my blog.
 

Dienstag, 3. Oktober 2017

♥ Craftin Desert Divas - Third Guest Designing with Pumpkin Spice Scene Card ♥

Hi everybody,
I'm very happy to see you here agian on my blog. Today we celebrate here in Germany the German Day of Unity and so thats a great day to relax and create some stamping cards.

Today I show you my third card as a Craftin Desert Divas guest designer for the stamp team.
 For this card I decided to make a little stamping scene with the Harvest Wishes stamp set and the Inside Scalloped Rectangle Dies.
I've stamped my little scene on a piece of copic paper and colored the images from the Harvest Wishes stamp set with my Copic and Spectrum Noir Markers. For the frame I've colored a piece of Canson Watercolor Paper with Kuretake Gansai Tambi Watercolors and let it dry. After that I cut out the frame with the Inside Scalloped Rectangle Dies and glue it with some Foam Tape on my scene. The sentiment is also in the Harvest Wishes stamp set. I cut out a banner with the Flag Banner Dies and glue it on my card. For the decoration I use some sequins from the Fall Harvest sequins set.

So I hope you like this scene card.  Many thanks for stopping by and I hope you come back tomorrow for the next guest design post.

Montag, 2. Oktober 2017

♥ Craftin Desert Divas - Second Guest Designing with round Happy Pumpkin Spice Season Card ♥

Hi everybody,
I'm very happy to see you here again on my blog.

Today I show you my second card as a Craftin Desert Divas guest designer for the stamp team.
For my second card I've decided to make a little round card with the Harvest Wishes stamp set and a distress oxide backgrounds.
I've cut out a round circle with the Stitched in Circle Dies. Then I create a grass stencil with the Outdoor Landscape2 Dies and use it for inking the background with Distress Oxide Salty Ocean and Peeled Paint. I've stamped the Harvest Wishes images, colored them with my Spectrum Noir Markers and fussy cut the images out. For the sentiment, which is included in the set, I've used a banner from the Flag Banner Dies. Some sequins from the Fall Harvest Set makes my card perfect.

I'll hope you like this little round card. Many thanks for stopping by and I'll hope to see you here again soon on my blog.

Mittwoch, 27. September 2017

♥ First Guest Designing with Truly grateful for Craftin Desert Divas Stamp Team ♥

Hi everybody,
I'm very happy to see you're here again on my blog.

Today it's a very special posting for Craftin Desert Divas
I'll have the honor to be a Guest Designer for the Stamp Team in September / October.
 I'll show you four projects with the cute stamp set Harvest Wishes from the new September release. Have you see all the cute new release stamp sets and dies?  If not you must hop over to the shop and take a look here at the new products.You will love this new release and especially the Harvest Wishes stamp set, because it's so cute and perfect for your fall/autumn cards.

Okay for my first card I've decided to make a shaker card with the cute little mouse in the middle of the shaker element.
 I've stamped the images from the Harvest Wishes stamp set on my Copic paper, colored it with my Copic markers and cut it out with a circle from the Stitched in Circles Dies. After that I'll do the same and create a frame with the die. I colored the frame also with my Copic markers. On the backside of the frame I've glue a piece of acetate and filled the shaker element with sequins from the Fall Harvest set.  
After that I've create my background, cut out a piece of paper with the Fancy Frame Dies and stamped some leafs from the Timber stamp set on my paper and colored them with my Copic markers. I've cut another circle in the middle of the background and I glue the shaker element  with Fun Foam on my background. And hooray it works.
I've glue the leaf background with Fun Foam on a piece of blue colored paper and glue it on another  piece of light green paper. 
For the sentiment I've cut out a banner with the Flag Banner Dies and colored it with the same green as the green background. Between the leafs of the background I've glue some sequins and finished my card.

I'll hope you'll like my first card as a guest designer for the stamp team. Many thanks for stopping by and I'll hope to see you're here again soon with my next guest designer project.