Posts mit dem Label Coffee Card werden angezeigt. Alle Posts anzeigen

Freitag, 26. März 2021

♥ DT Stamp Corner - Do You Need Coffee ♥

 Hallo Ihr Lieben,

ich wünsche Euch einen schönen Freitag und freue mich sehr, dass Ihr heute wieder hier auf meinem Blog vorbei schaut.

Heute zeige ich Euch auf dem Blog von Stamp Corner eine neue Karte mit dem süßen Kaffee Gnome Stempel von Stamp Corner.

Für die Karte habe ich ein Stück Perfect Colouring Paper mit der größten Stanze der Heffy Doodle Imperial Stitched Rectangle Dies ausgestanzt. Anschließend habe ich das Large Circle Masking Stencil von Time for Tea Designs drüber gelegt und mit Washi Tape befestigt (damit es nicht verrutscht). Dann habe ich über den Kreis noch ein Herzchen Stencil gelegt und den Herzchen Kreis mit Distress Oxide Spun Sugar und dann nochmal mit Picked Raspberry eingefärbt.  Den süßen Kaffee Gnome habe ich mit Copics koloriert, mit der Schere ausgeschnitten und mit Foam Dots mittig auf den eingefärbten Kreis geklebt. Die Buchstaben habe ich mit einer Stanze von C.C. Designs ausgestanzt und flach um den Kreis geklebt. Da mir der farblich passende Cardstock für eine Mattung fehlte, habe ich bei einem Stück Perfect Colouring Paper einfach den Rand mit dem BG11 Copic eingefärbt, das ausgestanzte Rechteck aufgeklebt und anschließend alles auf meine weiße Grundkarte geklebt. Zum Schluss habe ich noch ein paar Papermania Capsule Aqua Glitzersteine aufgeklebt.

Mit meiner Karte nehme ich teil an dem
 
 
Ich sage Danke für Euren Besuch und wünsche ich Euch noch einen schönen kreativen Tag. Tschüssi und bis bald.

Materialliste:

Dienstag, 9. Juni 2020

♥ DT Stamp Corner - Coffee for You / Trinken Meerjungfrauen Kaffee? ♥

Hallo Ihr Lieben,
ich wünsche Euch einen schönen Dienstag und freue mich sehr, dass Ihr heute wieder hier auf meinem Blog vorbei schaut.
 
Heute zeige ich Euch auf dem Blog von Stamp Corner eine Karte bei der ich unbedingt die süße Meerjungfrau von Stamp Corner und die neuen Karin Brushmarker Pro verwenden wollte.
Den Hintergrund habe ich mit den Karin Brushmarker Pro Nr. 654, 621,204 und 264 gestaltet und habe dabei versucht helle und dunklere Streifen wie Strahlen zu malen. Der türkisfarbene Rahmen ist aus dem Lawn Fawn Tropical Shimmer Cardstock und der My Favorite Things Stitched Scallop Rectangle Framed Die-namics ausgestanzt und auf den getrockneten Hintergund geklebt. Für die weiße Grundkarte habe ich das Perfect Colouring Paper verwendet. Zu meiner Meerjungfrau und haben sich noch das Seepferdchen und der kleine pummelige Fisch aus dem Clearstamp Maritim Set 8 gesellt  und genießen zusammen den Kaffee.*hihi* Die Motive habe ich mit Copics coloriert und ausgechnippelt. Da mir der unteren Rand noch etwas leer aussah, habe ich noch kleine Wasserpflanzen, Muscheln, usw. ausgestanzt, coloriert und aufgeklebt. Für den Text habe ich eine Bannerstanze aus meinem Bestand gewählt und mit Foam Dots aufgeklebt.

Nun sage ich Danke für Euren Besuch und wünsche ich Euch noch einen schönen kreativen Tag.
Materialliste:

Mittwoch, 8. Mai 2019

♥ Another Coffee Card with Gracielle Design ♥

Hi everybody,
I wish you a happy Wednesday and I'm really glad to see you here again on my blog.

Today I show you another card for the
 For this card I use a colorful background, which I create with some Brusho Crystal Colours and the Coffee Love Digital Stamp from Graciellie Design.
I add some water on a piece of Bristol Smooth Cardstock and play with some red and yellow Brusho Crystal Colours. If I like the colors of the background I let it dry and printed out the image from the Coffee Love Digital Stamp. I color it with my Copic Markers and cut it out with my scissors. If my background is dry, I cut it oiut with the Torn Paper Die from Craftin Desert Divas. I inked the edges of my card base with a Copic Marker and glue my background on the card base. For a bit dimension I glue the image with Foam Tape on the card. For the sentiment I use a stamp from the Coffee Time Stamp from Waffle Flower. For the final touch I glue some Coffee Break Sequins on my card.

So I'll hope you like my new card like I do.

With this card I'll take part of these challenges:


 Many thanks for stopping by and I hope to see you soon here on my blog.
Have a great day.

Freitag, 3. Mai 2019

♥ Craftin Desert Divas - Spring / Summer Coffee Lover's Blog Hop ♥

 Hi everybody,
I'm here again with my second posting on this day and I'm really glad to see you here again.

 Today starts a Blog Hop at the
There are many wonderful sponsors and so you'll have many chances to win some of the amazing prices. So come on and join this wonderful event.
Craftin Desert Divas take also part of this wonderful Blog Hop as a Sponsor and you'll find many inspiration on Craftin Desert Divas Blog.
 On the Shop you'll find here many Coffee themed Digital Stamps.
For my card I use the Cactus Coffee Mug Digital Stamp and the Cactus Coffee Digital Stamp and create a little sunny Summer Scene.
I start first to create the background. I inked a piece of Bristol Smooth cardstock with Distress Oxide Fossilized Amber. After this I lay the Burst Stencil over the cardstock and inked it again with Fossilized Amber and then with Picked Raspberry. I remove the stencil and let the background dry. Then I stamp some eyes from the Prickly Stamp Set with my Misti Tool in the middle of the burst background. Now I printed out the Cactus Coffee Mug Digital Stamp  and the Cactus Coffee Digital Stamp and color them with my Copics. I also stamp some flowers from the Prickly Stamp Set and color them also with my Markers. I fussy cut out all images with my scissors. Then I cut out a frame with the Inside Scalloped Rectangle Dies and inked it with Distress Oxide Tumbled Glass. I also cut out a border from the Garden Border Dies and color it with my Kuretake Gansai Tambi Watercolors. If the border is dry I glue it on my sunny background and then I glue the background on my white card base. Now I glue my colored images on my card and decide to cut out two clouds with the Puffy Cloud Die. I glue the light blue frame on my sunny scene and glue the sentiment on my card. The sentiment is from the Doodlebug Cream & Sugar Paper Pad. For the final touch I add some NUVO Crystal Drops Morning Dew on the flowers and the Coffee images.

So I'll hope you like my card and enjoy this posting.


With my card I'll take part of these challenges:

 Coffee Loving Cardmaker:  Spring / Summer Blog Hop

Cute Card Thursday: CH #580 Anything Goes

 Crafter's Cafe Challenge: CH #218 Make your own background

Incy Wincy Designs Challenge:  Coffee Tea /Time Challenge

Many thanks for stopping by and I'll hope to see you soon here on my blog.


For my card I use these Craftin Desert Divas products:

As a Design Team Member for Craftin Desert Divas I'm using affiliate links. That means if you buy products using the links, I recieve a small commission, but there are no additional costs for you. Many thanks for your support.


- Cactus Coffee Mug Digital Stamp 
 
- Cactus Coffee Digital Stamp
 
- Prickly Stamp Set 
 
- Inside Scalloped Rectangle Dies
 
- Garden Border Dies
 
- Burst Stencil
 
- Puffy Cloud Die
 
-Distress Oxide Fossilized Amber
 
- Distress Oxide Picked Raspberry

- Distress Oxide Tumbled Glass 
 
- NUVO Crystal Drops Morning Dew

Freitag, 8. Februar 2019

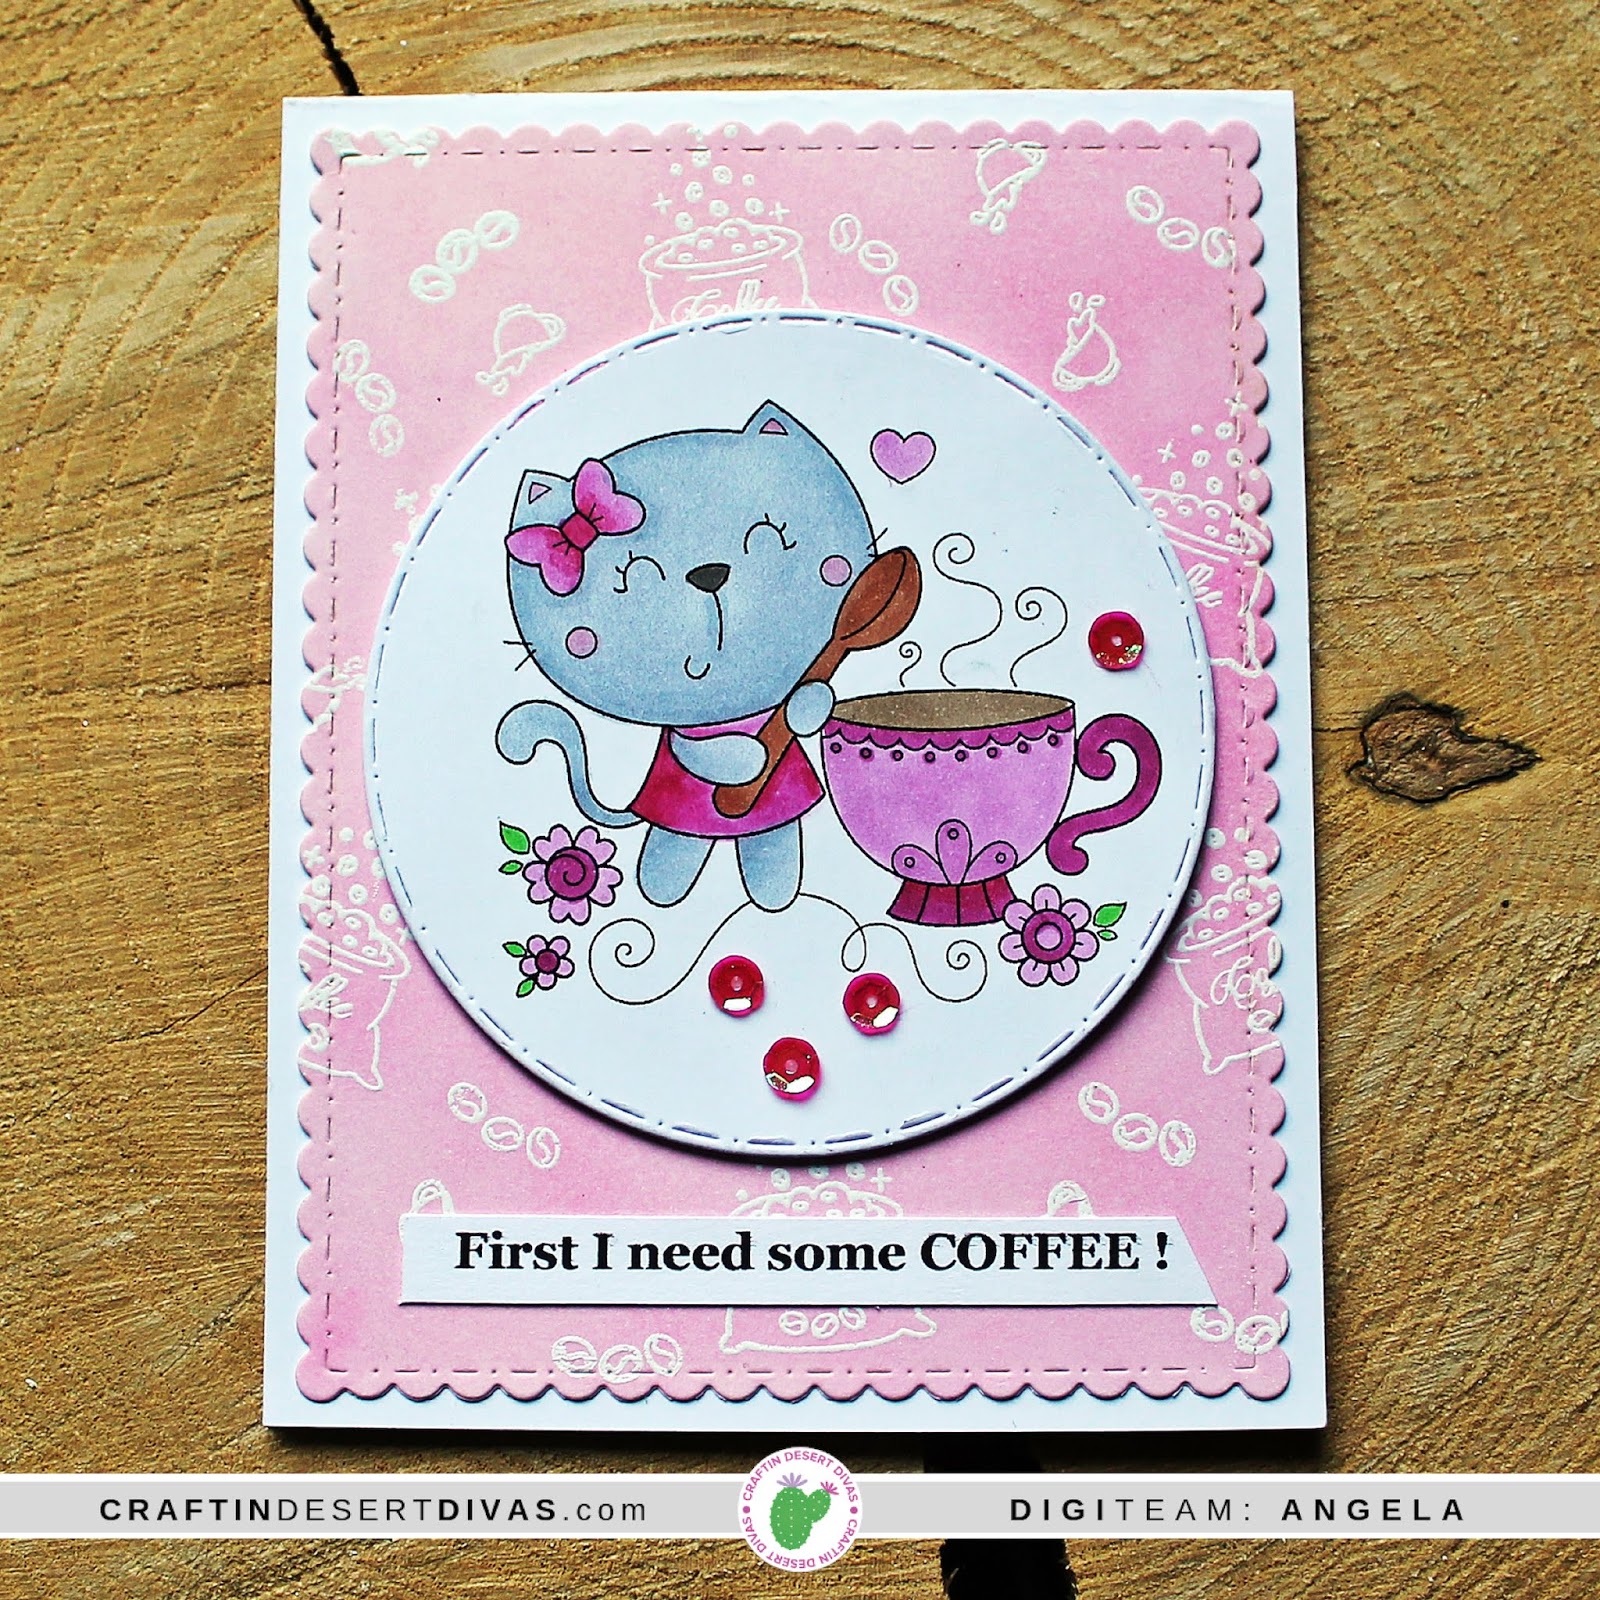
♥ Craftin Desert Divas - Card with Favorite Color Combo / Pink / Red Theme ♥

Hi everybody,
I wish you a happy Friday and I'm really glad to see you here again on my blog.

Today I show you another card with my favorite pink /red color combination. I really love to create backgrounds with Distress Oxides and my favorite pinks are Spun Sugar and Picked Raspberry. These two colors fits perfectly together and so I decided to use them for my card.
 I start first with stamping the tiny little images from Craftin Desert Divas Coffee Wizards Stamp Set. I use a VersaMark Watermark Stamp pad for stamping and white Embossing powder from Ranger for heat embossing.
If it is cooled down I inked my background with Distress Oxides Spun Sugar and Picked Raspberry and let it dry.
 In the meantime I printed out the Coffee Time Kitty Digital Stamp and cut it out with a circle from the Stitched in Circle Dies. For coloring I use the following Copic Markers:
C3,C2, C1, C0
RV 66, RV 19, RV 63
Then I cut out my background with the largest Die from the Fancy Frame Dies and glue it on my white card base.
 I glue my main image with some Foam Tape on my background and glue some Jingle Berries Sequins around the image.  I create the sentiment  on my PC and glue it at the bottom of my card.

 So I hope you like my new card, like I do.
Many thanks for stopping by and I hope to see you soon here on my blog.
 

Dienstag, 8. Januar 2019

♥ Craftin Desert Divas - Clean and Simple Card Design ♥

Hi everybody,
I wish a happy Tuesday and I'm really glad to see you here again on my blog.

Today I show you my first creation in 2019 for Craftin Desert Divas. This week the Design Team shows you Clean and Simple Card Designs.

I decided to make some Clean and Simple Winter Coffee Tags. 
For my tags I ink some Piece of Bristol Cardstock with Distress Oxides Tumbled Glass and Peacock Feathers and add some white Watercolor Splashes. After it is dry I cut them out with the Tag It Dies and with the Shaker Tag Dies.
I printed out the Penguin Coffee Cup Digital Stamp and the Fox Coffee Cup Digital Stamp on a piece of Copic Paper, color it with my Markers and fussy cut them out with my scissors. For a bit dimension I glue the images with Foam Tape on the Tags. On the Top of the Tags I add some large Eyelets and some Yarn and my Tags are ready.

So I really hope you like my Clean and Simple Tags. You find many more inspirations on the Facebook Gallery, hope you'll join us.
Many thanks for stopping by and I hope to see you soon here on my blog.

Samstag, 29. September 2018

♥ Craftin Desert Divas - Coffee Fairy Card for Coffee Loving Cardmakers Blog Hop ♥

Hi everybody, 
here I am again with my second posting today.

Today is the National Coffee Day and it's time for a Blog Hop at the
Coffee Loving Cardmakers
There are many sponsors and so you'll have many chances to win some of the amazing prices. So'll come on and join this wonderful event.
Craftin Desert Divas take also part of this wonderful Blog Hop as a Sponsor and create two super cute new Digital Stamps for this event. 
You'll find many more inspirations with the new Digital Stamps of the Craftin Desert Divas Blog.

I made a card with the new Coffee Fairy Digital Stamp. I'll create a Distress Oxide background with Carved Pumpkin and Abandoned Coral and let it dry. In the meantime I cut out the grass border and the trees from the Outdoor Landscape 2 Dies and inked them also with the Distress Oxides. I also cut out a frame with the Fancy Frame Dies from a piece of Neenah Desert Storm Cardstock and glue it with the grass and the trees on my background. After this I glue it all with Tonic Craft Tacky Glue on my white card base.
Now it's time to print the image on a piece of Copic Paper. I colored the image with my Copic Marker and fussy cut it out with my scissors. I glue the image on my card and cut out a banner from the Flag Banner Dies for the sentiment which you find also in the Fairy Coffee Digital Stamp Set. For an interesting look I inked the banner with Distress Ink Vintage Photo and glue it on my card. For the final touch I glue some Pumpkin Spice Sequins on my card and that's it.
So I'll hope you like my card and enjoy this posting. 

 With my card I'll take part of these challenges:

Crafty Cardmakers: CH #18 Autumn Colors

 Crafty Gals Corner: CH #175 Anything Fall Goes

4 Crafty Chicks: CH #422 Happy Fall Y'all

Many thanks for stopping by and I'll hope to see you soon here on my blog.

Mittwoch, 30. Mai 2018

♥ Craftin Desert Divas - Magical Coffee with Unicorn Coffee Cup ♥

Hi everybody,
 I wish you a wonderful Wednesday and I'm really happy to see you here again on my blog.

Today I show you a card with the new Unicorn Coffee Cup from Craftin Desert Divas, which I made for the Spring & Summer Blog Hop at the Coffee Loving Cardmakers Blog.
For this card I make a background with many selfmade colored Rainbow Stripes. For this Rainbow Stripes I inked some Bristol Smooth Paper with the Distress Inks, let them dry and cut all in small stripes.
After that I glue the stripes with Sticky Paper on a piece of Copic Paper, cut it out with the largest Die from the Fancy Frame Dies, which is really one of my favorite Dies from Craftin Desert Divas and glue it with  Tonic Craft Tacky Glue on my white card base.
Then I printed the Unicorn Coffee Cup with my Laser Printer on a piece of Copic Paper, color it with my Copic Marker and cut it out with my scissor.
I glue it with some Foam Tape in the middle of my card and add some clear Glitter with the Zig Wink of Stella Brush Glitter Marker on the stripes and on the Unicorn.
For decorate my card I cut out some little stars with the Star & Moon Dies and glue them with Multi Medium Matte on my card.

So I'll hope you like this Magical Coffee card, many thanks for stopping by and I hope to see you soon here on my blog.

Freitag, 25. Mai 2018

♥ Craftin Desert Divas - Digital Release with new Coffee Digis ♥

Hi everybody,
I'm really happy to see you here again on my blog.

Craftin Desert Divas starts today a new Digital Release with many cute Coffee themed Digital Stamps.

Here I show you my first card with the cute Chibi Coffee Mug Digital Stamp.
For this card I made a watercolored background with Distress Ink Spun Sugar and some little golden Gansai Tambi Watercolor splashes .
After it is dry I cut it out with the Inside Scalloped Square Dies in two different sizes. I'm also cutting out two Frames with  Bristol Smooth Paper and glue them with the watercolored background on my card base. On my card base I color the edges also with Distress Ink Spun Sugar, so that's fits perfectly to the background. Then I color the Chibi Coffee Mug with Copic Markers, fussy cut it out and glue it in the middle of the small square.  I create the sentiment on my PC and cut it out with one banner from the Flag Banner Dies and glue it with Tonic Craft Tacky Glue on my card. I use Multi Medium Matte to glue the Maple Leaves Sequins on my card.

So I'll hope you like this card. Many thanks for stopping by and I'm really glad to see you here again on my blog.

♥ Craftin Desert Divas - Spring & Summer Coffee Lovers Blog Hop ♥

Hi everybody,
 I wish you a happy Friday and I'm really glad to see you here again on my blog.
http://coffeelovingcardmakers.com/
Today starts at the Coffee Loving Cardmakers Blog the Spring & Summer Blog Hop. You have time until 06/01/2018 to take part of these amazing Blog Hop.
 You can join this Bloghop, if you create a card or other projects with a coffee, tea or cocoa image. There so many wonderful sponsors and you have a chance of an amazing price if you'll join this Bloghop. Craftin Desert Divas is also Sponsor of this fantastic event. So I hope you join the Spring & Summer Coffee Lovers Bloghop.

For this Bloghop I made this card with the Craftin Desert Divas Coffee Couple Digital Stamp.
 At first I create my background with my self made Coffee Cup Stencil which I showed you here. I use Distress Ink Tea Dye for inking the background. After it is dry I stamped the Coffee beans from the Craftin Desert Divas Coffee Wizards Stamp Set on my background. Then I use my Kuretake Gansai Tambi Watercolors and splashed some  brown color on my background. After all is dry I cut it out with the largest Die from the Fancy Frame Dies and glue it with Tonic Craft Tacky Glue on Neenah Craft Cardstock.
I color my images with the ZIG Clean Color Real Brush Marker, cut them out and glue them with Foam Tape on my card. For the sentiment I use my Dymo Label Maker. I also use some Maple Leaves Sequins for decorate my card.

So I hope you enjoy my card and take also part of this fantastic event. Many thanks for stopping by and I hope to see you soon here on my blog.

Dienstag, 27. Februar 2018

♥ Craftin Desert Divas - Serving Up Fun Card ♥

Hi everybody,
I wish you a happy Tuesday and I'm really glad to see you here again on my blog.

Today I show you another card for the Craftin Desert Divas Monthly Mood Board Challenge at Facebook.
 This is our lovely February Mood Board.
 And here is my scene card with the Serving Up Fun Digital Stamp.
For this card I printed the Serving Up Fun Digital Stamp on a piece of Copic Paper, colored my image with Copic Marker and cut it out with my scissor. Then I create my watercolor background with the Kuretake Gansai Tambi Watercolors and let it dry. In the meantime I stamp the little sun from the Sunny Smiles Stamp Set, the little worm and the dragonfly from the Ladybug Garden Stamp Set and color them also with Copic Markers and cut them out. For the green grass I use also the Gansai Tambi watercolors and after drying I cut it out with a die from the Outdoor Landscape 2 Dies. For the tree I use the Distress Ink Brushed Corduroy and cut it also out with the Outdoor Landscape 2 Dies. For the frame I use the Inside Scalloped Rectangle Dies. After all is cutting out and colored I glue all together for my scene card and glue some Jingle Berries Sequins as flowers on the grass.

So I hope you enjoy my scene card and you'll join us at our Facebook Gallery.
Many thanks for stopping by and I hope to see you soon here again on my blog.

Samstag, 24. Februar 2018

♥ Craftin Desert Divas - Time for Coffee with Bunny Coffee Cup Digital Stamp ♥

Hi everybody, 
I wish you a happy Saturday and I'm really glad to see you here again on my blog.

Today I show you my newest card with the Bunny Coffee Cup Digital Stamp from Craftin Desert Divas.
As I saw this Digi Stamp for the first time, I think it would be great to create my own coffee cup background. Okay so I look through my Craftin Desert Divas Dies and found a die from the Inside Scalloped Square Dies that would be perfect for my background.
 
Okay at first I show you how I made my own stencil with a die and a piece of acetate and then my Time for Coffee card.
 At first I try the die on piece of paper and I decided that it looks great and I give it a try.
Then I placed my die on the acetate and cut it out.
 Okay it looks great and now I can cut out more coffee cups.
 And here is my finished acetate stencil.
 Now I placed my stencil on a piece of paper for inking with Distress Inks.
 At first I use the Distress Brushed Corduroy and I'm really happy how it looks like.
 Then I use Distress Ink Tea Dye for a softer look and cut it out with the Fancy Frame Dies.
 So and here is my card with the stencil background.
I printed the Bunny Coffee Cup Digi Stamp with my laser printer, color it with my Copics and cut it out with my scissor. Then I decided to cut out a smaller background from the coffee cup background with the Fancy Frame Dies and glue my image on the background. Then I cut out a piece of Doodlebug Designpaper with the largest die from the Fancy Frame Dies and glue it on my brown card base. After that I glue the Coffee Cup background with some Fun Foam on my card. I create the sentiment on my PC, cut it out with a die from the Flag Banner Dies and inked it also with Distress Tea Dye. For decorate my card I use some Jingle Berries Sequins.

Okay I'll hope you like this little tutorial and my card a little bit. Many thanks for stopping by and I hope to see you soon here on my blog.