Posts mit dem Label Glossy werden angezeigt. Alle Posts anzeigen

Freitag, 29. Juli 2022

♥ DT Stamp Corner - Vorschau auf neuen Release / Von Herzen Alles Liebe ♥

 Hallo Ihr Lieben,

ich wünsche Euch einen schönen Freitag und freue mich sehr, dass Ihr heute wieder hier auf meinem Blog vorbei schaut.

Heute zeige ich Euch eine Karte mit einem Herzen Hintergrund Stempel, der ab dem 01.08.2022 im August Release im Stamp Corner Online Shop erhältlich ist.


 Für den Hintergrund habe ich ein Stück Bristol Papier mit dem Herzen Hintergrund mit dem VersaMark Stempelkissen bestempelt und mit weißem Embosssingpulver heiß embosst. Nachdem abkühlen habe ich den Hintergrund mit Distress Oxide Speckled Egg eingefärbt und mit einer Stanze aus dem Wave Stanzen Set ausgestanzt. Den mittleren Kreis habe ich mit einer Stanze aus meinem Bestand ausgestanzt und mit Foam Dots wieder aufgeklebt. Gemattet habe ich den Hintergrund mit ausgestanztem Perfect Colouring Paper und einem Stück Bristol Papier, bei dem ich den Rand ebenfalls mit Speckled Egg eingefärbt habe. Nach dem zusammenkleben habe ich dann alles auf meine weiße Grundkarte geklebt. Der Text ist aus dem Kleine Worte Stempel Set und ist mit weißem Embossingpulver auf einem Stück schwarzen Cardstock heiß embosst. Den Käfer aus dem Ladybug Stempel Set habe ich mit Copics coloriert, mit der Schere ausgeschnitten und ebenfalls mit Foam Dots aufgeklebt. Auf das Herz und die Fühler habe ich noch etwas Glossy Accents aufgetragen. Die kleinen roten Perlen sind eigentlich weiße Enamel Dots von Simple and Basic, die ich einfach mit einem roten Copic eingefärbt habe.

Materialliste:

Ich wünsche Euch noch einen schönen Tag, Tschüssi und bis bald.

Mittwoch, 15. Juni 2022

♥ LTTS Doodles - Can We Chill Together Soon ? ♥

 Hi everyone,

I wish you a happy Wednesday and I'm really glad to see you here again on my blog.

Today I show you another summer card with one of the cute Summer Piggies digital stamp from LTTS Doodles. For my card today I use the Pig Donut, you'll find it here on the LTTS Doodles Etsy Shop.

I start the card with cutting a card panel and inked it with Distress Oxides Peacock Feathers, Salty Ocean and Faded Jeans. I also add some Coliro Pearlcolor splashes on the background and let it dry. In the meanwhile I cut out another card panel and use the My Favorite Things Braided Border Dienamic for the middle part. Then I glue it on the inked background. I cut another card panel and inked only a little border around the rectangle with Distress Oxide Peacock Feathers and glue all on my white card base. I stamp the sentiment with my Misti Tool directly on the card. I color the image with my Copic Marker, fussy cut it out with a scissors and add some Glossy Accents on the image. After the Glossy is dry, I glue the image with Foam Tape on the card. For the last step I glue some pearls on the card and I'm really happy how the card looks like.

I hope you like my new summer card and hope to see you soon here on my blog. Have a great day.


Montag, 13. Juni 2022

♥ LTTS Doodles - Have A Happy Summer Day ♥

 Hi everyone,

I wish you a happy Monday and I'm really glad to see you here again on my blog.

Today I show you a new summer card with cute digital stamps from LTTS Doodles. I really love their cute digi stamps.

For the card today I start with creating the background with the tropical background die from Lawn Fawn.


For the background I use Dirstress Oxide Salty Ocean, Tumbled Glass, Fossilized Amber, Dried Marigold and Picket Raspberry. For the palm trees I use Distress Ink Vintage Photo. Then I printed my images from the Summer Kitties and from the Summer Piggies, colored them with my Copic Marker and fussy cut them out with my scissors. I glue the critters with Foam Tape on the card and I'm really happy how the card looks like.

 I hope you like this summer card also and hope to see you soon here on my blog. Have a great day.


Sonntag, 8. Mai 2022

♥ DT Stamp Corner - Viel Glück Käfer ♥

 Hallo Ihr Lieben,

ich wünsche Euch einen schönen Sonntag und freue mich sehr, dass Ihr heute wieder hier auf meinem Blog vorbei schaut.

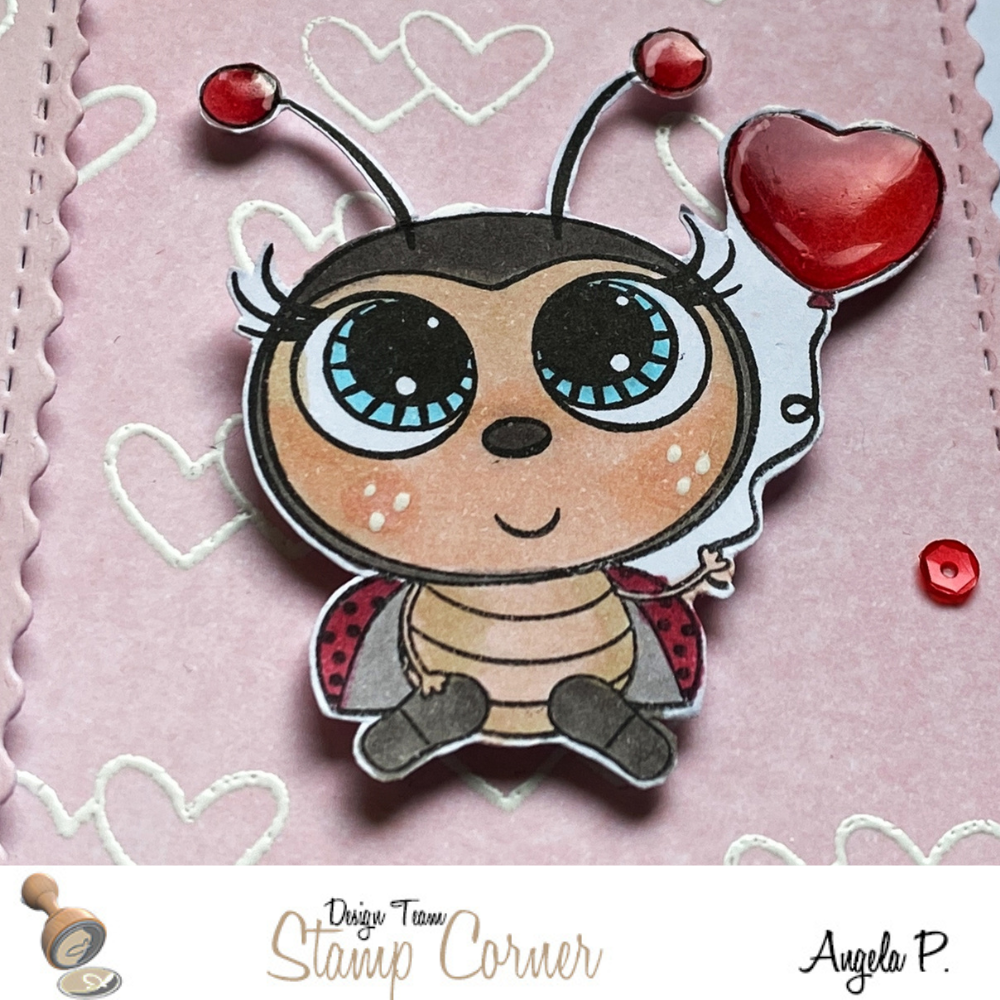
Ich zeige Euch heute auf dem Blog von Stamp Corner eine Karte bei der ich wieder meine neue Lieblingsstanze, die Stamp Corner - A6 DIE - Wave verwendet habe. Außerdem habe ich die Stanze Stamp Corner - DIE - Viel Glück und natürlich den süßen Herz Käfer aus dem Stamp Corner - Stempel Set - Ladybug verwendet.

Für den Hintergrund habe ich ein Stück Perfect Colouring Paper mit der Stamp Corner - A6 DIE - Wave ausgestanzt. Darauf habe ich das kleine Doppel Herz aus dem Stamp Corner - Stempel Set - Ladybug mit dem VersaMark Stempelkissen mehrfach gestempelt und mit weißem Embossingpulver heiß embosst. Das kleine Rechteck habe ich ebenso gestaltet. Anschließend habe ich die gestanzten Rechtecke mit Distress Oxide Spun Sugar eingefärbt und das größere auf meine weiße Grundkarte geklebt. Das kleinere Rechteck habe ich mit Foam Tape auf die linke Seite des Hintergunds geklebt. Den süßen Herz Käfer aus dem Stamp Corner - Stempel Set - Ladybug habe ich mit  Copics coloriert und nach dem ausschneiden mit Foam Dots  auf die rechte Seite geklebt. 

Auf das Herz und auf die Fühler habe ich dann noch etwas Glossy Accents aufgetragen. Den Schriftzug Viel Glück habe ich mit der Stamp Corner - DIE - Viel Glück aus eingefärbten Perfect Colouring Paper ausgestanzt und auf das kleinere Rechteck geklebt. Zum Schluss habe ich noch ein paar Pailletten aus meinem Bestand aufgeklebt.

So Ihr Lieben, nun wünsche ich Euch einen schönen kreativen Sonntag und lasst es Euch gut gehen. Tschüssi und bis bald.

Materialliste:

Freitag, 6. Mai 2022

♥ LTTS Doodles - Happy Birthday ♥

 Hi everyone,

I wish you a happy Friday and I'm really glad to see you here again on my blog.

Today I show you a new birthday card with the cute Digital Stamp from LTTS Doodles. I'm really a big fan of these cute digis. You find these cute Digis here on Etsy.

For this card I use a special anniversary digi, which Ana created for the LTTS Doodles anniversary.


I start my card with printing out the image on a piece of Perfect Colouring Paper. I cut it out with the Stamp Corner - A6 DIE - Wave and use my Copic and Tri Blend Marker for coloring the image. Then I cut out  a piece of MFT Design Paper from the Birthday Brights Paper Pad and glue it on my white card base. I glue the panel with the image on the green background and stamp the sentiments from Lawn Fawn with my Misti Tool directly on the card. For the last step I use some Glossy Accents and glue some little pearls on the card. I'm really happy how the card looks like and hope you like them also.

Many thanks for stopping by and I hope to see you soon here on my blog. Have a great day.


Montag, 2. Mai 2022

♥ DT AAA Birthday Challenge - Game #37 Let's Party ♥

 Hi everyone,

 I wish you a happy Monday and I'm really glad to see you here again on my blog.

Today it's time to start a new challenge at the

AAA Birthday Challenge

with the topic

I use for my card the Cupcake Bunny digital stamp from Lili of the Valley. Many years ago the rubber stamps from LoTV were really popular. Now I found a LoTV shop on Etsy which sell these stamps as digitals stamps and so I decided to use this cute image  for my card.*woohoo*

I printed twice the image with my laser printer on a piece of Copic friendly paper and use my Copics for coloring. I fussy cut out the ballon with a scissors and glue it with Foam Tape on the card. Then I cut out the image with the largest die from the Lawn Fawn Stitched Scalloped Rectangle Frames Set. I also cut out some more white frames for more dimension and for the top frame I use a design paper from My Favorite Things. For the sentiment I use a stamp from Lawn Fawn.
For the last step I add some Glossy Accents on the muffin bubbles and some sequins on the card.

So now it's your turn to create a card for our new challenge, you can join it until the 29th May 2022.

Many thanks for stopping by and I hope to see you soon here on my blog. Have a great day.


Sonntag, 13. März 2022

♥ DT Stamp Corner - Caramba ATC's ♥

 Hallo Ihr Lieben,

ich wünsche Euch einen schönen Sonntag und freue mich sehr, dass Ihr heute wieder hier auf meinem Blog vorbei schaut.

Inspiriert von meiner lieben Stamp Corner Design Team Kollegin Silke habe ich mich entschieden mal wieder ein paar ATC's zu werkeln und heute zeige ich Euch auf dem Stamp Corner Blog drei ATC's, auf denen ich Stempel aus dem Stamp Corner Caramba Set verwendet habe.

Ich habe die ATC's aus Bristol Paper ausgestanzt und mit Distress Oxide Salty Ocean, Dried Marigold, Picked Raspberry und Seedles Preserve eingefärbt. Für die Sandhügel habe ich Bristol Paper mit Distress Ink Tea Dye und Antiquie Linen eingefärbt. Zum ausstanzen habe ich Stanzen aus dem Lawn Fawn Slimline Stitched Hillside Borders Set verwendet. Die Punkte, die kleine Steine darstellen sollen, habe ich mit Copics aufgetragen und anschließend die Hügel auf die ATC's aufgeklebt.

Die Motive aus dem Stamp Corner Caramba Set habe ich mit Copics coloriert , mit der Schere ausgeschnitten und auf die jeweilgen ATC's mit Tombow Multi Talent Liquid Glue aufgeklebt. Die Texte habe ich mit meiner Stempelhilfe direkt auf den Hintergrund gestempelt. Dekoriert habe ich die ATC's noch mit kleinen Zubehör Stempeln von Lawn Fawn und auf manche noch etwas Glossy Accents aufgetragen.

Ich wünsche Euch noch einen schönen Sonntag und hoffe Euch gefallen meine ATC's ein bisschen, Tschüssi und bis bald.

Materialliste:

Sonntag, 21. November 2021

♥ DT Stamp Corner - Let's Celebrate Together Slimline Karte ♥

 Hallo Ihr Lieben,

ich wünsche Euch einen schönen Sonntag und freue mich sehr, dass Ihr heute wieder hier wieder auf meinem Blog vorbei schaut.

Heute zeige ich Euch auf dem Stamp Corner Blog eine neue Karte, für die ich die neue Slimline Stanze Deckle Edge von Stamp Corner verwendet habe.

Für den Hintergrund habe ich ein Stück Bristol Cardstock ausgestanzt und das Stamp Corner Slimline Stencil 2 über die Hälfte gelegt und mit Distress Ink Vintage Photo die Mauer gestaltet. Für den oberen Teil habe ich Distress Oxide Tumbled Glass und Peacock Feathers verwendet. Darüber habe ich das Snowy Sky Stencil von Lawn Fawn gelegt und ganz zarte Schneeflocken mit einem weißen Stempelkissen angedeutet. Für die Abgrenzung der Mauer habe ich einen dunkelbraunen Polychromo verwendet und noch Stickles Star Dust aufgetragen. Am unteren Rand durfte natürlich auch ein Schneehügel nicht fehlen, den ich mit der Lawn Fawn Slimline Stitched Hillside Border Stanze ausgestanzt habe und ebenfalls den Rand mit Stickles Star Dust beglitzert habe. Anschließend habe ich alles mit Stamp Corner Sticky Tape auf ein Stück Kraft Cardstock geklebt, bei dem ich den Rand mit dem Distress Tool aufgeraut habe und danach auf meine weiße Grundkarte aus dem Perfect Coloring Paper. Bei den Motiven von Purple Onion Designs konnte ich nicht widerstehen, coloriert habe ich sie mit Copics, dann mit der Schere ausgeschnippelt und zum Teil mit Foam Dots aufgeklebt. Die süße Lola ist ganz entsetzt, als sie in Fido's House die kleine Joyce entdeckt, denn eigentlich wollte sie ja mit Claus den Weihnachtsbaum aufstellen und des sich in Fidos Haus gemütlich machen. Auf die Bommeln an der Mütze und auf den Ornamenten an Fidos Haus habe ich Ranger Glossy Accents aufgetragen. Den Text habe ich auf eine Bannerstanze aus meinem Bestand gestempelt. Zum Schluss habe ich kleine Schneeflocken Sterne ausgestanzt und darauf kleine Papermania Glitzersteine geklebt.

Ich wünsche Euch noch einen kreativen Tag, Tschüssi und bis bald.


Materialliste:

Samstag, 6. November 2021

♥ Avery Elle - Christmas Critters ♥

 Hallo Ihr Lieben,

ich wünsche Euch einen schönen Samstag und freue mich sehr, dass Ihr heute wieder hier vorbei schaut.

Als ich vor einer Woche die süßen Christmas Critters von Avery Elle entdeckt hatte, musste ich einfach zuschlagen und zeige Euch heute damit meine erste Karte damit.

Für den Hintergrund habe ich endlich meine Simple Stripes Diagonal Stanze von Lawn Fawn eingeweiht. Die roten Streifen habe ich mit Distress Ink Festive Berries eingefärbt. Die einzelnen Streifen habe ich auf ein passendes Cardstock Rechteck geklebt und anschließend auf ein Stück Kraft Cardstock. Den Rand habe ich mit dem Distress Tool aufgeraut und anschließend alles auf meine weiße Grundkarte geklebt. Für die heutige Karte habe ich den süßen Elch / Rentier mit der Lichterkette verwendet.

Coloriert habe ich das Motiv mit meinen Copics, mit der Schere ausgeschnippelt und mit Foam Tape aufgeklebt. Der Schriftzug Christmas habe ich mit weißem Embossingpulver auf schwarzem Cardstock heiß embosst. Das Wort Merry habe ich mit der My Favorite Things Stanze aus Joy Crafts Glitter Cardstock ausgestanzt und aufgeklebt. Zum Schluss habe ich noch kleine Sterne ausgestanzt und aufgeklebt.

Nun sage ich Danke für Euren Besuch und wünsche Euch noch einen schönen Tag.
Tschüssi und bis bald.
 

Donnerstag, 31. Dezember 2020

♥ ATC Verrückte - ATC Adventskalendar - Day 20, Day 21, Day 22 ♥

  Hallo Ihr Lieben,

ich wünsche Euch einen schönen Donnerstag und freue mich sehr, dass Ihr auch heute wieder hier auf meinem Blog vorbei schaut.

Heute geht es weiter mit den ATC's welche für den Adventskalender bei den #ATC Verrückten Mädels entstanden sind.

 
Day 20
Für dieses ATC habe ich wieder eins meiner Lieblings Sets von Lawn Fawn verwendet, diesmal ist es das Frosty Fairy Friends Set. Der Hintergrund ist mit Distress Oxides Tumbled Glass und Peacock Feathers entstanden. Auf den Hintergrund habe ich wieder Schneeflocken mit einem Stencil und Embossingpaste aufgetragen. Koloriert habe ich die Motive mit Copics, ausgeschnitten und zum Teil mit Foam Dots aufgeklebt.

Day 21
 
 Für dieses ATC habe ich Santa und Misses Claus aus dem Ho Ho Holidays Set verwendet. Bei diesem ATC ist der Hintergrund diesmal aus Designpapier. Den Text habe ich mit dem Misti Tool direkt auf das Designpapier gestempelt. Die Motive sind mit der Schere ausgeschnitten und mit Foam Dots aufgeklebt. Auf die Kugeln im Weihnachtsbaum habe ich etwas Glossy Accents aufgetragen. Ein paar Glitzersteine und Stickles Star Dust durften bei diesem ATC auch nicht fehlen.
 
Day 22
Bei diesem ATC habe ich Stempel aus dem Cheery Christmas Set und dem Yeti or Not Set verwendet und mit Copics koloriert. Der Hintergrund ist wieder mit den Distress Oxides entstanden. Für die Schneeflocken habe ich den Stempel aus dem Snow Cool Stempel Set verwendet und mit weißem Embossingpulver heiß embosst. Für den Schneehügel habe ich wieder die Forest Border und einen Punkte Embossingfolder verwendet. Den Schriftzug habe ich auf ein Stück Cardstock gestempelt und leicht abgeschrägt. Die Motive habe ich wieder mit Copics coloriert und mit Foam Dots aufgeklebt.
 
Ich hoffe Euch gefallen auch diese ATC's und Ihr schaut auch morgen hier wieder vorbei.
 
Nun sage ich Danke für Euren Besuch und wünsche Euch noch einen schönen Tag. Lasst es Euch gut gehen. Tschüssi bis bald.
 

Sonntag, 2. Juni 2019

♥ Creative with Stamps - Get Well Card ♥

Hi everybody,
I wish you a happy Sunday and I'm really glad to see you here again on my blog.

Since yesterday we have a new challenge on the 

Creative with Stamps Challengeblog
 For this challenge we want to see some
We also have a Sponsor for this challenge:


(3 images)

I'll hope you join our new challenge, we love to see your Get Well Cards.

For my card I decide to use stamps from the Doctor's Helpers Stamp Set from Create a Smile.

I started first to create my background with Distress Oxide Tumbled Glass. I also add some splashes with Distress Oxide Tumbled Glass and with Avery Elle Aquamarine Liquid Watercolors and let it dry. If the background is dry I cut it out with the My favorite Things Stitched Rectangle Scallop Frames Die-namics. Then I decide to cut out the middle with the My favorite Things Stitched Triple Peek-a-Boo Windows Die-namics.
I glue the background on my white card base and stamp the sentiment in middle of the Peek A Boo Windows. No I stamp the images and color them with my Copic Markers. I fussy cut them out with my scissors and glue them with Foam Tape on my card. For the final touch I add some Nuvo Crystal Drops Morning Dew on the little pills and that's it.

I'll hope you like my new card and join our Get Well Challenge.

With my card I'll take part of these challenges:

Colour Crazy Craft CH: Week 21 Anything Goes

Creative Moments CH: CH #169 Anything Goes

The Crafty Addicts CH: CH #60 Anything Goes

QKR Stampede CH: CH #350 Anything Goes

Many thanks for stopping by and I hope to see you soon here on my blog. Have a great Sunday.

Sonntag, 4. Februar 2018

♥ Craftin Desert Divas - Card with Release freebie You Got Mail ♥

Hi evereybody,
I wish you a happy Sunday and I'm really glad to see you here again on my blog.

Have you seen that Craftin Desert Divas February Release starts soon?
 At the moment you can participate at the Craftin Desert Divas Release event page at the Facebook Gallery, to earn Freebies and win some awesome prizes. I'll hope you join us.

For my card today I use the first Freebie from this event, the You Got Mail Digi Stamp. It's so perfect for Valentine cards.
At first I printed the Digi Stamp twice on some Marker Paper and cut it out with the Inside Scalloped Square Dies. I colored the image with my Copic Markers, glue some Glossy Accents on the envelopes and let it dry. In the meantime I colored the little hearts from my second image, cut them out with my scissor and glue them with some Fun Foam on my main image. Then I use my Gansai Tambi watercolors for the grass border, let it dry and cut it out with the Outdoor Landscape 2 Dies and glue it on my image. After that I put all together and glue it on a piece of craft cardstock and then on my white cardbase. I glue some Jingle Berries Sequins as flowers on the grass. For the sentiment I use one die from the Flag Banner Dies and color it with a Copic Marker.

So I hope you enjoy my card and join us at the Craftin Desert Divas Release Event page at the Facebook Gallery.

Many thanks for stopping by and I hope to see you soon here on my blog.

Sonntag, 3. Dezember 2017

Craftin Desert Divas - Sending Warm Wishes Card with Christmas Eve Digital Stamp Set ♥

Hi everybody,
here I'm again with my second posting for today and another new card.

I'm showing you a new card with another wonderful Digital Stamp from Craftin Desert Divas.
It's also time for another Mood Board Monthly Social Media Challenge at Facebook.
This is our amazing December Mood Board.
 
And here is my card to inspire you.
For my card I use the little winter bird from the Christmas Eve Digital Stamp Set. I've printed the image with my Laser Printer on a piece of Marker Paper, cut it out with a die from the Fancy Frame Dies and glue it on a piece of Craft Cardstock. For the background I cut out a piece of Designpaper with the largest die from the Fancy Frame Dies, glue it also on a piece of Craft Cardstock and of my white card base. On the berries of the Designpaper I glue also a little bit Glossy Accents.
 I color the image with my Copic Markers and add some Glossy Accents on the little red berries. On the edge of the red cap I glue some glimmer embossing paste for shimmering.
 I also glue some white Nuvo Drops around the image. I've stamped the sentiment from the Oh What Fun Stamp Set with my Misti Tool right beside the image.

So I hope you'll join us at our #cddmonthly Mood Board Challenge at Facebook and my card inspire you a little bit. Many thanks for stopping by and I hope to see you soon here on my blog.

Samstag, 25. November 2017

♥ Halbzeitwerk Weihnachtskarte für Sweet Stampers Challenge ♥

Hallo Ihr Lieben,
ich wünsche Euch einen schönen Samstag und freue mich sehr, dass Ihr heute wieder hier auf meinem Blog vorbei schaut.

Heute ist es wieder soweit, Euch meine neueste Karte als Reminder für die laufende Challenge auf dem Sweet Stampers Challengeblog zu zeigen.
 Ihr habt noch bis zum 08.12.2017 Zeit um an unserer  
 teilzunehmen.Wir freuen uns sehr auf Eure Werke.

Ich habe mich bei meiner Karte für zwei digitale Stempel von Craftin Desert Divas entschieden und diese als kleine weihnachtliche Szene zusammengestellt.
 Für meine weihnachtliche Szene habe ich die digitalen Craftin Desert Divas Stempel Teddys Christmas und das Fenster mit der Katze aus dem Christmas Eve Set mit Photoshop zusammengefügt, mit dem Laser Printer auf einem Stück Marker Papier ausgedruckt und mit der größten Stanze von den Fancy Frame Dies ausgestanzt. Coloriert habe ich meine weihnachtliche Szene mit meinen Copic Markern.
Auf die Kugeln am Weihnachtsbaum habe ich etwas Glitzer mit dem Wink of Stella aufgetragen und auf die Mützen von dem Teddy und der Katze etwas Glossy Accents. Für den Text aus dem Oh What Fun Stempel Set von Craftin Desert Divas  habe ich wieder eine Stanze aus dem Flag Banner Dies Set ausgewählt. Ein paar Polar Frost und Shimmer Sequins machen meine Weihnachtskarte perfekt.

So Ihr Lieben nun seid Ihr wieder an der Reihe. Zeigt uns bis zum 08.12.2017 Eure Werke auf dem 
 Wir freuen uns sehr auf Eure Beiträge.

Einreichen möchte ich meine Karte bei folgenden Challenges:


Nun sage ich Danke für Euren Besuch und wünsche Euch noch ein schönes Wochenende.
Tschüssi bis bald.

Samstag, 4. November 2017

♥ Craftin Desert Divas - Little Christmas Wishes Scene with Christmas Eve Digital Stamps ♥

Hi everybody,
I wish you a happy Saturday and I'm really happy to see you here again on my blog.

Today I show you another christmas card with the Digital Stamp Set Christmas Eve from Craftin Desert Divas. There are so many individual stamps in this set, so that you have so many options to combine these stamps.

For my card I've created a little scene card with 9 individual stamps from this set. I've designed the card on my computer and printed it out on a piece of Copic Paper. For coloring I've used many of my Copic Markers.
After coloring I've cut out my scene with my favorite Craftin Desert Divas Die, the Fancy Frame Dies, glue it on a piece of Doodlebug Design Paper Here Comes Santa Claus and on my green cardstock base. I've also glue some Glossy Accents and some Carnie sequins on my card. 
I've printed the sentiment out with my PC and cut it out with one of the Flag Banner Dies.

So that's it for today. I'll hope you like this card a little bit.
Many thanks for stopping by and I hope to see you soon here on my blog.

Samstag, 22. Juli 2017

♥ I wish YOU a special day for Craftin Desert Divas ♥

Hallo Ihr Lieben,
 einen schönen Samstag wünsche ich Euch und freue mich sehr, dass Ihr heute wieder auf meinem Blog vorbei schaut.

Hy everybody,
I wish you all a happy saturday and I'm very happy to see you here again on my blog.

Heute möchte ich Euch wieder eine Action / Wobbler Karte mit dem süßen Cat Ships Captain Digi Stamp von Craftin Desert Divas zeigen. 
Today I show you another Action / Wobbler card with the sweet Cat Ships Captain digi stamp from Craftin Desert Divas.

Für meine Karte habe ich den Hintergrund der Karte mit Distress Broken China und Tumbled Glass gewischt.
For my card I inked the background with Distress Ink Broken China and Tumbled Glass.
 Den Cat Ships Captain Digi Stamp habe ich mit Copics coloriert, ausgeschnitten und mit dem Action Wobbler mittig auf der Karte aufgeklebt. Den Text habe ich mit dem Computer erstellt und mit Fun Foam aufgeklebt. Den Anker Charm habe ich am oberen Rand der Karte mit etwas Garn befestigt. Auf die kleinen süßen Fische aus dem Set Under the Sea habe ich noch Glossy Accents aufgetragen und mit Abstandspads aufgeklebt.

I've colored the Cat Ships Captain Digi Stamp with Copics, fussy cut it out and glued it with the Action Wobbler in the middle of my card. The sentiment is generated on the PC and glued with some Fun Foam on my card. I fixed the anchor charm with some yarn on the top of my card. On the little cute fishes from the Under the Sea Set I've glued some Glossy Accents and glued them with some foam pads on the card.


Nun sage ich Danke für Euren Besuch und wünsche Euch noch einen schönen Tag.Tschüssi bis bald.
Thanks a lot for your visit here on my blog. I wish you a happy saturday and I hope to see you soon.

Donnerstag, 13. Juli 2017

♥ Turtle with Sandcastle Card for Craftin Desert Divas Monthly Mood Board Challenge♥

Hallo Ihr Lieben,
einen schönen Donnerstag wünsche ich Euch.
Heute möchte ich Euch eine neue Karte für die monatliche Social Media Challenge von Craftin Desert Divas zeigen.

Hi everybody,
I wish you a happy thursday and I'm very happy to see you here again on my blog.
Today I show you another card for the monthly Social Media Challenge fom Craftin Desert Divas.
Als Inspiration ist hier ist das Mood Board für Juli. / Here is the Mood Board for July.

Für meine Karte habe ich den Turtle with Sandcastle Digi Stamp verwendet und mit meinen Copics coloriert. Die Ränder habe ich wieder aufgeraut. Der Text ist aus dem Winter Cheer Stempelset.
I create a card with the cute turtle with sandcastle digi stamp and for the coloring I used  my copics. For the edges  I used again my paper distresser. The sentiment is from the Winter Cheer Stampset.
Den Hintergrund habe ich mit den neuen Distress Oxide Stempelkissen Salty Ocean und Wild Honey gewischt.
For the background I used my new Distress Oxide Inks Salty Ocean and Wild Honey.
 Nach dem colorieren habe ich das Motiv ausgeschnitten und mit etwas Fun Foam hinterklebt.
After coloring I fussy cut the image out and glue some Fun Foam behind the image.
Auf den Hintergrund habe ich noch ein paar Wassertropfen getropft, dadurch entstehen diese schönen Wasserränder.
After drying I splashed some drops of water on the background.
 Auf einige Bereiche vom Motiv habe ich wieder etwas Glossy Accents aufgetragen.
I glue some Glossy Accents on some details from the image.

Einreichen möchte ich mein Werk bei folgenden Challenges:

Crafty Sentiments Designs: Sea, Sun, Beach or Sand Challenge

Sunny Day Crafting: Challenge #43 B is for Beach

 Nun wünsche ich Euch noch einen schönen Tag und sage Tschüssi bis bald.
Thanks a lot for your visit and I wish you a happy day. See you soon.