Posts mit dem Label Stickles werden angezeigt. Alle Posts anzeigen

Mittwoch, 10. Dezember 2025

♥♥ Mennys Bastelshop - Lawn Fawn Weihnachtskarte ♥♥

 Hallo Ihr Lieben,

ich wünsche Euch einen schönen Mittwoch und freue mich sehr, dass Ihr heute wieder hier auf meinem Blog vorbei schaut.

  Heute ist Mittwoch und das bedeutet, dass ich Euch wieder einen neuen DT Beitrag für Mennys Bastelshop zeige.

Für meinen heutigen Beitrag habe ich mich für die Caroling Mice Stempel von Lawn Fawn entschieden. Außerdem habe ich die Village Hillside Border Stanze von Lawn Fawn verwendet. Für den Hintergrund habe ich ein Stück Bristol Cardstock mit der Large Stictched Rectangle Stackables Stanze von Lawn Fawn ausgestanzt und mit Distress Oxide Faded Jeans eingefärbt. Mit einem dünnen Pinsel habe ich dann weiße Coliro Pearlcolor Farbkleckse aufgetragen und trocknen lassen. In der Zwischenzeit habe ich die Village Hillside Border Stanze verwendet und aus weißem Cardstock ausgestanzt. Auf die Dächer der Häuser habe ich etwas Stickles StarDust aufgetragen. und trocknen lassen. Die kleinen Weihnachtsbäume habe ich mit Distress Oxide Rustic Wilderness eingefärbt und kleine weiße "Schnee" Punkte aufgetragen.


Für die Hügel am unteren Teil der Karte habe ich weißen Cardstock mit der Stitched Hillside Backdrop Landscape Stanze ausgestanzt und die Ränder mit dem Copic BG10 eingefärbt und dann auf den Hügel der Village Hillside Border Stanze geklebt und danach auf den getrockneten Hintergrund geklebt. Danach habe ich noch einen weißen Rahmen mit der Stitched Rectangle Frames Stanze ausgestanzt und aufgeklebt. Dann habe ich mir ein Stück Designpapier aus dem All the Sparkles Set zurecht geschnitten und mit dem Distress Tool den Rand aufgeraut und meinen Hintergrund auf das Designpapier geklebt. Danach habe ich die Hintergründe auf meine weiße Grundkarte geklebt. Die Motive aus dem Caroling Mice Stempel Set habe ich  mit Copics und Ohuhu Markern coloriert und mit den passenden Stanzen ausgestanzt. Zum aufkleben habe ich zum Teil Flüssigkleber und Foam Pads verwendet. Zum Schluß habe ich noch kleine goldene Noten aufgeklebt. 

Falls Ihr etwas im Shop bestellen wollt und das ist nicht vorrätig, könnt Ihr Euch im Shop benachrichtigen lassen oder Ihr schreibt eine Mail an den Shop.  

Ich hoffe Euch gefällt meine Karte und wünsche Euch noch einen schönen Tag.


Mittwoch, 9. Juli 2025

♥♥ Mennys Bastelshop - Inspirationswoche - Wasser/Maritim/Unterwasser ♥♥

  Hallo Ihr Lieben,

ich wünsche Euch einen schönen Mittwoch und freue mich sehr, dass Ihr heute wieder hier auf meinem Blog vorbei schaut.

Am Beginn jeden Monats gibt es bei Mennys Bastelshop eine Inspirations Woche und das gesamte Team zeigt Euch an den einzelnen Tagen Werke zum entsprechenden Thema. 

Im Juli lautet das Thema:

 Wasser/Maritim/Unterwasser

Ich habe mich bei meiner Karte für Stempel von Pink&Main mit den passenden Stanzen entschieden. Inspiriert hat mich die liebe Jenn Shurkus von Lawn Fawn. Sie zaubert sooooo tolle Distress Hintergründe, die sind jedesmal ein Augenschmaus.

 Für die Karte habe ich ein Stück Bristol Cardstock mit der größten Stanze aus dem Large Stitched Rectangle Stackables Set von Lawn Fawn ausgestanzt und mit verschiedenen Distress Ink und Distress Oxides eingefärbt und darauf ein paar Wasser Sprenkel aufgetragen und eintrocknen lassen. In der Zwischenzeit habe ich die Motive aus dem Let`s Make Waves Stempel Set von Pink&Main coloriert und mit den passenden Stanzen ausgestanzt.

Den getrockneten Hintergrund habe ich dann auf meine weiße Grundkarte geklebt. Die Motive habe ich mit Flüssigkleber und mit Foam Pads aufgeklebt. Der Text ist aus einem Mermaizing Set von Impronte dÀutore und mit einer Bannerstanze von Lawn Fawn ausgestanzt. Zum Schluss habe ich noch kleine helle Sequins von Pretty Pink Posh aufgeklebt und etwas Stickles Star Dust aufgetragen.

Schaut unbedingt mal bei den anderen DT Mädels vorbei, es gibt wirklich tolle Werke zu sehen.

Ich hoffe Euch gefällt meine Karte und wünsche Euch noch einen schönen Tag.

Donnerstag, 12. Dezember 2024

♥ 24 Days of Christmas with Mama Elephant / Tag 7 ♥

 Hallo Ihr Lieben,

ich wünsche Euch einen schönen Donnerstag und freue mich sehr, dass Ihr heute wieder hier auf meinem Blog vorbei schaut. 

Heute ist Tag 7 meiner

24 Days of Christmas with Mama Elephant Challenge

Für meine heutige Karte habe ich Stempel aus dem Decorate the Tree Stempel Set und Stanzen aus dem Peek a Frame Die Set verwendet.
 
Für den Hintergrund habe ich ein Stück Bristol Cardstock mit Distress Oxide Salvaged Patina, Faded Jeans und Tumbled Glass eingefärbt. Darauf habe ich kleine Kleckse mit Coliro Pearlcolors aufgetragen und trocknen lassen. In der Zwischenzeit habe ich ein Stück weißen Cardstock mit einer Hügel Stanze ausgestanzt und mit einem Punkte Embossingfolder geprägt. Am oberen Rand habe ich dann noch Stickles Stardust aufgetragen und ebenfalls trocknen lassen. 
Nachdem alles getrocknet war, habe ich alles zusammen geklebt und auf meine weiße Grundkarte geklebt. 

Die Motive habe ich mit Copics und Ohuhu Markern coloriert, mit der Schere ausgeschnitten und als Szene aufgeklebt. Den Text habe ich wieder mit einer Stanze aus dem Winter Banner Greetings Stanzen Set ausgestanzt und aufgeklebt. Zum Schluss habe ich noch kleine goldene Sterne aus Glitter Cardstock ausgestanzt und  aufgeklebt.

Ich hoffe Euch gefällt meine heutige Karte und wünsche Euch noch einen schönen Tag.

Montag, 2. Dezember 2024

♥ 24 Days of Christmas with Mama Elephant / Tag 2 ♥

 Hallo Ihr Lieben,

da bin ich wieder mit meinem zweiten Posting für heute und ich freue mich sehr, dass Ihr wieder hier auf meinem Blog vorbei schaut.

Heute am zweiten Dezember zeige ich Euch die zweite Karte für meine Challenge

24 Days of Christmas with Mama Elefant

 Für meine heutige Karte habe ich das Stempel Set Owl are You, die Winter Forest Stanze und den Text aus dem Let it Snow Stempel Set.

Für den Hintergrund habe ich ein Stück Bristol Cardstock mit Distress Oxide Faded Jeans und Tumbled Glass eingefärbt und anschließend mit einem dünnen Pinsel weiße Coliro Farbkleckse aufgetragen. Die Winter Forest Stanze habe ich aus Perfect Colouring Paper ausgestanzt und ebenfalls Coliro Pearlcolor Kleckse aufgetragen und danach auf den getrockneten Hintergrund geklebt. 


Gemattet habe ich den Hintergrund mit einem Stück Bristol Cardstock, den ich mit Distress Oxide Faded Jeans eingefärbt habe. Den Rand habe ich mit dem Distress Tool aufgeraut und anschließend alles auf meine weiße Grundkarte geklebt. Die Motive aus dem Owl are You Stempel Set habe ich mit Copics und Ohuhu Markern coloriert und mit der Schere ausgeschnitten. Die süßen Weihnachtsmann Mützen sind aus einem Stamp Corner Stempel Set. Ich habe sie nach dem ausschneiden noch mit Stickles Star Dust beglitzert und dann auf die süßen Tiere geklebt. Die Motive habe ich dann mit Foam Pads aufgeklebt. Den Text aus dem Let it Snow Stempel Set habe ich auf einen schmalen Cardstock Streifen gestempelt. Den Rand habe ich mit dem Distress Tool aufgeraut und mit Foam Pads auf die Karte geklebt.

Ich hoffe Euch gefällt meine zweite Karte und wünsche Euch noch einen schönen Tag.

Donnerstag, 25. Juli 2024

♥ Lawn Fawnatics - Challenge 177 Christmas in July

 Hi everyone,

I wish you a happy Thursday and I'm really happy to see you here again on my blog.

Today I show you my card for the current 

Lawn Fawnatics Challenge 177 Christmas in July


 For my card I create a underwater Christmas scene card with some mermaids. 

 I inked a piece of Bristol cardstock with Distress Oxide Mermaid Lagoon, Peacock Feathers and Blueprint Sketch, add some water splashes on it and let it dry. In the meanwhile  I cut out a piece of Desert Storm Neenah Cardstock and inked it with Distress Ink Tea Dye. I add some white, brown and black splashes and let themn dry. In the meanwhile I color all images from the Christmas Fishes and from the Mermaid for You stamp sets and fussy cut them out with my scissor. On the santa hats I add some Stickles Star Dust. Then I cut the sand hill with a die from the Stitched Hillside Borders and with the Large Stictched Rectangle Stackables and glue it on my blue background. I glue all images with liquid glue and with Foam Tape on the card. For the sentiment I use a die from the Extra Sentiment Banners.
 
With my card I'll take part of the challenge
 

Many thanks for stopping by and I hope to see you soon here on my blog. Have a great day.

Donnerstag, 9. Mai 2024

♥ Lawn Fawnatics - Challenge 172 - Inspired By ♥

 Hi everyone,

I wish you a happy Thursday and I'm really really glad to see you here again on my blog.

Today I show you a new card for the current

Lawn Fawnatics Challenge 172 - Inspired By


 For my card I was inspired by my friend Marine. I really love all her cards, she made so adorable scenes with a lot of cute details. I decided to make another Christmas card for my own Christmas Challenge and here is Marine's card that inspire me for my Christmas card. 

And this is my Christmas card.

I decided to make a square card. For the background I use the Quilted Backdrop die and cut it out with a Small Stitched Square Stackables die from Lawn Fawn. I inked the background with Distress Oxide Tumbled Glass and glue it on a piece of white paper, which I cut out with a die from the Outside Stitched Squalloped Square Stackables dies. Then I cut out a rectangle and inked it with Distress Oxide Tumbled Glass and glue all together on my white card base. I stamp the sentiment on a piece of white cardstock and cut it out with a Lawn Fawn banner die. I stamp the images from the Little Snow Globe Dog Set, from the Little Snow Globe bear, from the Furry and bright set and from the Christmas dreams Set on Copic friendly paper, color them all with my Copics and fussy cut them out with my scissors.  For the bottom I cut out a small stripe of brown cardstock and glue all images with liquid glue and with Foam Tape on the card. For the last step I add some Stickles Star Dust on the Christmas caps and glue some small pearls on the background. 

With my card I'll take part of the challenge

Lawn Fawnatics Challenge 172 – Inspired By

 Many thanks for stopping by and I hope to see you soon here on my blog. Have a great day.

Samstag, 24. Februar 2024

♥ Whimsy Stamps - Sweet Christmas Slimline Karte ♥

 Hallo Ihr Lieben,

ich wünsche Euch einen schönen Samstag und freue mich sehr, dass Ihr heute wieder hier auf meinem Blog vorbei schaut.

Heute ist der 24.Februar und ich zeige Euch meine zweite monatliche Weihnachtskarte meiner eigenen Weihnachtschallenge.

Diesmal habe ich mich für eine Slimline Karte und Stempel von Whimsy Stamps entschieden. Für die Karte habe ich ein Stück Perfect Colouring Paper mit der Slimline Marquee Stanze von Whimsy Stamps ausgestanzt und auf ein Stück Lawn Fawn Designpapier  und anschließend auf meine weiße Grundkarte geklebt.

Die süßen Bären aus dem Teddy Bear Christmas Sweets Stempel Set habe ich mit Copics koloriert, mit der Schere ausgeschnitten und mit Foam Pads aufgeklebt. Auf die Bommeln an den Mützen habe ich Stickles Star Dust aufgetragen. Die Texte sind ebenfalls im Set enthalten.

Dies ist nun meine vierte Weihnachtskarte in diesem Jahr und ich hoffe, dass Sie Euch ein bisschen gefällt. 

Nun wünsche ich Euch noch einen schönen Tag, Tschüssi bis bald.

Samstag, 9. Dezember 2023

♥ Winter / Weihnachts Challenge Instagram - Holiday Greetings mit Purple Onions Design ♥

 Hallo Ihr Lieben,

ich wünsche Euch einen schönen Samtag und freue mich sehr, dass Ihr heute wieder hier auf meinem Blog vorbei schaut.

Heute am Samstag ist es wieder Zeit für eine Karte für die Winter und Weihnachts Challenge, die von Elena, Michaela und Betty vom Stempellädle organisiert wurde.

Für meine heutige Karte habe ich einen Stempel von Purple Onions Design letztem Release verwendet. 

Für den Hintergrund habe ich ein Stück Bristol Cardstock mit Distress Oxide Peacock Feathers und Tumbled Glass eingefärbt. Anschließend habe ich wieder Coliro Farbkleckse aufgetragen und alles trocknen lassen. Für den unteren Teil habe ich einen Schneehügel mit einer Lawn Fawn Stanze ausgestanzt und am Rand Stickles Star Dust aufgetragen.


In der Zwischenzeit habe ich das Motiv mit Copics koloriert und mit der Schere ausgeschnitten. Dann habe ich den Schneehügel auf den Hintergrund geklebt und dann den Hintergrund auf meine weiße Grundkarte geklebt. Das Motiv habe ich mit Foam Tape aufgeklebt. Die kleinen Noten habe ich aus Vintage Glitzer Papier von Studio Light ausgestanzt und aufgeklebt. Den Text Holiday Greetings habe ich mit dem Misti Tool direkt auf den Hintergrund gestempelt. 

Ich hoffe meine Karte gefällt Euch und Ihr habt Lust auch an dieser Winter / Weihnachts Challenge teilzunehmen.

Nun wünsche ich Euch noch einen schönen Samstag, Tschüssi und bis später.

Freitag, 1. Dezember 2023

♥ 24 Days of Christmas Tags - Day 1 ♥

 Hallo Ihr Lieben,

ich wünsche Euch einen schönen Freitag und freue mich sehr, dass Ihr heute wieder hier auf meinem Blog vorbei schaut.

In den letzten Jahren habe ich ja regelmäßig einen ATC Adventsklaender gewerkelt. Dieses Jahr hatte ich aber mal Lust 24 Tags zu werkeln und so zeige ich Euch die nächsten 24 Tag hier jeweils ein Weihnachts oder Winter Tag.

Für den ersten Dezember heute habe ich Stempel von My Favorite Things verwendet.

Für den Hintergrund habe ich ein Stück Aquarellpapier mit Aquarell Farben von Altenew eingefärbt und trocknen lassen. Anschließend habe ich den Hintergrund mit einer Tag Stanze von my Favorite Things ausgestanzt. Für die Rückseite habe ich noch einmal das Tag aus Perfect Colouring Paper ausgestanzt und zusammengeklebt.

Am unteren Teil habe ich einen Schneehügel aufgeklebt, den ich mit einem Pünktchen Embossingfolder geprägt habe. Am Rand des Hügels habe ich noch Stickles Star Dust aufgetragen. DIe Motive sind aus dem Extra Long Holiday Wishes Stamp Set von My Favorite Things. Koloriert habe ich die Motive mit Copics, mit der Schere ausgeschnitten und mit Foam Tape aufgklebt. Der Text ist ebenfalls im Set enthalten.

Nun wünsche ich Euch noch einen schönen Tag, Tschüssi bis bald.


Dienstag, 14. November 2023

♥ Lawn Fawn - Wishing You Love, Joy, & Treats! ♥

 Hallo Ihr Lieben,

ich wünsche Euch einen schönen Dienstag und freue mich sehr, dass Ihr heute wieder hier auf meinem Blog vorbei schaut.

Heute zeige ich Euch eine Karte, bei der ich die süßen Home for the Pawlidays Stempel von Lawn Fawn & Simon Says Stamp  verwendet habe. Da die Stempel seit September auf ihren Einsatz gewartet habe, war nun die richtige Zeit um sie endlich einzuweihen.

Für die Karte habe ich ein Stück Bristol Cardstock mit Faded Jeans eingefärbt und mit der Lawn Fawn Landscape Stitched Hillside Backdrop Stanze ausgestanzt. Auf den oberen Teil habe ich mit dem Snow Flurries Background Stencil von Lawn Fawn weiße Embossingpaste aufgetragen. Den unteren Teil habe ich aus weißem Cardstsock ausgestanzt. Auf die beiden Hügel habe ich etwas Stickles Star Dust aufgetragen. Nach dem trocknen habe ich beide Teile zusammen auf einen türkisen Hintergrund  und anschließend auf meine weiße Grundkarte geklebt.

Die süßen Motive habe ich mit Copics koloriert, mit der Schere ausgeschnitten und mit Flüssigkleber und mit Foam Tape auf die Karte geklebt. Den Text habe ich auf ein Lawn Fawn Banner gestempelt und mit Foam Tape aufgeklebt. Ich denke, ich werde bestimmt noch einige Karten mit diesem süßen Stempel Set werkeln.

Nun wünsche ich Euch noch einen schönen Tag, Tschüssi bis bald.

Mittwoch, 8. November 2023

♥ DT Christmas Craft Creations Challenge - Add a hat Challenge ♥

 Hi everyone, 

I wish you a happy Wednesday and I'm really glad to see you here again on my blog.

Today we start a new Challenge at the

Christmas Craft Creations Challenge

For this month we have the topic

Add a Hat (as the weather is getting cold...)

For my card I use a digital stamp from Polkadoodles. I printed out the stamp with my Laser printer and use my Copic Marker for coloring. I also add some Stickles Star Dust on the hat. I use a piece of Bristol Cardstock and inked it with Distress Oxide Tumbled Glass. With a white gel pen I add some tiny dots on the background. I also cut out a white frame with a Mama Elephant die and glue it on the background. I also cut out a snow hill, use a dot embossing folder and glue it on the background. Then I glue it on a turquoise cardstock and then on my white cardbase.


 I stamp the sentiment with my Misti Tool directly on the background. I glue two white christmas tress on the right side of the card. Then I glue the image with thin Foam Dots on the card and I'm really happy how the card looks like.

So now it's your turn to create a Add a hat Christmas card, we can't wait to see your creations. 

Many thanks for stopping by and I hope to see you here again on my blog.

Mittwoch, 11. Januar 2023

♥ DT Christmas Craft Creations Challenge - January Challenge / Snippets ♥

 Hi everyone,

I wish you a happy Wednesday and I'm really glad to see you here again on my blog.

This is really a special posting for me, because it's the first posting as a new Design Team member for the

 Christmas Craft Creations Challenge. 

So now let's start the new chapter and for this month we have the topic

Snippets

 For my DT card I use a leftover from a turquoise background and a leftover piece of a Christmas Text paper from My Favorite Things. I cut these leftovers out with a scalloped die from Stamp Corner and glue them on a white scalloped cutting background. My card base is a little bit smaller and I glue it behind the papers.

The image is a Digital stamp from amandajaynedesigns, you'll find her Etsy Shop here with many cute Digital Stamps. I printed out the image on a piece of Copic friendly paper and use my Copics for coloring. Then I fussy cut it out with my scissors and glue it with Foam tape on the card. I stamp a sentiment from Lawn Fawn with my Misty Tool directly on the card. for the last step I glue some color matching pearls on the card and I'm really happy how the card looks like.♥ 

So now it's your turn, I can't wait to see your creations and we hope you join our new challenge.
Many thanks for stopping by and I hope to see you soon here on my blog.Have a great day.

Dienstag, 20. Dezember 2022

♥ It's the Most Wonderful Time of the Year with Stuff-Deluxe ♥

 Hi everyone, 

this is my second posting for today and I show you a Christmas card with the cute Stuff-Deluxe digital stamp Weihnachtsmaus Fienchen. For the background I create a Distress Oxide background with Salvaged Patina, Peacock Feathers and Uncharted Mariner. Then I lay a snowflake stencil over the background and add a white embossing paste over the stencil and let the background dry.

If the background is dry I cut it out with a stitched die from Lawn Fawn. I also cut out the Birch Tree Cover with a die from My Faviórite Things and a white frame with a die from Lawn Fawn. I glue all togehter and then all on my white card base. I printed the Stuff-Deluxe digital stamp out with my laser printer and fussy cut it out with my scissors. I color it with my Copics and add some Stickles Star Dust on the Christmas hat. I glue it with Foam Tape on the card. For the last step I glue some Enamel Dots on the trees.

Many thanks for stopping by and hope to see you soon.


Mittwoch, 14. Dezember 2022

♥ ATC Advent calendar - Day 14 with Lawn Fawn ♥

 Hi everyone,

I wish you a happy Wednesday and I'm really happy to see you here agian on my blog.

Today I show you my ATC for Day 14 of the ATC Advent calendar.

For this day I use the cute stamps from Lawn Fawn.


I create a watercolor background with my Kuretake Gansai Tambi Watercolors and let it dry. If it is dry I use a snow stencil and white embossing paste. I cut out a snow hill with a die from My Favorite things and use a dot embossing folder. I color all images with my Copics and fussy cut them out with my scissors. I glue them with liquid glue and Foam Dots on the background.

Many thanks for stopping by and I hope to see you soon here on my blog. Have a great day.


Montag, 12. Dezember 2022

♥ ATC Advent calendar - Day 11 and Day 12 ♥

  Hi everyone,

I wish you a happy Monday and I'm really glad to see you here again on my blog.

Today I show you the next ATC's from my ATC Advent calendar. 
 
Day 11
 For Day 11 I use the cute Penguin from Stuff-Deluxe 
I create another watercolor background and a snow stencil with white embossing paste.
 For the snow hill I use a die from My Favorite Things and a dot embossing folder. I color the image with my Copics, fussy cut it out andglue it with Foam Dots on the background.
 
Day 12 
For Day 12 I use a stamp Set from Whimsy Stamps. I really love the cute images.
I create a Distress Oxide background with Faded Jeans and use a die cut from My Favorite Things for the snow hill.
I color all images with my Copics and fussy cut them out with my scissors. I stamp the sentiment directly on the snow hill. I also add some Stickles Star Dust on Santas jacket and on Santas hat.
 
Many thanks for stopping by and I hope to see you soon here on my blog. Have a great day.

Samstag, 10. Dezember 2022

♥ ATC Advent calendar - Day 8, Day 9 and Day 10 ♥

 Hi everyone,

I wish you a happy Saturday and I'm really glad to see you here again on my blog.

Today I show you the next ATC's from my ATC Advent calendar.

Day 8

For Day 8 I use stamps from My Favorite Things. I create another blue watercolor background and use also a snow stencil and white embossingpaste . 

I cut out some white clouds with a My Favorite Things die and glue them on the background. I color the images with Copic Marker and fussy cut them out with my scissors.

Day 9

For day 9 I also use stamps from My Favorite Things. For the background I use the snow hill and embossing paste.

For the snow hill I use a die from My Favorite Things. On the snow hill border I add some Stickles Star Dust. I color the images with Copics, fussy cut them out and glue them with Foam Dots on the background.

  Day 10

For Day 10 I use a stamp set from Mama Elephant and a design paper from Lawn Fawn.

I color the tree and Mr and Mrs Claus with my Copcs and fussy cut them out with my scissors. I glue them with Foam Dots and liquid glue on the design paper. I also cut out some glitter starswith a Lawn Fawn die  and glue them on the background.

Many thanks for stopping by and I hope to see you soon here on my blog. Have a great day.

Montag, 5. Dezember 2022

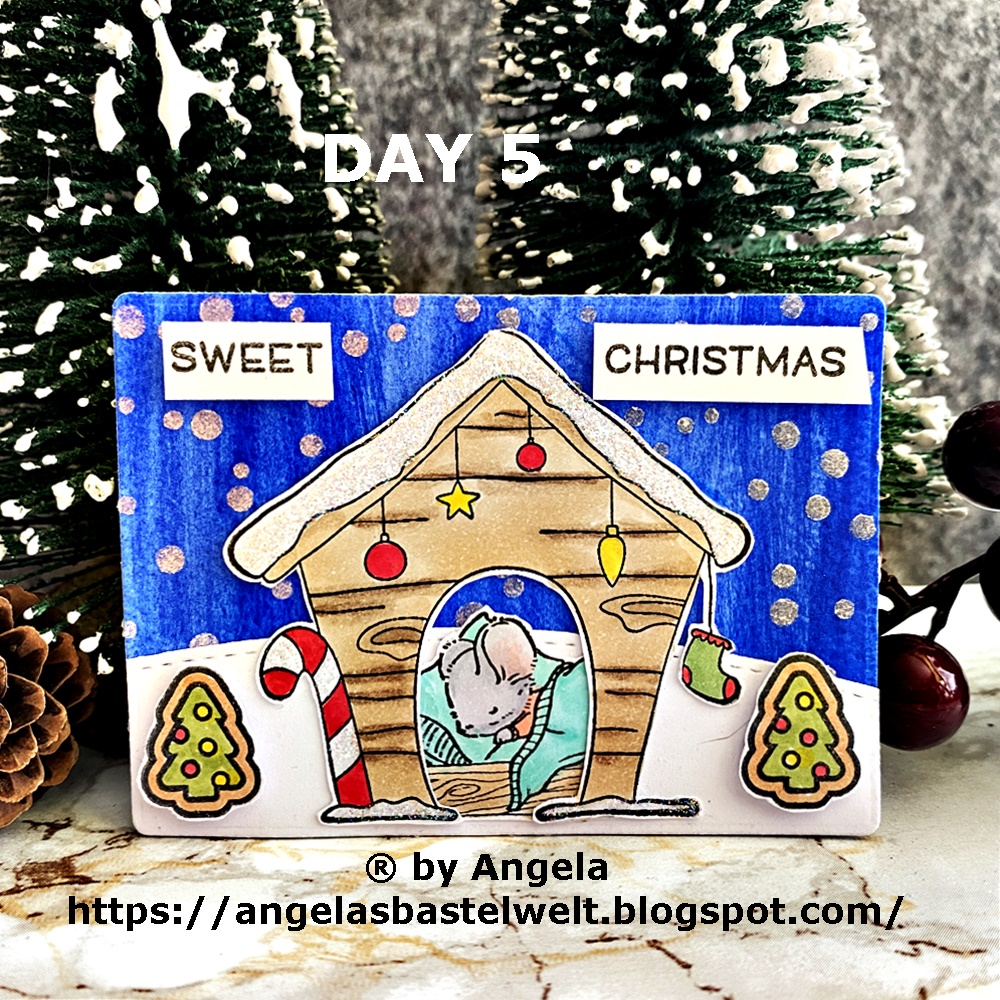
♥ ATC Advent calendar - Day 5 with Purple Onion Designs ♥

 Hi everyone,

this is my third posting for today and I show you my ATC for Day 5 of the ATC Advent calendar.

For this day I use the cute stamps from Purple Onion Designs. You'll find many stamps here by Stamp Corner.

For this ATC i start creating a watercolor background with my Kuretake Gansai Tambi Watercolors an let it dry. When it is dry I lay a snow fall stencil over the background and add some Nuvo Glacier Paste Winter White on the background and let it dry. In the meanwhile I stamp the images from Purple Onion Designs, color them with Copics and fussy cut them out with my scissors.

I cut out a snow hill with a die from My Favorite Things and glue it on the background. I glue the sleeping mouse behind the Fido's House and then on the snow hill. I glue Christmas tree cookies from Lawn Fawn with Foam Dots besides the dog house. On the top of the little house I add some Stickles Star Dust for shimmering. I think the sentiment is also from Lawn Fawn.
 
Many thanks for stopping by and I hope to see you soon here on my blog. Have a great day.

Mittwoch, 30. November 2022

♥ DT Magengo - Joy To the World Christmas Card ♥

  Hi everyone,
I wish you a happy Wednesday and I'm really glad to see you here again on my blog.

Today I'm on the Magengo Blog and show you another inspiration card with the cute Magengo Christmas stamps and a Stencil background.


For my card today I use the Joy To The World stamp set and the Forest of trees stencil. I start the card with creating the background. Therefore I lay the stencil over a piece of Bristol paper and ink the paper with Distress Oxide Faded Jeans and Prize Ribbon. After this I add some Stickles Star Dust on some branches and let it dry. In the meanwhile I cut out a white frame and a white hill. I add also Stickles Star Dust on the hill and let it also dry. 

I stamp the images on a Copic Marker friendly paper and color them with my Copics and fussy cut them out with my scissors.

After the background is dry I glue the hill and the frame on the background and then all on a a little bit larger background paper and on my white card base.


I glue the images with Foam Tape on the card and I'm really happy how the card looks like.


Many thanks for stopping by and hope to see you soon.

Freitag, 18. November 2022

♥ My Favorite Things - Be Merry with Stencil Background ♥

 Hi everyone,

I wish you a happy Friday and I'm really glad to see you here again on my blog.

Today I show you another Christmas card with stamps and stencil from My Favorite Things.

I start my card with creating the background with the My Favorite Things Watercolor Wash Rectangle Stencil. I use Distress Oxide Salvaged Patina and Uncharted Mariner to ink the background and apply some white Coliro Pearlcolor splashes. If it is dry I cut out the background with the largest die from the Imperial Stitched Rectangle Dies from Heffy Doodle. my card base is a little bit smaller than the sticthed rectangle and I glue it behind the stitched rectangle.

Then I use the Be Merry Die-namics, cut it out with white cardstock and glue it on the inked background. I color the cute Santa from the Holly Jolly Santa set with my Copics and glue it with thin Foam pads on the card. For the last step I glue some red Enamel Dots on the card and I'm really happy how the card looks like.

I participate with this card to this challenge:

 52cct.blogspot.com - november-colour-challenge


Pearly Sparkles Challenge - CH #79 Merry Christmas

Simon Says Stamp Wednesday Challenge - STENCIL IT

Many thanks for stopping by and hope to see you soon here on the blog.